Planning
The Planning screen can be accessed via the drop-down menus C-TMS Modules / Trip Management / Planning.
Trip manipulation can be used for both the pre-planning of trips and the execution of that plan. A planner will often be responsible for creating the orders and then putting these orders onto trips. Fixed routes will often automate part of this job for you, leaving some orders to be tripped up manually using the skill of the planner. There is functionality within trip manipulation that will aid and guide the planner in making an informed decision.
For instance, the Network (point-to-point) table held in the background of C-TMS holds details of travel times and mileages that will illustrate to the planner the planned arrival and departure times for these trips. This will then work in conjunction with the times populated on the order to show whether the deliveries will be made on time or not. C-TMS will also flag whether the planner is trying to create a trip that exceeds the trailer capacity of the vehicle type that has been allocated to this trip. Further to this, C-TMS can tell the planner if the trip exceeds a pre-set drive or duty time for each driver.
The Transport operator will then be able to allocate resources to the trips, and enter actual trip times and pallets delivered after the driver has returned from their journey.
General Use
The following is an example of the Planning Screen:
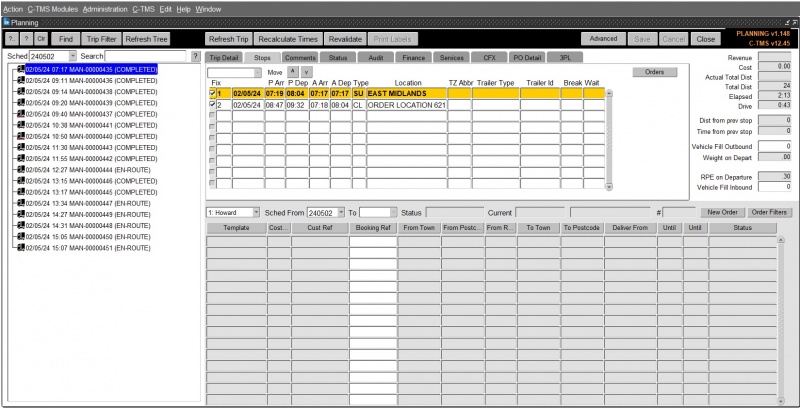
The screen consists of multiple sections
- Left - Trip tree - a list of all trips on the schedule.
- Middle Top - Trip Details - for specific details of the trip.
- Top Right - Trip Summary Details
- Bottom - Order Well - unscheduled orders.
Key functions may be accessed by buttons above the section:
- Revalidate - validate the currently-selected trip displayed in the Trip Details section.
- Recalculate Times - recalculate distances and times on the currently-selected trip displayed in the Trip Details section.
- Refresh Trip - refresh the currently-selected trip displayed in the Trip Details section.
- Advanced - advanced integration features
- Save - save any changes you have made. The button will only be enabled when you have changes to save.
- Cancel - cancel any changes that have not yet been saved. The button will only be enabled when you have changes to cancel.
- Close - close the Planning form and exit.
Many of these key functions are discussed in more detail in the following sections.
Trip Tree section
By default, the screen will open with the latest active schedule already shown, with all the trips that have already been created, either automatically or manually.
The trip tree will display only trips that match your user's depot (BASED_AT) parameter (if you are a planner for a single depot), or all trips if your user is configured to see all depots (a control tower-style configuration set by using the ALL_DEPOTS user parameter). Trunk trips (trips between depots) will be shown for any trips that are from or to your depot. Owning depot configuration is covered in the Owning Depot guide.
The Trip Tree displays the header for the trips contained within the schedule selection.
The trip header contains the planned arrival time of the driver at the depot, the unique transport identifier, and the status of the trip. This is also configurable to display the route. The trip header in the trip tree can also indicate if there are any outstanding warnings or errors with this trip, with a red highlight - you can see these warnings on the Comments tab in the Trip Details section, discussed below. Note that this icon may also display in RED, depending on how you want the screen implemented for your system.
This schedule selection can be made in the top left drop-down box named "Sched". The schedule refers to a date and is the method of grouping a set of orders and trips together into one manageable set. The schedule can be daily or weekly.
You can change the schedule shown on the screen by clicking on the Sched box and selecting or typing a schedule.
The Find function can find trips across schedules by many criteria.
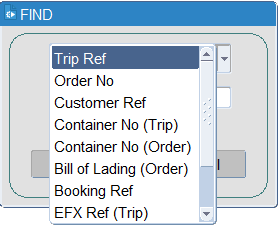
You can select one of:
- Trip Ref
- Order No
- Booking Ref
- Customer Ref
- Container No (Trip)
- Container No (Order)
- Bill Of Lading (Order)
- EFX Ref (Trip)
- EFX Ref (Order)
- Route Code
- Tractor ID
Enter the value you wish to search for (note: case-sensitive) and then click Find (or Cancel to cancel the search.
When you click Find, the system will find all matching trips across all schedules and display the results in the trip tree.
The Filter function can filter the trips that are displayed in the trip tree.
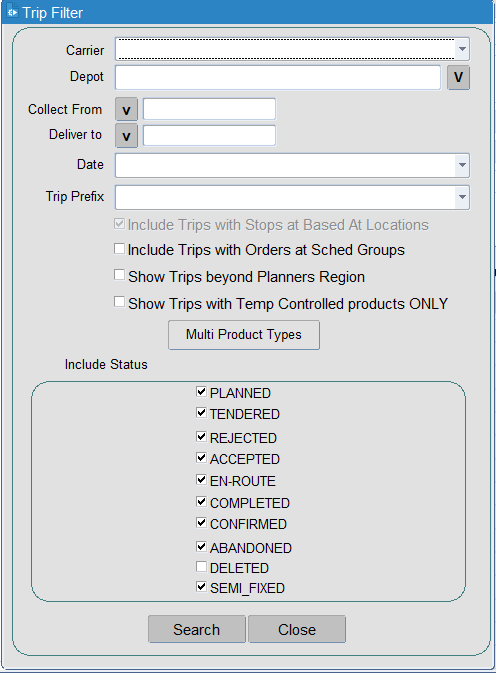
You can choose to filter by:
- Carrier - a drop-down list of all available carriers your user can see.
- Depot
- Collect From - a list of locations from which the orders are being collected. You can use the v button to initiate a pop-up lookup.
- Deliver To - a list of locations from which the orders are being delivered. You can use the v button to initiate a pop-up lookup.
- Date
- Trip Prefix
- Checkboxes can also apply a filter:
- Include Trips with Stops at Based At locations - this is initially checked.
- Include Trips with Orders at Sched Groups - this is initially unchecked.
- Show Trips beyond Planning Region - this is initially unchecked.
- Show Trips with Temp Controlled Products ONLY - this is initially unchecked.
- Product type - you can select multiple product types to match trips against through the Multi Product Types button.
- Include status - you can filter the trips at particular statuses only through the check-boxes provided. By default, all trips at all statuses bar DELETED will be shown.
Once you have entered the criteria, click Search, and the trip tree will be filtered by your criteria. If you don't want to search, click Cancel.
The Refresh Tree button refreshes the trip tree.
Many key functions can be accessed through a right-click menu on the trip in the tree.
- Refresh - refresh the trip.
- Validate Trip - revalidate the trip to see any validation errors.
- Set Status - set the status of the trip from a sub-menu of statuses.
- Change Schedule Date - move the trip onto a different schedule.
- Split Trip - split the trip from the stop selected on the Trip Stops section - a second trip will be created with all stops from that point removed from the original trip.
- Merge Trip - merge two selected trips together.
- Merge Trip across Schedules
- Merge Trip with...
- Delay Trunk - mark the trunk as delayed and unplan every order on this trip.
- Delete Trip - delete the selected trip and unplan every order on this trip.
- Unschedule Orders - unschedule orders from this trip.
- Edit Order
- Resend NAKs
- Show Map - show a map in a new browser window showing all the stops on that trip, plus navigation instructions.
- Print Maps - print the map above.
- Several standard documents can be generated from this trip tree - the report run is configured through system parameters shown later in this document:
- Print Manifest
- Loading List
- Delivery Docs
- Despatch Note - This will generate the Despatch Note report in PDF form for the trip that is currently highlighted in the trip tree.
- CMR Note
- Combined Documents
- Send Message
- Send Enabling Message
- Resend PO Message
- Debrief Trip - open the trip in the Trip Debrief screen.
- Trip Volumetrics
- Redirect Trip
- Reject Trip
Many of these key functions are discussed in more detail in the following sections.
Trip Summary section
Summary trip and stop information is presented here.
- Revenue - the total revenue allocated to this trip from orders planned on this trip.
- Cost - the trip cost calculated from the carrier tariff, if present.
- Actual Total Dist
- Total Dist - the planned total distance travelled on this trip.
- Elapsed - the planned elapsed time taken for this trip.
- Drive - the planned drive time taken for this trip.
- Dist from Prev Stop - the distance of the stop selected from the previous stop.
- Time from Prev Stop - the time of the stop selected from the previous stop.
- Vehicle Fill Outbound - the percentage of vehicle fill on departure of the trip.
 Note: This is only available if there is a trailer type associated with the trip and stops, and that type has a defined capacity. Trailer types may be automatically assigned to the trips when created from fixed routes. This guide shows how to assign trailer types in the Key Functions section below. Trailer Type definitions are covered in the Resources screen guide.
 - Weight on Departure - the total weight of orders on the trip at departure.
- RPE on Departure - the total RPE of all orders on this trip loaded at the departure point.
- Vehicle Fill Inbound - the percentage of vehicle fill on completion of the trip.
Trip Details section
This section will display the details of the trip that is currently selected within the trip tree section. There are multiple tabs in this section, the default of which is the Stops tab, which displays the different stops on the trip selected.
- Trip Detail - This shows the general information on the trip. Resources can be assigned, and the references edited here.
- Stops - This shows all stops on the trip, and is the default tab. This is where the key functions for a trip can be accessed. Orders on stops can be accessed here through the Orders button.
- Comments - You can add or edit general comments here. You can also view rejection comments, errors and contract auditing from this tab.
- Status - The screen shows general trip status changes here.
- Audit - The screen shows detailed auditing information on the changes to the trip here.
- Finance - The screen displays generated finance (trip cost and revenue from orders) here. Payments and additional costs can be added here.
- Services - You can see, add or modify any trip services here.
- CFX - You can see, add or modify CFX information here.
- PO Detail - You can see, add or modify PO information here.
- 3PL - You can see details of the 3rd-party carriers here to compare costs.
Stops Tab

It shows by default (from left to right):
- the stop number,
- the planned arrival and departure times from each stop,
- the actual arrival and departure times (if this has been keyed within the debrief screen),
- the type of stop (SU = Start-up, DL = Deliver, PK = Pick-up, CL = Closedown),
- the name of the location,
- the type of trailer that has been allocated to the trip,
- the trailer ID associated with each stop,
- where the driver break needs to be taken,
- any wait time at the stops.
This layout is configurable, and the following fields may also be added to the display:
- Booking Time
- Pick By
- Pick By Time
- Location Town
- Location PostCode
- Trailer ID (2)
- Mother Feeder
- Vessel ID
- Voyage
- Port
- Stop ETA Date
- Stop ETA At Date
- Warehouse Loading Time
- Stop Lifts
- RPE on Arrival
- REP At Stop
- Bordero
- Drop Number - a Fixed Drop Number.
 Note: This is specific to the Fixed Drop Scheduling Engine.
Many key functions can be accessed through a right-click menu on the trip stop in this tab:
- Configure Layout - configure the columns on this table.
- Insert Stop - insert a stop at this point.
- Append Stop - append a stop to the trip at a specified point.
- Delete Stop - delete the selected stop.
- Abort Stop - abort the selected stop.
- Assign Trailer Type.
- Remove Trailer Type.
- Assign Trailer ID.
- Remove Trailer ID.
- Print Material Checklist.
- Move Stopover back.
- Reset Stopover.
- Move Stopover Forward.
- Move Stop - move the stop to a new position.
- Desp Conf Message Hold.
- Transfer Orders - transfer all of the orders on the stop onto a different trip (also Job Swap).
- Create Pickup.
- Create Delivery.
- Print Labels.
- Send Trip Stop.
Many of these key functions are discussed in more detail in the following sections.
You can also see the orders that have been placed on the stop on the trip through the Orders button, which will open a pop-up window to show you the orders.
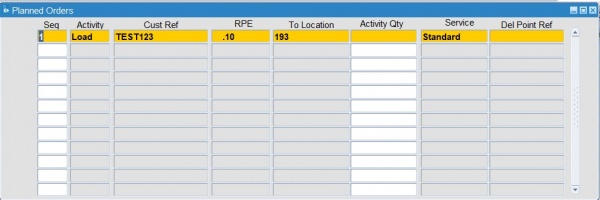
In this window, you will find the orders that are related to the stop that is highlighted within the larger section above, and it shows the following information:
- Seq
- Activity
- Cust Ref
- RPE
- To Location
- Activity Qty
- Service
- Del Point Ref
Double-clicking on the order header will take you into the details of the order itself, where you will be able to amend time windows and pallet quantities.
Several key functions are available from this stop orders list, accessed via right-clicking on an order in the list:
- Unschedule Order - unschedule the order from this trip.
- Unschedule Order from Trips - unschedule the order from all trips.
- Show Shipment
- Transfer Order - transfer the selected order on the stop onto a different trip (also Job Swap).
- Find and Replace/Replace - replace the order with another order.
- Carry Forward - this configurable option allows you to select orders and carry them forward to another route on the following schedule.
Trip Detail Tab
The "Trip Detail" tab in this section will allow for resources such as the carrier, the driver and the tractor registration to be allocated against the trip.

You can right-click on the driver and choose to show resource details of the driver, carrier or tractor - a pop-up window will be shown with these details.
You can also enter the following:
- Seal number - free text entry
- Container no
- Shift Code - with lookup
- Delivery type - The Delivery Type is set from the first order planned against a trip and is triggered automatically. In normal circumstances, this is display only and for information only.
- For the NHSBT Scheduling Engine and Fixed Templates processing, this is critical to the adding of orders automatically to these trips.
- Note also that for Carriers that are marked as LogiNext enabled (i.e. they are executing tasks through the LogiNext 4PL platform), this can be configured through a system parameter ALLOW_TRP_DEL_TYPE_UPDATE configured per carrier, to allow the Delivery Type to be changed to a curated list, available through a drop-down list. The list will display only those values that have been configured in the decode list for LogiNext use. No manual entry is allowed.
- Route Code - a free text route code. If this trip was created from Paragon or from fixed routes, this will be populated with the route code. See note below.
- Route code can also be set to be a lookup item as well as free text - this is controlled through a system parameter LOOKUP_FOR_ROUTE_CODES. In this case, a lookup button will be provided. This lookup will display the 'Route Code', 'Route Name', and 'Trip ID' if a trip already exists for the given Route Code. If multiple trips exist, the first one will be displayed that is in either PLANNED, ACCEPTED, EN-ROUTE state. You can then select a trip, and the route code and description will be set for you against this trip.
- Route Name - a free text field describing the route, for informational purposes.
- Status - the trip status, display only.
- Carrier - the carrier assigned to the trip, and from whom the resources (driver, crew, tractor/trailer/vehicle) will be sourced. You can change this with the lookup button provided.
- Carrier Ref - if this is a third-party carrier, then a carrier reference may have been provided, and is displayed here.
- Crew 1/2 - additional crew.
- PO Number
- ADR Reg
- Full Trailer Load
- Groupage
- Subcontractor
Comments Tab
You can add comments against the trip by right-clicking in the general Comments sub-tab, selecting Add comments and entering your text.

To the right of the General comments tab is the Errors tab. This displays the rules that have been broken for this trip, which could include the total time of the trip or a broken delivery window.
You can also view rejection comments and contract auditing from this tab.
Note that any information regarding the tendering, acknowledgement or acceptance of trips and orders for 3rd-party carriers using the LogiNext interface may be displayed here, such as indications when all orders have been acknowledged or accepted.
Status Tab
This tab shows the auditing of the change of status of the trip.

It also shows whenever a carrier is changed, and who made the change and when, the last change date and whether the manifest has been produced or sent.
Audit Tab
The screen shows detailed auditing information on the changes to the trip here.

This enables you to view the history of the trip, showing both who has created and amended the trip. It will also show if the trip has been set to another status, and if it has been deleted.
Finance Tab
The screen displays generated finance (trip cost and revenue from orders) here. Payments and additional costs can be added here.

This allows you to see, add or change the costs associated with doing this trip when allocated to a subcontractor. Finance can be studied in more detail within the Contracts Module.
The cost against a trip indicates the amount paid to a subcontractor to carry out the trip. If the trip is being carried out by an own fleet carrier, there is generally no charge. Subcontractor charges can be created automatically from Contracts, in a similar way to Order revenue. The payments are automatically generated when the order is set to Accepted. The revenue displayed is a sum of the revenue generated for the orders being collected on the trip.
The trip revenue displays the sum of the revenue against the orders on the trip.
The Profit Loss fields show the revenue minus the cost. Where there is a loss, the field will be coloured red.
The set up of account charges, is covered fully in the Accounts module. This section will show you how to allocate a cost to a trip within the trip manipulation or Planning screen after all the set-up has taken place.
There are two ways that the cost of a trip can be allocated. These are either manually, or automatically, both of which are covered below.
To allocate a cost automatically (assuming that rates and contracts have been set up), all you need to do is to allocate the relevant carrier to the trip in question, recalculate the trips times and then set the trip status to "TENDERED". You should then select the "Finance" tab from within the trip detail section of the screen. You should notice that the cost of the trip has been automatically assigned to the trip below. In this example the cost of £100 has been allocated to the trip.
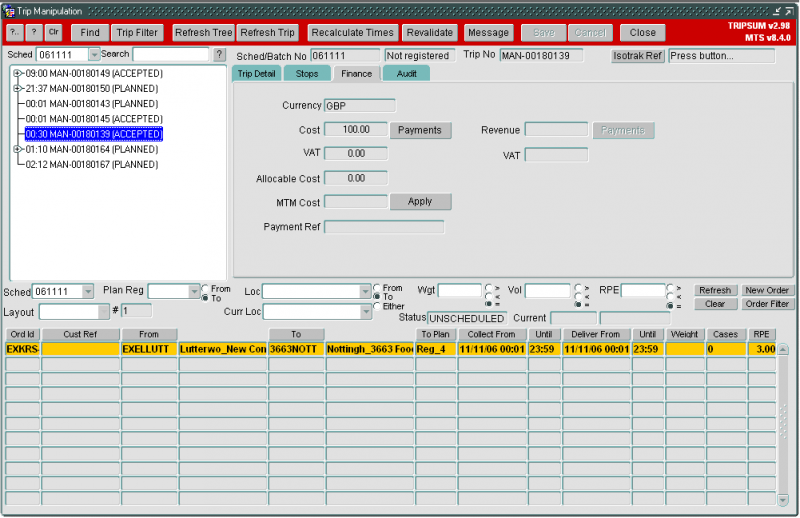
This automation has been possible because a contract and rate matrix have been set up for this carrier. If you do not have this set up, you are still able to enter a cost against the trip, but again the relevant set-up must have taken place beforehand. To do this, select your trip and allocate the relevant carrier to that trip. Re-calculate times of the trip and save your changes. Next, switch to the finance tab and press the ‘Payments’ button. This will bring up the "payments for trip" screen which details all the payments that have been allocated to the trip so far. At this point this screen will be empty as you have not entered any payments yet.
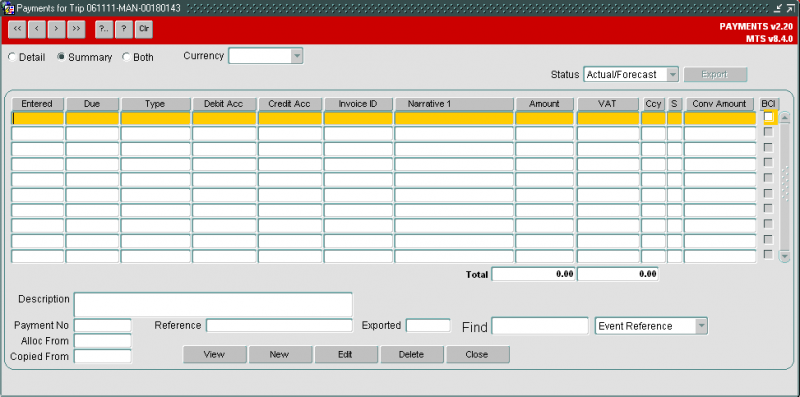
To enter a payment press the New button at the bottom of the screen. This will take you into the "Create payment" screen.
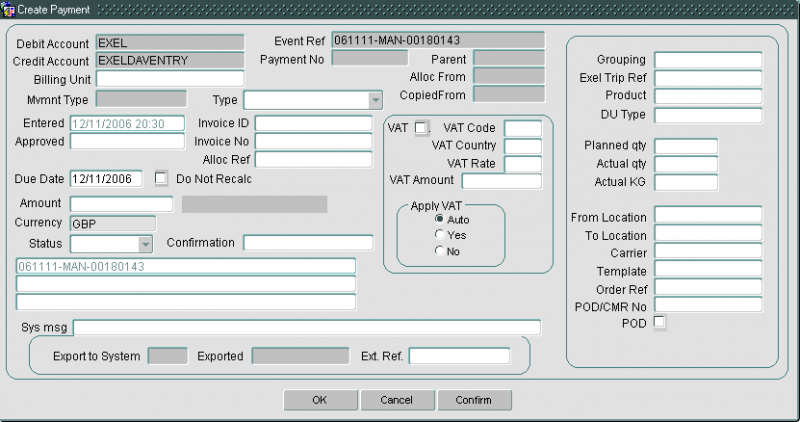
First enter the payment type. This will usually be "Trip haul ma" (as in the example below), but may also be payments such as fuel surcharge. Next, enter the cost of using the selected carrier for doing this trip (the example below has a cost of £100 entered). Lastly enter the status of the payment as "forecast".
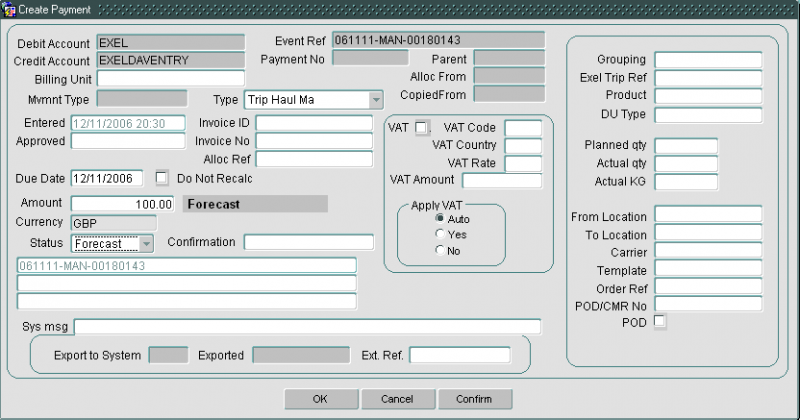
Once you have entered those three pieces of information you can press the OK button to create the payment. This will take you back to the "Payment for trip" screen where you will see your newly created payment. When you close this screen you will see the payment assigned to the trip. If you want to add further payments against the same trip, you will simply need to repeat the process detailed above. If you chose to add a manual payment, the system will no longer calculate the cost from contract, recognizing that you have chosen to overrule the cost.
Services Tab
This tab allows you to see, create, amend and delete any trip services.

These are additional costs accrued against a trip from the carrier.
The buttons below are available:
- Save - save any changes you have made.
- New - create a new service in the table - you enter the details there.
- Edit - edit a selected line
- Delete - delete a selected line.
CFX Tab
This tab shows specific CFX interface parameters.

PO Detail tab
This tab allows POs to be entered against a trip. See Purchase Orders for more information on this process.

3PL Tab
When a carrier is known, the carrier may simply be selected for the trip created for these orders. If the carrier is not known or multiple carriers exist, you can ask the system to select the best 3PC for the trip.

To use this functionality:
Enter the carrier of the trip as "3PL" and click Save.
The system will calculate the charges for each carrier specifically and compare costs, selecting the best. The calculated charges from the carriers will be specified in the audit trail, and the total charges are displayed in this 3PL tab in this section.
Order Well Section
This section can be found at the bottom of the screen, and it displays orders that have not yet been allocated to trips. You are also able to create new orders or cancel existing orders here.
The order well will display only orders that match your user's depot (BASED_AT) parameter (if you are a planner for a single depot), or all trips if your user is configured to see all depots (a control tower-style configuration set by using the ALL_DEPOTS user parameter).
Each line within this Order Well shows you the header information for an unscheduled order. The order ID is a unique sequential number allocated to an order at the time of its creation. The customer reference is an optional field on the order that is often populated when orders are imported into C-TMS. This is because you tend to import your orders from another system that will have its own reference number. You can however, input this reference number manually straight into C-TMS.
You can also see where the order is being collected from and where it is being delivered to. You will also see the region code for that order. This will typically relate to the first two alpha characters of the locations' postcodes so that the planner has an idea of its location. Next to the region code is the 4 time windows that make up the collection and delivery window. Lastly, you can see the weight, volume and RPE that relate to the quantity of goods that are being moved for that order.
![]() Note: Emergency orders are shown in red and will always be at the top.
Note: Emergency orders are shown in red and will always be at the top.
You can change the layout of the field in this section and filter by many attributes.
You can add a new transport order using the New Order button from this section - you will be taken to the New Order form to enter the details.
There are several filter options relating to the unscheduled order well section, so that when the planner is undertaking the planning, they are able to narrow their search to particular order types.

The "Schedule selector" can be used to change the set of orders that the order well is showing you. This is a separate filter from the schedule filter found in the trip tree section of the trip manipulation screen. This means that you are able to drag orders from previous or later schedules onto trips that belong to this schedule.
You can access additional order filters using the Order Filters button.
The Planning Region filter allows you to select the Planning Region from/to that the orders have been assigned to. Orders are assigned to planning regions automatically based on their postcode and postal area.
The Postal Region Filter relates to the first two alpha characters of the postcode for a location on the order. This can either be the collection or the delivery location of the order, depending on whether the ‘From’ or the ‘To’ check box is selected. Choose whether you are interested in the collection point ("from") or the destination point ("to"), and select the relevant box. The drop-down box will now show all the region codes that relate to your chosen location point against each order. Selecting one of these will filter out locations that do not have the region code you have selected (i.e. you are left with orders that are delivering or collecting from your chosen region code).
There is also a filter to find orders that have specific trailer type requirements.
The Location Filter relates to the order Collection from location, Delivery to location, or both. This is dictated by the check boxes to the right of the location drop-down box. By selecting the "From" check box, the locations within the drop-down box will relate to the collect from locations within the orders listed in the unscheduled order well. If you then selected one of those locations from the list, the unscheduled order well would filter out any locations that didn’t have your chosen "from" location as their collection point. Conversely, selecting the "To" check box will display the delivery locations within the well, and selecting one will filter out any locations that don’t deliver to your specified location. The "Either" check box allows you to see and filter both the collection and delivery locations of the order.
The Weight, Volume and RPE filters all work in the same way. They allow you to filter out orders via the weight, volume or pallets associated with each order in the unscheduled orders well. Selecting the ">" check box and entering a figure in the associated box, will filter out any orders that have less weight, volume or pallets than your specified figure. The "<" check box will give you the opposite result. The "=" check box will keep any orders that have that exact figure on their order as you have keyed into the relevant search box.
There is also a filter on Current location - this allows you to select orders based on where they have been planned up to. So an order that has been planned from the from location FROM 1 to RDC1 (on the way to location TO1) will be found if you search for the current location "RDC1".
You can right-click on orders here to access many key features.
- Configure Layout
- Refresh
- Apply to Trip
- Send to Paragon
- Apply to Stops
- Apply via X-Dock Locations
- Create One Order Trips
- Create One Order Trips and Brief
- Create New Trip
- Add Order to Milk Round
- Move to Schedule - You can use this to carry forward orders onto another schedule.
- Edit
- Find External Reference
- Amend Day Offset
- Amend Values - You can amend an unscheduled orders booking ref, planned DU quantity or latest delivery through this option.
- Cancel Order
- View Order Locations
- Show Volumetric Information
- Set Order to On Hold
- Suggest Trip - This option will search for planned, accepted or en-route trips where the from and to locations of the order are present, where the stops have not been arrived at yet, and where the collection and delivery windows of the order match up to the stop arrival and departure windows.
 Note: This will IMMEDIATELY plan the order onto the first trip it finds with that location on it. This option will only suggest trips on cost centres that have been configured for this functionality through a system parameter - see Further Configuration for more details.
 - Reset Auto-Scheduling - This configurable option allows you to select orders that have been marked for Manual Planning and reset that flag, so that they can be processed by the scheduling engine again.
- Carry Forward - This configurable option allows you to select orders and carry them forward to another route on the following schedule.
Key Functions
Create New Trip
Once you have a set of orders ready to plan, you can start to put them onto trips. Select one of your unscheduled orders from the unscheduled orders well by left-clicking onto it. Now right-click on the order and choose the Create New Trip option. Note that you can multi-select orders from the well by holding down the SHIFT or CTRL keys when clicking.
After you have selected the Create New trip option, a pop-up window will appear asking you to select a carrier.
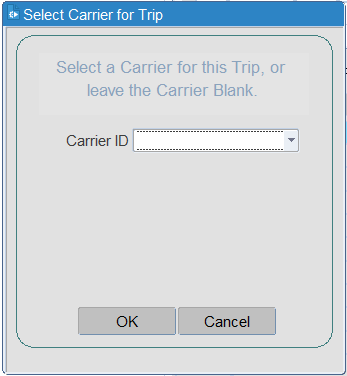
Using the drop-down list, select the required carrier. ![]() Note: For subsequent trips, the carrier ID will default to the previously selected carrier - you can change the carrier if required by reselecting using the drop-down list.
Note: For subsequent trips, the carrier ID will default to the previously selected carrier - you can change the carrier if required by reselecting using the drop-down list.
The order will now disappear from the unscheduled order well, as it is now scheduled onto a trip, and the new trip will be visible (and selected) in the trip tree.
The trip you have just created will be the one highlighted in blue in the trip tree section of the screen. The detail section of the screen will relate to your new trip. You will see that C-TMS has worked out the arrival and departure times for each of your stops on the trip. This has been driven by your collection and delivery windows for your order. C-TMS will try and meet the windows, getting to the delivery location as early as is feasible at the start of the delivery window.
C-TMS will then work backwards / forwards from this time to work out the arrival and departure times at the depot on the first and final stops. The drive time and distance are worked out from the network table that sits behind the trip manipulation screen. The network table keeps a record of the distance and drive time between every location and uses the applicable record when calculating times and distance on a trip.
You will also notice that at each stop, C-TMS has allocated a stop time. This can be worked out by looking at the difference between the planned arrival and planned departure times at each stop. This time will have been taken from the loading / unloading rates allocated to each location within the location maintenance screen. It may also include a break time if the driver has reached the designated limit (usually 4.5 hours drive time, but configurable against the carrier).
If you click on the detail tab within the trip detail section of the screen, you will see that the carrier has been allocated to your trip. You can change the carrier by clicking on the carrier button and selecting it from a list (this will be covered in more detail within the resource allocation section module).
Assign Resources
Within the Planning form, it is possible to assign resources to a Trip.
Once you have created a trip, you will then be able to allocate different resources to it. These include the carrier, the driver, the tractor registration, the trailer type and the trailer ID.
A Carrier can be selected from a list of valid Carriers. This is done by pressing the button to the right of the carrier name box, which activates the lookup. This will list all the carriers available for selection. If your intended carrier does not appear here, you will first need to set it up from within the resources maintenance screen.
When you have found the required carrier, you can either double click on its name, or left-click once to highlight it and press the OK button. You should then notice that your selected carrier's ID has been populated in the relevant box on the trip.
It is then possible to populate a Driver (and optionally 2 crew members), Vehicle and Trailer Id. Depending on the set-up of the carrier (i.e. Fleet or Haulier) these values will either be selected from a list or entered as free text. If a Haulier is being used, the details of all resources will not be stored in C-TMS, so they will need to be entered manually. If selecting from a list, the list will be restricted to those resources that are available to the Carrier that is assigned to the Trip.
How you assign fixed driver, crew, tractor and Trailer resources like this can vary depending on configuration.
- Simple - just select from a drop-down list of all available resources.
- If the resource diary has been maintained and the tractors/trailers are all fixed, then this can be done through the resource diary allocation.
Simple Resource Allocation
Adding a Driver's name - After selecting the required trip from the trip tree section, click on the Trip Detail tab within the trip detail section of the screen. Within this tab, you will see that there is a Driver section.
If the driver name box has a white background, then the population of this field will be free-text. This means that you are able to type the driver's name straight into the box.
If the box has a grey background, then the population of this field is via a pre-set driver list. The type of entry is dependent on the way that the carrier you have selected is set up in resource maintenance.
If the name box has a grey background, then by pressing the button to the right of the Driver name box, this activates the lookup, and a list of all the drivers available for selection would appear. If your intended driver does not appear here, that driver has either not yet been set-up, or the driver is not allocated to that carrier. As part of the driver set-up (covered in the resources Module) you will see that each driver is allocated to a particular carrier, so if you select that carrier on a trip, the drivers selectable will only include those that have been allocated to that carrier.
When you have found the required driver, you can either double click on their name, or left-click once to highlight it and press the OK button. You should then notice that your selected Driver name has been populated in the relevant box on the trip.
Adding a Tractor Unit - After selecting the required trip from the trip tree section, click on the "trip detail" tab within the trip detail section of the screen. Within this tab you will see that there is a Vehicle section. It is within this section that you are able to record the tractor registration number of that trip. If the vehicle box has a white background, then the population of this field will be free-text. This means that you are able to type the tractor registration straight into the box. If the box has a grey background, then the population of this field is via a pre-set vehicle registration list. The type of entry is dependent on the way that the vehicle you have selected has been set up in resource maintenance.
This is done by pressing the button to the right of the Vehicle box, which activates the find box. This will list all the vehicle registrations available for selection. If your intended vehicle registration does not appear here, that registration has either not yet been set-up, or the vehicle is not allocated to that carrier. As part of the vehicle set-up (covered in the resources Module) you will see that each vehicle is allocated to a particular carrier, so if you select that carrier on a trip, the vehicle registrations selectable will only include those that have been allocated to that carrier. When you have found the required vehicle registration, you can either double click on the relevant registration, or left-click once to highlight it and press the OK button. You should then notice that your selected vehicle registration name has been populated in the relevant box on the trip.
Adding a Trailer Type – The trailer type is selectable from the main trip stops tab of the trip manipulation screen, rather than from the trip detail tab as with the carrier, driver and tractor unit.
Select the trip that you want to allocate a trailer type to from the trip tree section of trip manipulation. You may notice that the trailer type for this trip has been pre-populated for you by C-TMS. When you create a trip, C-TMS will look for the most appropriate trailer type for your trip, taking into account the trailers based at the depot and the number of pallets to be moved. This process will have taken place at the time of the trip's creation.
Right-click on the blank trailer type box of the first stop. This will bring up a menu. From this menu, select the Assign Trailer Type option. This in turn will provide you with an entry box.
If you know the trailer type ID, you can enter it straight into the Trailer type box and press the OK button. Otherwise, type in a percent symbol ("%") into the Trailer type box. Pressing the OK button in this instance will provide the find box, which will list all the trailer types available for selection. Select the trailer type from the list and press the OK button. Your trailer type will populate the trailer type field and you will now be able to press the OK button. You will then see that the trailer type you selected has been allocated to the trip.
You are able to add a different trailer type for different stops on the trip (these must be for subsequent collections, rather than stops serviced from the collection picked up at stop one). Simply repeat the process outlined above, but starting off by right-clicking on the desired stop number rather than the first stop. This will effectively change the trailer type for that stop and all subsequent stops after it.
Adding a Trailer ID – The trailer ID is selectable in exactly the same way as the trailer type above.
Allocate Resources (Diary)
The Allocate Resources (Diary) screen is accessible via the Alloc Resource button in the PLANNED and ACCEPTED sections of the Trip Overview screen and through the Planning screen.
In order for this functionality to be available, the system parameter RES_AVAILABILITY_ALLOC must be set to "Y" for the applicable cost centre - you can use the System Parameters screen to do this.
From the Waterfall screen. select a trip from the well, that you want to allocate resources to, then click the Alloc Resource button.
From the Planning screen, select to resource a driver, tractor or trailer against a trip or trip stop.
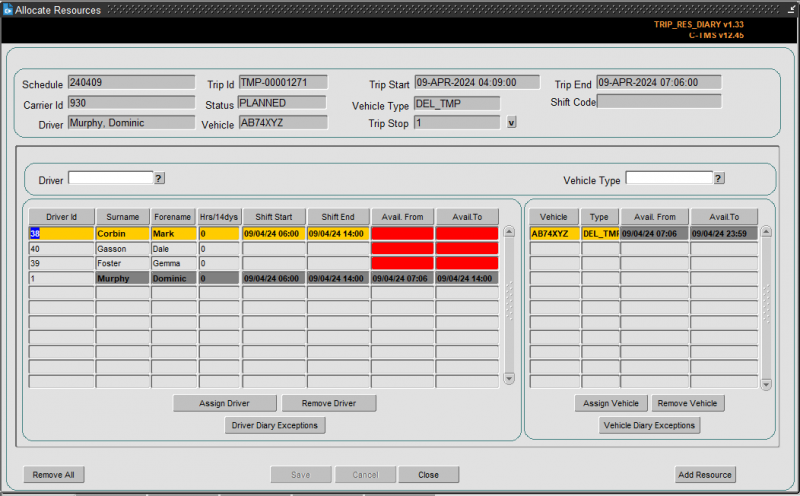
The screen below will be displayed:
![]() Note: All fields on the driver and vehicle part can be sorted by clicking on the button above that column.
Note: All fields on the driver and vehicle part can be sorted by clicking on the button above that column.
The Drivers and Vehicles that appear in the bottom of the screen are those available to be allocated to the current trip.
Only Drivers and Vehicles linked to the Carrier assigned to the trip are available for selection.
If a Trailer Type has already been assigned to the trip then only Vehicles of that Trailer Type are available for selection. Only Drivers that can drive that Trailer Type will be available for selection.
If no Trailer Type has been assigned, then all Drivers and Vehicles will be available.
See the Resources screen for the set up of these links.
You can filter drivers and vehicles using the filters above each panel, and then clicking the ? button to the right.
The screen displays the availability of the drivers, based on their assigned shifts and resource diary. If the driver has been assigned to another trip, this will be accounted for in the availability.
The screen displays the availability of the vehicles, based on their assigned trips and VOR/Inactive status.
RAG colouration is applied to make it easy to see which drivers and vehicles are available.
- GREEN - available
- RED - unavailable for any of the reasons above.
The Driver column marked Hrs/14dys is an indication of the hours the driver has worked in the last 14 days, allowing you to take into account a driver working too many hours.
The currently allocated driver and vehicle are displayed in the top of the screen, and darkened in the driver and vehicles lists.
If a Trailer Type has not been assigned, this can be done using the V lookup button next to that field in the header.
Those resources that are currently in use between the trips start time and finish time are high-lighted in grey to show the user they are currently in use, although they can still be allocated.
To assign a resource, select it from the list and click the associated Assign ... button. When assigned, the name/id will appear in the header. Use the Remove ... button if a resource needs to be removed.
You can remove all resources applied to the trip using the Remove All button provided.
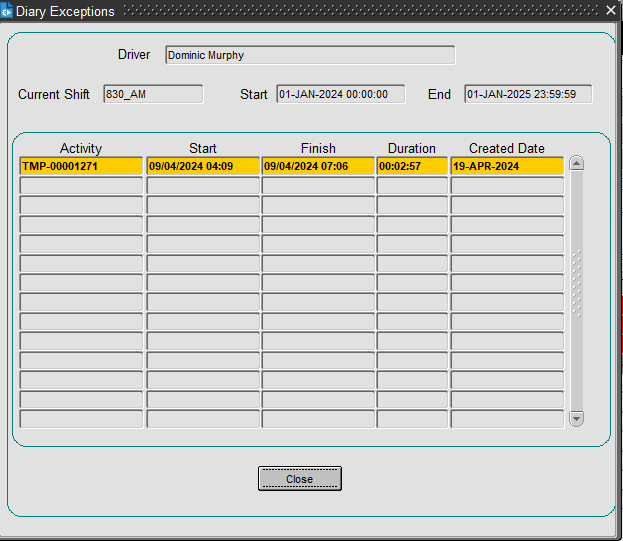
You can view the resource availability in detail using the ... Diary Exceptions buttons provided.
![]() Note: When you add the last resource for this carrier, the screen will warn you of this in a pop-up.
Note: When you add the last resource for this carrier, the screen will warn you of this in a pop-up.
Whilst in this screen, you may need to add or change a resource to make them available for the trip. You can do this by clicking on the Add Resource button - you will be taken to the Resources maintenance screen.
Once happy that resources have been added, click Save. If during a Save, all resources have been added to a PLANNED trip, the system will automatically update the trip status to ACCEPTED.
Apply to Trip/Apply to Stop
Allows any Unscheduled Orders on that Schedule to be applied to a new or existing Trip.
Once you have created a trip, you may want to add further orders to the same trip. To do this, select the trip you want to add orders to (if not already selected), and highlight the unscheduled order (or orders) you want to add to that trip. Right-clicking on that order will cause a menu to pop up where you should click on the Apply to Trip option.
Once you have done this you will see that your order has jumped onto the selected trip and disappeared from the unscheduled order well. Notice that only one stop has been added as the order was collected from a location already on the trip.
By default, an Order will be automatically applied to what the system believes to be the most appropriate stops.
It is also possible to apply an Order to a specific pair of stops to reduce the need for manual manipulation. When multiple orders are being applied to a trip, the system will try to minimise the number of stops required by selecting the largest trailer type available.
Revalidate Trip
Performs validation checks on the selected Trip to ensure that the trip is valid and feasible. If the trip breaks any validation rules these will be reported back to the user.
These checks include:
- Ensure that the trip has at least 1 load and unload activity and these activities are in the correct order.
- Ensures that the trip complies with driving regulations such as Driver's Breaks.
- Checks whether the Trip will deliver within the delivery windows of the Orders.
- Ensures that a valid Trailer Type is assigned to the Trip. If a Trailer has been 'fixed' onto a Trip (see Fixed Routes for more details) it will not be overwritten.
Recalculate Distance and Time
Allows the times on a Trip to be recalculated, wait times will be optimised and Driver's Breaks included (this can include an overnight stopover), all departure times will be made unique. This may result in Delivery windows being breached, however, these failures will be reported during Trip Validation.
Set Trip Status
The trip status is a way of signifying to the operation just what stage the trip is at.
Typically this follows the process as below:
PLANNED -> TENDERED (optional) -> ACCEPTED -> EN-ROUTE -. COMPLETE -> CONFIRMED (Optional).
A status of planned will signify that the trip is still being looked at by the planner and the trip is yet to be finalised. Planned is the status that is allocated to the trip when it is first created.
When the planner is happy with the trip, they will set the trip to accepted to signify this fact.
Alternatively, they may set it to Tendered to show that the trip has been tendered out to a different carrier, and they are waiting for the carrier to accept or decline that piece of work (if the carrier has accepted the piece of work, the planner will then set the trip to accepted). Note that some interfaces to 3rd/4th party carriers will automatically change the status from TENDERED to ACCEPTED (such as LogiNext 4PL interfaces)
When the driver has left the site with their trip, operations will tend to set the trip to EN-ROUTE. Note that certain Electronic POD systems will automatically handle this change of status (such as Aptean POD systems and LogiNext 4PL interfaces), as will use of Calidus MCS Despatch.
After the driver has returned and the trip has been debriefed within the trip debrief screen, the trip status will be changed to complete. Note that certain Electronic POD systems will automatically handle this change of status (such as Aptean POD systems and LogiNext 4PL interfaces), as will use of Calidus MCS Receipt.
Confirmed status may be used for any other purpose that your operation needs, such as to mark as dealt with for Invoicing, etc.
Setting the status of the trip is simple. Highlight your trip within the trip tree section of the screen, and then right-click on it. This brings up a menu list where you should select Set Status, followed by the status that you want to set the trip to.
C-TMS will ask you a question, making sure you want to change the status of the trip, to which you reply OK. The system will check whether there are any dependencies on changing the status to the selected value (such as resources allocated when changing to Accepted status). You will then notice the status of the trip change to accepted within the trip tree section of the screen.
Manipulating a Trip
Once you have added your orders to a trip, you may then want to change the trip around somewhat. You will be able to manoeuvre stops around, change order details, override C-TMS-derived stop times, split trips into two separate trips, merge trips together, and remove stops on existing trips.
Manoeuvre Stops
You are able to move a stop up and down the stop order by using the move up ^ and down v buttons found at the top of the Trip Detail section.
Simply highlight the stop you want to move and press the relevant move button. C-TMS will not let you move the order's delivery above the order's collection, which is logical as you cannot deliver an order before you have collected it.
It may not always be feasible to move stops, in which case C-TMS will warn you if delivery windows will be missed.
Merge Trip
Most people use Trip manipulation to track their drivers' workload. Once they have scheduled all their orders onto single trips, they are likely to start looking for trips to put together to create multiple "gate exit" trips. So a driver may go out and do a delivery, come back to base before collecting a further load for delivery. These two gate exits are likely to be represented originally by two separate trips in C-TMS. So you will need to use the merge functionality within C-TMS to bring those two trips together.
To do this, highlight the first trip you want to merge by left-clicking on it within the trip tree section of the screen. You will then need to hold down the CTRL key on your computer keyboard, and while you are doing this, left-click on the second trip that you want to merge (again from within the trip tree section of the screen). You will notice that the result of your actions are that both trips are highlighted within the trip tree. You will now need to right-click on one of your two trips in the trip tree to bring up the options menu.
Select the Merge Trips option. You will receive a confirmation message telling you that the merge you undertook was successful. One of your trips will have been deleted, and the orders that were on that trip have been moved onto the other trip. C-TMS will have recalculated the times automatically for you.
Two configurable system options are now possible for this function. Either duplicate Stops will be removed and stops will be combined together where possible, or Stops will be appended on to the end of the resulting trip.
Split Trip
If you have merged two separate "gate exit" trips together, but later want to reverse that merge, or you have a large over-capacity trip that you want to split, or a time-limited resource problem to solve, you will be able to utilise the split functionality.
The split functionality will split one trip into two separate trips.
Select the trip that you want to split by left-clicking on the trip within the trip tree section of the screen. You will first need to expand the trip within the trip tree so that all its trip stops are showing. To do this, you will need to press the small + button to the left of the trip. If there is not a small + next to your trip, press the Refresh Trip button. Once you have expanded the trip, you will need to select the stop where you want the split to take place by left-clicking on it. The split will take place above the stop you select.
Select Split Trip to activate the split trip functionality. You will be confronted with a message box telling you that you that split has been successful and that a second trip has been created for you. You will also notice that the trip does not appear to have changed. This is because C-TMS has not refreshed the screen, so you will need to do it. Press the Refresh Tree button to update all the trips with the trip tree. You should now notice the effect of the split functionality.
Each Trip will then be validated to ensure that it has the relevant SU and CL activities.
Delete Trip
If a trip is no longer required, it can be deleted. The trip will remain on the database with a status of deleted, the stops will be removed and the Orders set back to Unscheduled.
Insert Stop
Allows a new stop to be manually added to a Trip after the selected Stop, an Activity Type, Location and Trailer Type are required.
Specific stops may be added to trips as a manual task. This will then allow orders to be added to the trip, with the load and unload at the required part of the trip.
Select a stop, then right-click in the Stops and choose Insert Stop.
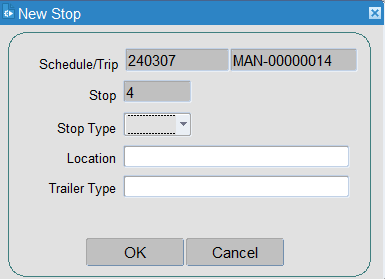
This will display a pop-up screen where the details of the new stop are specified, including where the stop is to be added (the stop number) and the stop (PK, DL). You must also select the location, using a lookup if required.
Append Stop
Allows a stop to be appended to the end of a Trip, an Activity Type, Location and Trailer Type are required.
This works in the same way as Insert Stop above, but automatically assumes that the stop will be after the final stop on the trip.
Move Stop
Moves the currently selected stop. You will be asked where the stop will be moved on this trip, before/after a specific stop number. Clicking OK will confirm the movement and this will be reflected on the stops tab. Clicking Cancel will cancel the move.
Overriding Stop Times
C-TMS will work out the times against each stop on your trip for you. If for some reason you want to change these times against the trip, you can do this using the "Fixed" functionality.
The first column in the Trip Detail section of the screen is headed "Fixed". Clicking in a fixed box puts a tick in that box and has effectively fixed the stop, meaning that C-TMS will not recalculate that stops times.
So if you wanted to change the times on the first stop of a trip to start a driver at a later time than C-TMS had allocated, click in the first stop's "Fixed" box. Then change both the planned arrival and planned departure times for this stop.
Clicking on the Recalculate button will leave the first stop's times to how they have been set by you, but change the subsequent stops to reflect the driver's new start time.
![]() Note: You are able to fix more than one stop on the trip, but you are unable to effectively fix a stop in the middle of a trip without fixing all previous stops.
Note: You are able to fix more than one stop on the trip, but you are unable to effectively fix a stop in the middle of a trip without fixing all previous stops.
When you do forcibly change the stop time of a trip, you may notice that you receive a warning message detailing windows that have been broken. Because you are overriding the times on the order, you may well have broken one of the windows on that order. Drill down into the order in question to find out the details, for example, by how much you have broken the window.
Removing Order(s)
If you need to remove an order from a trip, there are two ways of doing it. The first involves deleting an entire stop and all of its orders from the trip, and the second is a little more subtle, where you are able to remove a single order at a time.
Delete Stop
Allows a stop to be deleted from a Trip, any Orders at that Stop will be Unscheduled.
To use the "Delete stop" functionality, highlight the stop you want to delete from within the trip detail section of the screen. Right-click on that stop and select the Delete Stop option from the menu.
C-TMS will ask if you are sure you want to delete the stop to which you press the OK button. You will notice that the stop has been deleted from the trip. The order(s) you have removed from the trip may not at first appear within the unscheduled order well at the bottom. To see the order, press the Refresh button within the Order Filters pop-up on the unscheduled order well section.
Unschedule Orders
You can also achieve similar results by using the Unschedule Orders functionality. This way will allow you to remove single orders at a time from a stop. To do this, highlight the trip that you want to remove the the order from, by clicking on it from within the trip tree section of the trip manipulation screen. You will then need to highlight the stop on the trip that contains the order you want to remove (remember that the order will be present at two stops on the trip, both where the order is collected and where the order is delivered). Next, press the Orders button and highlight the order that you want taking off the trip.
Now right-click on that order and select the Unschedule Order option. You will be given confirmation that your order was removed successfully, and the order will drop-down into the unscheduled order well automatically.
Change Order Details (whilst on a trip)
You can change an order's planned pallet quantities or order time windows whilst the order is on a trip. This will often be the case when you have added multiple orders to a trip, only to find that because of previous stops on the trip, your order will be arriving late. Also, if you have planned to squeeze 27 pallets onto a trailer that has the capacity to support only 26 pallets, then you may also want to make changes to the pallet quantities.
Select the stop that the order is either collected from, or delivered to, and click the Orders button. Then double click on the order from within the pop-up. This opens the order details form, where you are able to edit pallet quantities or time windows accordingly.
![]() Note: If you try to edit the order but C-TMS does not allow you to, this will be because of your access level. These have been set up by your system administrator.
Note: If you try to edit the order but C-TMS does not allow you to, this will be because of your access level. These have been set up by your system administrator.
Transfer Order(s)
You can transfer an order from a trip stop or all orders on a trip stop.
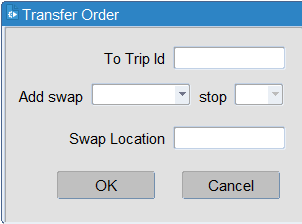
You will be asked to select the trip onto which you want to transfer the order or orders. A lookup of available trips is provided, with information to help you decide which trip to select.
- Trip ID
- Trip Status
- Route Number.
- Route Description.
- Trip departure time.
- RPE on departure.
- Number of stops.
- Trip completion time.
- Last non-RDC stop departure time.
You must also identify a swap transfer point if you are only transferring the delivery of the order. You can identify the stop and whether the swap should be before or after the stop you identified. If you are transferring the collection, this is not required.
The position of the new load in the swap trip is identified by defining AFTER or BEFORE an existing stop on the swap trip. The swap location selected must exist in C-TMS to be selected as a swap location. You may manually create locations.
Selecting OK will complete the following changes:
- Original Trip - The order is unloaded at the new swap location. If the trip does not currently have a stop at the swap location, a new stop will be created. The new stop will be inserted after the last stop to be debriefed. Checks will ensure the new stop is not inserted before the stop on which the order is loaded.
- Swap Trip - If the swap or unload location do not exist on the trip, 2 new stops will be created. The swap location will be created in the position as defined in the screen above and the unload location will be added to the end of the trip. The unload location will be set to the same unload location on the original trip.
Move to Schedule
You can use this to carry forward orders onto another schedule.
You can select multiple orders using the CTRL or SHIFT keys when clicking on orders in the order well.
You will be prompted for confirmation, and then prompted on to which schedule you want to move the order, selected from a drop-down list.
The system will then automatically refresh the order well, at which point your updated orders may well be removed from the order well for the schedule selected (depending on your selection criteria of course).
Note that this will not change the orders' collection and delivery windows - this option just changes the schedule. You may then want to change the order's windows through the New Order screen.
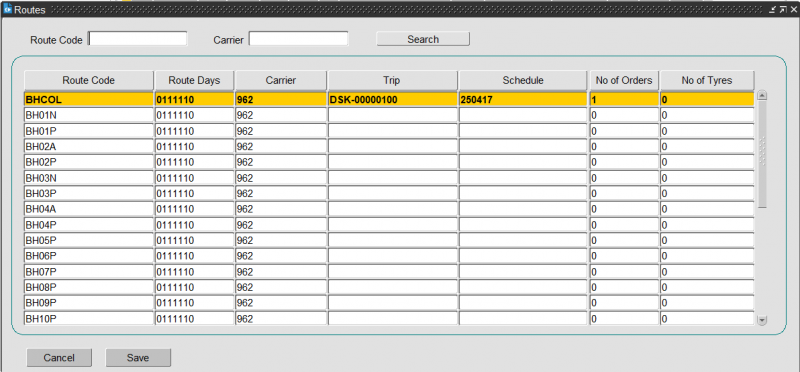
Carry Forward
This configurable option allows you to select orders and carry them forward to another route on the following schedule.
You will be prompted to select a route or trip from the next available schedule.
The screen will display a list of all routes that are available in the system (provided you have access), indicating whether a trip has already been created for that route on the schedule.
The information displayed is:
- Route Information:
- Route Code
- Route Days - the days that the route is active, from Sunday to Monday
- Carrier
- Trip information (if there is a trip created for that route):
- Trip
- Schedule
- No of Orders
- No of Tyres
You can filter by partial carrier or route code, then click the Search button to filter the list.
When selected and confirmed with the Save button, this will add the selected order to the selected trip, or create a new trip for that order from the selected route.
If the order was already planned on to a trip, this order will be moved.
Amending Order Values
You can amend an unscheduled orders booking ref, planned DU quantity or latest delivery by highlighting the required order in the order well, right-clicking and selecting Amend Values. This will display a pop-up screen where you can do the following:
- Amend the details - save with the OK button.
- Create a trip for the unscheduled order with the Create Trip button.
- Cancel any changes with the Cancel button.
Creating Trips via Crossdocks
This is functionality within C-TMS that will allow you to create multiple trips with one order. You are therefore able to emulate a collection at point "A", a delivery at point "B", via a crossdock at point "C".
The first thing you need to make sure of is that the location ID you are to use as a crossdock has been set up as such within the Maintenance business data screen. The Location Types tab within this screen enables you to set certain locations up as crossdocks. This should be set up by a superuser or a system administrator.
To create your crossdocked trips from within the trip manipulation screen, highlight the order you want to use from within the unscheduled order well. Now right-click on the same order to bring up the menu box, and select the Apply via x-dock locations option.
This will cause a new screen to appear titled "X-Dock Order".
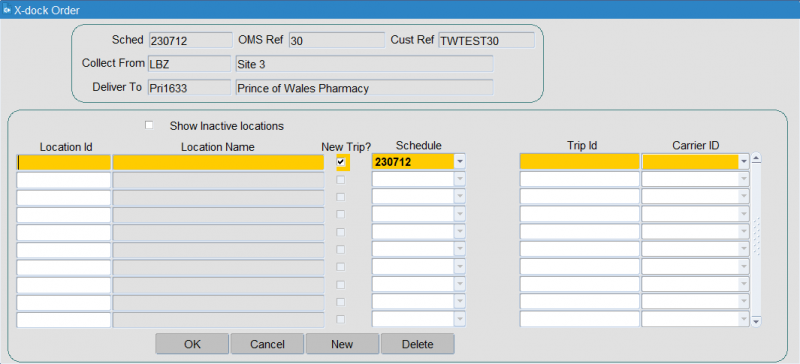
This screen will enable you to create the first legs of your crossdocked trips. The final leg will then be created back in the trip manipulation screen as normal.
The top box within this screen provides header information for the order you are to crossdock. This includes the original collection point and the final destination point. The box below it allows you to list the locations that this order will be crossdocked via. If a further crossdock location is required, press the ‘New’ button and enter a second crossdock location ID in the row below.
The "New Trip?" box should be ticked if this crossdock trip is to be added to a new trip rather than a pre-existing one. If you are adding this to an existing trip, un-tick the box and enter the C-TMS trip number into the "Trip id" box.
When you have entered all the required crossdock locations, press the OK button. This will prompt C-TMS to create all the trips that you have requested via the "X-Dock Order" screen. The final leg of the trip, the one that delivers the goods to the final destination, is still to be created. You will still be able to see the order you have used to create your crossdock legs within the unscheduled order well at the bottom of the trip manipulation screen with a status SCHED-COLL, indicating the collection has been scheduled but not the delivery. Select the order and create a new trip from it. This will mean that all legs of the trip have been created and are available from within the trip tree section of the screen.
Pass a Depot Trip to Another Depot or Carrier
It may be that a lack of resources means that your depot may not be able to complete a trip. In that case, you can pass your trip on to another carrier. This may be another of your internal fleet carriers or a third-party carrier (3PC). To do this:
- Select the trip in the trip tree.
- Go to the Trip Details tab.
- Change the Carrier to the new carrier - select it from a list of available carriers.
New SU and DL stops at the new carrier location will be added to the trip.
Change a Driver on a Trip
It may be that drivers change after execution has started, perhaps due to sickness. In this case, you may not want to change the driver allocation (which might require resending manifests to third parties, execution systems like C-ePOD or APOD, etc). In this case, if you just want to record the changed driver, you can use the crew to record this:
- Retain the existing driver on the trip.
- Add the name of the new driver in to the Crew field on the trip detail tab.
- Select the comments tab and edit comments to record the stop where the driver was changed.
Notes
Distance and Fuel Units
Please note that distance and fuel units, displayed throughout C-TMS, but specifically on the Planning form, are now controlled within C-TMS via 2 system parameters: GEO_DT_DISTANCE_UNITS and RES_DT_FUEL_UNITS. These are initially set up to only be edited by your implementation team. They will default to "Miles"' and "Litres" respectively if the operation does not request alternative units such as Kilometres and Gallons.
It is assumed that any external system to C-TMS will be configured by to pass data using the correct units.
Break Times
Within C-TMS, when calculating the planned stop times, the system takes into account the legal driver regulations as regards the regular breaks and overnight stops.
This includes an overnight break (stopover or layover) once the driver has exceeded his maximum number of working hours for a day.
The data used within this calculation is configurable at the carrier level.
- Trip Threshold Hours
- Standard Shift Hours
- Overtime Factor
- Work Break Threshold (Hrs)
- Work Break Threshold (Mins)
- Stopover Threshold (Hrs)
- Stopover Threshold (Mins)
- Stopover Duration (Mins)
- Max Shift Hours
- Standard Factor
- Driver Break Threshold (Hrs)
- Driver Break Threshold (Mins)
If not specifically set for the carrier, then the values will default to the database-level system parameters.
- TRM_APPLY_DRIVER_BREAK_RULES - This can be used to switch off this functionality altogether
- TRM_MAX_DRIVING_HOURS - This can be used to default the maximum driving hours for a driver (within a shift) when it has not been specified at the carrier level. This value is compared against the total driving hours for each trip to ensure that the trip does not exceed the maximum shift driving hours permissible for a driver.
- TRM_MAX_SHIFT_HOURS - This can be used to default the maximum shift hours for a driver when it has not been specified at the carrier level. This value is compared against the total hours for each trip to ensure that the trip does not exceed the maximum shift hours permissible for a driver.
The following parameters can be used to default the appropriate values to be used in planned stop time calculations when they have not specified at the carrier level:
- TRM_DFLT_DRV_BREAK_MINS
- TRM_DFLT_MAX_DRV_HRS_WO_BREAK
- TRM_DFLT_MAX_DRV_HRS_WO_STOPOVER
- TRM_DFLT_MAX_WRK_HRS_WO_BREAK
- TRM_DFLT_MAX_WRK_HRS_WO_STOPOVER
- TRM_DFLT_STOPOVER_BREAK_MINS
- TRM_DFLT_WRK_BREAK_MINS
The TRM_MAX_WAIT_TIME parameter is used to optimise the wait time, i.e. Will cause any waiting time incurred at a stop to be moved to end of the preceding stop, if the latter is an RDC.
The MTM_OPTIMISE_WAIT_TIME parameter is used to restrict the amount of time that a driver can wait at a location.
The planned arrival and departure times are then calculated using the driving times between stops and loading/unloading time required at the stop to determine the planned times.
It keeps track of the total time and drive time since the last break and then adds on any necessary breaks (including stop-overs), before calculating the next time, also taking into account any slack time.
These breaks and layovers can be seen on the trip planning form against each stop (depending on the configurable layout - layover) as break time.
They can be manually adjusted, and options exist on the right-click menu to move the stopover position.
- Move Stopover back.
- Reset Stopover.
- Move Stopover Forward.
Wait Times
A planned order may have restrictions on it as to when it can be delivered or collected. CTMS will, by default, plan the departure times of the trip to be flexible, in order to accommodate the least amount of time out of the depot. But if the departure time is fixed from the depot (for example, leaving at 6AM, the first delivery is at 9AM, but the travel time is only half an hour), then wait times occur.
In this case, a 2.5 hour wait time will be accrued against the stop and displayed in the wait time column.
Note that CTMS will always do its best to accommodate order and location delivery times within the plan, which sometimes results in wait times. However, if the planned sequence of stops means that CTMS can't get to the order for collection or delivery, it will still retain the order, but will note that the collection or delivery window has been missed on the stop and order.
Further Configuration
The following system parameters affect this functionality:
| Parameter | Description | Level |
|---|---|---|
| SUGGEST_TRIP | Suggest an appropriate trip for an order | COST_CENTRE |
| GEO_DT_DISTANCE_UNITS | Current distance unit - miles or kilometres | SYSTEM |
| RES_DT_FUEL_UNITS | Current fuel unit - Litres or Gallons | SYSTEM |
| RES_AVAILABILITY_ALLOC | Determines how resources are allocated to a trip. | COST_CENTRE |
| FORMS_DEFAULT_ORDERS_MODULE | Default Orders Form - ORDERS_WIDE, ORDERS or ORD_ENTRY_TARGET | SYSTEM |
| TRIP_ALWAYS_SHOW_EMERGENCY_ORDERS | Emergency Deliveries are always displayed regardless of filter criterion | SYSTEM |
| TRIP_HAZARD_DISPLAYED | Show the Trip hazardous Totals or not. | SYSTEM |
| TRIP_LABELS | Indicates the name of the report to be run from the Print Labels menu option in the trip tree in the Planning screen. | COST_CENTRE |
| CMR_NOTE | Name of the CMR note report | COST_CENTRE |
| CMR_NOTE1 | Name of the CMR note report | COST_CENTRE |
| COMBINED_DOCUMENTS_REPORT | Name of the Combined Documents report. | COST_CENTRE |
| DELIVERY_NOTE | Name of the delivery note report | COST_CENTRE |
| DESPATCH_REPORT | Name of the despatch note report printed from the trip tree | COST_CENTRE |
| LOADING_REPORT | NON Cost centre Loading Report | SYSTEM |
| MANF_REPORT | Indicates the name of the manifest report to be automatically generated when a trip is accepted | COST_CENTRE |
| MANF_REPORT | Driver Manifest Name | COST_CENTRE |
| REP_DELIVERY_DOCS | Name of the Delivery report printed from trip tree | COST_CENTRE |
| SEND_MANF_TO_SUPP | Indicates if the supplier manifest report will be automatically generated when a trip is accepted for the cost centre of the trip being collected. | COST_CENTRE |
| SEND_MANF_TO_SUPP | Indicates if the supplier manifest report will be automatically generated when a trip is accepted for the cost centre of the trip being collected. | CUSTOMER |
| SUPPLIER_MANF | Indicates the name of the supplier manifest report to be automatically generated when a trip is accepted. | COST_CENTRE |
| TRIP_SHEET | Trip Sheet Report | COST_CENTRE |
| TRM_LFS_PRINT_TRIP_POD_POC | Display LFS Trip Sheet POD POC report menu option (Y/N)? | SYSTEM |
| TRM_APPLY_DRIVER_BREAK_RULES | Switches Driver Breaks on or off - Y or N | SYSTEM |
| TRM_MAX_DRIVING_HOURS | Maximum Driving Hours | SYSTEM |
| TRM_MAX_SHIFT_HOURS | Maximum Shift Hours | SYSTEM |
| TRM_DFLT_DRV_BREAK_MINS | Default Driver Break (minutes) | SYSTEM |
| TRM_DFLT_MAX_DRV_HRS_WO_BREAK | Default maximum drive hours without break | SYSTEM |
| TRM_DFLT_MAX_DRV_HRS_WO_STOPOVER | Default maximum drive hours without stopover. | SYSTEM |
| TRM_DFLT_MAX_WRK_HRS_WO_BREAK | Default maximum work hours without break | SYSTEM |
| TRM_DFLT_MAX_WRK_HRS_WO_STOPOVER | Default maximum work hours without stopover. | SYSTEM |
| TRM_DFLT_STOPOVER_BREAK_MINS | Default stopover duration (minutes). | SYSTEM |
| TRM_DFLT_WRK_BREAK_MINS | Default work break duration (minutes) | SYSTEM |
| TRM_MAX_WAIT_TIME | Maximum waiting time at Location (minutes) | COST_CENTRE |
| MTM_OPTIMISE_WAIT_TIME | Should wait time incurred at a stop be moved to end of the preceding stop if the latter is an RDC. | SYSTEM |
| RESET_MANUAL_SCHEDULE | Provides described new menu functionality to allow reset of manual schedule flag and carry forward. | SYSTEM |
| LOOKUP_FOR_ROUTE_CODES | Display lookup button in PLANNING beside Route Code | SYSTEM |
| ALLOW_TRP_DEL_TYPE_UPDATE | Allow Delivery type updates in the planning screen | CARRIER |
