User-Defined Fields: Difference between revisions
(Passive voice) |
m (Minor correction) |
||
| Line 15: | Line 15: | ||
You can use | You can use each of these processes to resolve certain use cases - this guide will highlight some of the requirements UDF the application has been used to fulfill, as well as expanding on how to enter and maintain UDF in general. | ||
UDF is an import part of configuring ''CALIDUS'' ePOD to capture the data required at the right points. In most cases, you can use UDF instead of software changes to achieve the processes your customers require. | UDF is an import part of configuring ''CALIDUS'' ePOD to capture the data required at the right points. In most cases, you can use UDF instead of software changes to achieve the processes your customers require. | ||
Revision as of 13:42, 8 November 2023
You can extend CALIDUS ePOD data capture on the device without application changes through the use of User-Defined Forms and Fields.
The system allows the device to capture complex data at many different stages during the execution of jobs on the device. In many cases, you can use User-Defined Forms to replace more basic configurations already present in CALIDUS ePOD and add much more functionality to these areas, for example, terms and conditions, vehicle defect checks and load metrics.
You can add User-defined Forms (or UDF) at the following stages:
- When entering terms and conditions.
- When confirming items as delivered/collected.
- When confirming products as delivered/collected.
- When arriving at a job.
- Before completion of a job.
- When starting or ending a load.
- Many stages of Service Job processing.
- Exception processing (Cancellation) of Jobs, Items, Products, Services, etc.
You can use each of these processes to resolve certain use cases - this guide will highlight some of the requirements UDF the application has been used to fulfill, as well as expanding on how to enter and maintain UDF in general.
UDF is an import part of configuring CALIDUS ePOD to capture the data required at the right points. In most cases, you can use UDF instead of software changes to achieve the processes your customers require.
UDF is an important part of CALIDUS ePOD - OBS Logistics are always adding features to this already-powerful functionality, ensuring that the application grows with the customer's requirements.
The UDF Configuration Screen
This screen allows you to maintain the UDF (User-Defined Forms and Fields) configurations within the system.
Certain stages of operation of the mobile device application have these UDF configurations attached to them. This configuration extends the data that can be entered on the device and therefore the use of the system. These customer forms can vary from a single field to multiple data entries, and even control additional buttons on the mobile device application.
You can view, create and edit UDF configurations on this screen.
You can filter data by:
- Description.
- Key Type - this defines to what key level the configuration is applied. One of "S" (Site), "J" (Job Group), "P" (Product Group/Model), "V" (Vehicle Type) or "R" (Reason Code).
- Key Value - a text box to select the key value. This may be a job group, product group, etc - all will be matched.
- Config Type - a drop-down list of all the different types of UDF configuration.
Once you have entered the criteria, click Search. The screen will display a table of all the matching data. Any plain text boxes will match data that contains what you enter as the criterion.

UDF Configurations Search Panel and Results table
The results table displays a single line for each configuration found.
The results table shows the following columns:
- UDF ID - a unique identified for the configuration, automatically generated by the system.
- Description - the UDF description.
- Config Type - the type of UDF configuration.
- Key Type - To what key level the configuration is applied. One of "S" (Site), "J" (Job Group), "P" (Product Group/Model), "V" (Vehicle Type) or "R" (Reason Code).
- Key Value - the key value associated to the key type. This may be a site, job group, product group, etc
You can sort the table by column by clicking on the column header - clicking again will reverse the sort sequence.
New UDF Configurations
You can create new UDF configurations by pressing the provided New button at the top of the screen.

New UDF Configuration Pop-up
You can enter the following UDF configuration settings:
- Description - the UDF description, for reference.
- Config Type - a drop-down list of all the different types of UDF configuration. Select from:
- Arrival Terms and Conditions for Collections
- Arrival Terms and Conditions for Deliveries
- Container UDF
- Driver Terms and Conditions for Collections
- Driver Terms and Conditions for Deliveries
- Driver Terms and Conditions for Services
- Job Details
- Load End Metric
- Load Start Metric
- Product UDF
- Service Diagnosis
- Service Info
- Service Post-work
- Service Pre-work
- Terms and Conditions for Collections
- Terms and Conditions for Deliveries
- Terms and Conditions for Services
- Terms and Conditions for Vehicle Checks
- Vehicle Checks
- Job Cancellation
- Container Cancellation
- Container Clause
- Product Cancellation
- Product Quantity Change
- Service Cancellation
- Service Item Cancellation
- Subform
- Service Product Installation
- Service Product Removal
- Service Product – Other Work
- Service Activity
- Key Type - a drop-down list of the key level the configuration is applied. One of "S" (Site), "J" (Job Group), "P" (Product Group/Model), "V" (Vehicle Type) or "R" (Reason Code). Only some values are allowed for the different config types.
- Key Value - a drop-down list of the key values for the key type selected. For example, if this is job group, this drop-down list will show all job groups for the site.
You can enter the following form parameters:
- Name - this may be used on the mobile device application as the title of the screen or form in some instances.
- Required - whether the form is required entry. This affects certain forms, for example Container and Product UDF.
 Note: For job UDF, this will be a drop-down list and will allow configuration of "When Amended", which indicates that the form is only required to be entered when the job is amended i.e. a container has been cancelled or a product quantity has been changed on the job.
For vehicle checks, you can enter the following additional form parameters:
- Frequency (Days) - the number of days between checks being enforced.
- Required at Load End - whether the checks are also prompted for at the end of executing a workload.
- Signature - whether a signature is prompted for after checks are complete.
Once you have entered the basic form details above, you can add fields to a form by clicking the New Field button. Each field you create can have the following parameters:
- Default Field - a drop-down list of default fields in the system. When you select a default field, the ID, label, requirement, type, validation and any items will be entered for you. Note that, if you are changing an existing field, the label and ID will not be changed. This allows you to quickly set up a field and then make any changes to it you wish. This list of default fields is shown at the end of this UDF guide. The list will be filtered to those that are applicable to the type of form you are creating, so, if Load Metrics are being created, only Load level information is available. The device and general fields are always available.
- ID - a unique identifier for the field on the form. This is required to be unique on the form.
- Type - a drop-down list of field types. You can select from:
- Text - a simple in-line text box.
- Numeric - a simple in-line number entry box.
- CheckBox - a check box, starting unset by default, allowing Checked (Tick) or Unchecked (Cross).
- CheckBox List - a grouped list of CheckBox fields.
- Tri-State CheckBox - a check box, starting unset by default, allowing Checked (Tick), Unchecked (Cross) or Not Applicable (N/A).
- Tri-State CheckBox List - a grouped list of Tri-state CheckBox fields.
- Drop-down List - a drop-down list of values.
- Textarea - a larger text box for large text entry, automatically growing in size on the mobile device application (e.g. notes).
- Label - a text label.
- Photo - a photo bar, allowing multiple photos to be taken on the form.
- Button - a button, which can trigger a sub-form. Buttons may not be added to sub-forms.
- Multi-Select Lookup - similar to a check-box list, but the values are derived from a Lookup of data on the device, normally reason codes or service products. You can define the lookup used using the Lookup attribute, which will show when you select this type.
- Product Search - this is a very bespoke field type for looking up a tyre product. The field displays with the part code, manufacturer, size and description, with an ability to search for a tyre using these parameters. If the tyre position is known and the tyre position has been recently inspected, the tyre details will be pre-populated.
- Drop-down List (Lookup) - similar to a Drop-down list, but the values are derived from a Lookup of data on the device, normally reason codes or service products. You can define the lookup used using the Lookup attribute, which will show when you select this type.
- Label - A text label for the field, typically on the left of the field. If this is a grouped checkbox list, this will appear as a title before the individual checks.
- Sub-Label - a smaller piece of text below the main label.
- Group - a text ID which groups fields. Deprecated.
- Post Text - A small text label under the value to be entered. Typically used for UOMs (units of measure).
- Required - a check-box denoting whether a non-blank value must be entered in or selected for the field.
- Action - a drop-down list of actions allowed for this field.
- Validation - A Regular Expression (RegExp) validation string, to validate the entered data on text, numeric or text area fields.
 Warning: This is advanced functionality and should only be attempted with knowledge of Regular Expressions.
 - Conditional - a simple condition for whether the field displays. This is based on the value of a selected field within this UDF form. A simple example is PDASERVICEPRODUCT.EPL_SERVICES_SUPPLIED = "TWINT".
- Comment - tick box, only for Photo types. If checked, this means that a comment is required when taking a photo.
- Default - a drop-down list on default values.
- Keyboard - a drop-down list of keyboards that the device can display when entering the value in the field.
- Default (the default value)
- ASCII
- Decimal
- Name/Phone
- Numeric (Punc) - the default value for Numeric fields
- Numeric
- URL
- Auto-Capitalisation - a drop-down list of how the device automatically upshifts text entry on the device
- None - the default
- All - all characters upshifted
- Sentences - The first character in a sentence is upshifted.
- Words - the first character of every word is upshifted
- Lookup - a drop-down list of lookups that can be used by the device for Multi-Select Lookups and Drop-down List (Lookup) field types.
For Action, this is dependent on the field type. For normal fields, select from:
- None - no actions
- Barcode - displays a barcode button after the label. If clicked, this will start the Camera Barcode Scanner as part of the application, and will place the scanned value into the field value. Note: If the mobile device has a built-in scanner, this action can be ignored - the device scanner can be used to scan the value when the field value is selected (for text and numeric entry fields).
- A list of GS1 Barcode AIs available for text, numeric and text area fields.
- Photo - displays a photo button after the label. If clicked, this will start the camera and allow a photo to be taken linked to the field.
For Button fields, the screen will display a list of available sub-forms to attach to the button.
When you create lists (drop-down, check box, tri-state, these require entry of the options - an items table will be displayed showing the details, allowing you to enter the following:
- Text.
- Value - (Only for DDLs).
- Default - (Only for DDLs).

Drop-Down List UDF Configuration
You can add new items by entering the values in the last row in the table and clicking the Add button.
You can delete existing items by clicking the 'Delete button against that item in the items table.
When you have created your new field, you can save them onto the form by clicking the Update Field button.
![]() Warning: Although you have saved the field onto the form, you have not yet saved the form, so remember to save the whole form after you have created all your fields.
Warning: Although you have saved the field onto the form, you have not yet saved the form, so remember to save the whole form after you have created all your fields.
You can move fields up or down on the form using the buttons provided.
Buttons can be added to the form for service pre- and post-work and pre-job forms. You can do this by clicking the Buttons tab to create them.

UDF Buttons Configuration
Up to 2 buttons can be created based on 3 button types - you select them through the Button Type drop-down list:
- Complete - a button to complete and save all changes. The mobile device will apply validation.
- Cancel - a button to cancel the screen - no changes are saved.
- Ignore - a button to complete and save the form, marking it as ignored. The mobile device will not apply validation.
The details of the button can be added through the following configuration:
- Text - the button label
- Confirm Message - if you set this, when the mobile device user clicks the button, the device will display a confirmation message with the text that you enter here, along with OK and Cancel buttons.
You can save the buttons onto the form using the Update Button button.
![]() Warning: Although you have saved your buttons onto the form, you have not yet saved the form, so remember to save the whole form after you have created all your buttons.
Warning: Although you have saved your buttons onto the form, you have not yet saved the form, so remember to save the whole form after you have created all your buttons.
You can delete buttons from the form by clicking the Delete Button button.
As you edit the UDF form and creating fields and buttons, a preview of the form you are creating will be shown to the right. Remember this is a representation of the basic layout of the form, and is not intended to be absolutely representative of the final mobile device form.
When you have finished entering your form, fields and buttons, you can finally save the for by clicking the Save button provided. You can discard the new UDF configuration by clicking Close or Cancel.
View/Edit UDF Configurations
You can view or edit the configurations by clicking the Select button against the line in the table. The screen will display a pop-up showing all the details of the UDF configuration.

View/Edit UDF Configuration Pop-up
The UDF configuration may be edited by clicking the provided Edit button.
In all ways, editing a form is identical to creating a new form, so follow the guide above for more details.
When you have finished entering your form, fields and buttons, you can finally save the for by clicking the Save button provided. You can discard the new UDF configuration by clicking Close or Cancel.
You can click the Delete button to delete the form - the screen will ask you to confirm before the form is deleted.
Default Fields
Default fields are used to set up a new UDF field or amend an existing UDF quickly.
They come in two main types:
- Data-bound - Data-bound fields are UDF fields that get their value directly from a core CALIDUS ePOD field, like a reference on a job, or the quantity of a product. When the UDF field is changed, the value is also changed in the data field.
- General - general fields are just that - general use. They are there so that you can get going creating fields without having to know everything about the field itself - we have put together a list of many common fields to help you out.
Here we list all the default fields information about how they work and what they are for.
The list is categorised, with all data-bound fields listed first.
The categories are:
- Data-bound - Container - data directly from the container (item) being completed.
- Data-bound - Job - data directly from the job being completed.
- Data-bound - Load - data directly from the load being completed.
- Data-bound - Product - data directly from the product being completed.
- General - general-purpose useful fields.
- General - Contact - general purpose contact fields, like address, post code, email, etc.
- Load End - fields usually used in metrics-gathering information.
- Pallet Network - fields usually used by pallet networks.
- Risk Assessment - risk assessment fields, usually used pre-job, or at arrival to a location.
- Services - fields specific to service jobs.
- Terms and Conditions - usually customer-service related.
- Tipper - fields usually used by tipper or bulk operators.
The list shows the following details:
- Label - the label on the mobile device.
- Validation - whether the field is explicitly validated when the user enters a value, beyond the limits of the type, and what that validation is. Lists and check boxes require no validation. The following are some common validation rules:
- Chars - a limitation of a certain number of any alphanumeric or symbolic characters.
- Numeric with dp - number-related values only i.e. numbers, decimal point, with a limited number of decimal places (dp).
- X-Y - usually a range of values, for example, 1 to 999. Anything outside this range is not allowed.
- Reqd - whether the user must enter a value in the field.
- Type - the basic type, one of
- Textbox - a basic text entry box on a single line.
- Numeric - a basic text entry box on a single line, accepting numbers only.
- Checkbox - a check box that can be ticked or crossed.
- Checkbox List - a list of check boxes, grouped together with a title.
- Tri-state Check - a check box that starts empty, and can then be either ticked, crossed or made "N/A" (not applicable).
- Tri-state Check List - a list of tri-state check boxes, grouped together with a title.
- Text Area - a basic text entry box, allowing greater space for entry over multiple lines.
- Drop-down List - a drop-down list of values.
- Values - if the type is a List of any kind, this defines the values that the user will be able to select of check.
![]() Note: This list is subject to change - default field definitions can be added and removed by the development team.
Note: This list is subject to change - default field definitions can be added and removed by the development team.
| Label | Validation | Reqd | Type | Values |
|---|---|---|---|---|
| Data-bound - Containers | ||||
| Code 1 | 30 chars | Textbox | ||
| Code 2 | 30 chars | Textbox | ||
| Code 3 | 30 chars | Textbox | ||
| Customer Comments (Container) | Textbox | |||
| Data-bound - Job | ||||
| Address Line 1 | 40 chars | Textbox | ||
| Address Line 2 | 40 chars | Textbox | ||
| Address Line 3 | 40 chars | Textbox | ||
| Address Line 4 | 40 chars | Textbox | ||
| Contact Name | 40 chars | Y | Textbox | |
| Customer Name | 50 chars | Textbox | ||
| Customer Reference (Job) | 20 chars | Textbox | ||
| Valid email address | Textbox | |||
| Mileage End (Job) | Numeric with 2dp | Numeric | ||
| Mileage Start (Job) | Numeric with 2dp | Numeric | ||
| Owner Name | 50 chars | Textbox | ||
| Post Code | Valid UK postcode | Y | Textbox | |
| SO Number | 40 chars | Textbox | ||
| Trailer ID (Job) | 20 chars | Y | Textbox | |
| User Notes | Textbox | |||
| Data-bound - Load | ||||
| Load Information | Text Area | |||
| Mileage End (Load) | Numeric with 2dp | Y | Numeric | |
| Mileage Start (Load) | Numeric with 2dp | Numeric | ||
| Route Code | 40 chars | Y | Textbox | |
| Trailer ID (Load) | 20 chars | Y | Textbox | |
| Data-bound - Products | ||||
| Customer Comments (Product) | Textbox | |||
| Customer Reference (Product) | 30 chars | Textbox | ||
| Gross Weight | Numeric with 3dp | Y | Numeric | |
| Position | 0-999 | Y | Numeric | |
| Product Weight | Numeric with 3dp | Y | Numeric | |
| Services - Info | ||||
| Code 1 | 50 characters | Textbox | ||
| Code 2 | 50 characters | Textbox | ||
| Code 3 | 50 characters | Textbox | ||
| Group | 10 characters | Textbox | ||
| Mileage | Numeric with 2dp | Textbox | ||
| Type | 30 characters | Textbox | ||
| Unit Type | 12 characters | Textbox | ||
| Services - Product | ||||
| Authority | 30 characters | Textbox | ||
| Barcode | 30 characters | Textbox | ||
| Casing | 30 characters | Textbox | ||
| Casing Destination | 30 characters | Drop-down List | MajorRepair,Casing Bank,COP Stock,Scrap,Driver | |
| DOT Code | 4 Numeric wwyy | Textbox | ||
| Location | 13 characters | Textbox | ||
| New or Remould | Drop-down List | Remould | ||
| Notes | 255 characters | Text Area | ||
| Pressure | 5 Numeric with 1dp | Numeric | ||
| Quantity | 8 Numeric | Textbox | ||
| Regroove | Checkbox | |||
| Removal Reason | 12 characters | Drop-down List | ||
| Return to SE | 30 characters | Checkbox | ||
| Serial No | 30 characters | Textbox | ||
| Services Supplied | 255 characters | Checkbox List | ||
| Torque | 10 Numeric | Numeric | ||
| Tread Depth | 3 numeric with 1dp | Numeric | ||
| Work Type | 30 characters | Textbox | ||
| Work Types | 30 characters | Drop-down List | ||
| Services - Activity | ||||
| Action | 30 characters | Drop-down List | ||
| Authority | 30 characters | Textbox | ||
| Comments | 255 characters | Text Area | ||
| Complete | Checkbox | |||
| New or Remould | Drop-down List | New,Remould | ||
| Pressure | 5 numeric with 1dp | Numeric | ||
| Quantity | 8 Numeric | Numeric | ||
| Regroove | Checkbox | |||
| Services - Completion | ||||
| Check 1 | Checkbox | |||
| Check 2 | Checkbox | |||
| Check 3 | Checkbox | |||
| Customer Damage | Checkbox | |||
| Diagnosis | Text Area | |||
| Fault | 100 characters | Textbox | ||
| Ref 1 | 10 characters | Textbox | ||
| Ref 2 | 10 characters | Textbox | ||
| Ref 3 | 10 characters | Textbox | ||
| Ref 4 | 10 characters | Textbox | ||
| Ref Narrative | 100 characters | Text Area | ||
| Spec Required | Checkbox | |||
| VNOS | Checkbox | |||
| Device | ||||
| Device Country | Textbox | |||
| Device Current Date (DD/MM/YYY | Textbox | |||
| Device Current Time (HH:MM) | Textbox | |||
| Device GPS | Textbox | |||
| Device ID | Textbox | |||
| Device Language | Textbox | |||
| Device Locale | Textbox | |||
| Device Timezone | Textbox | |||
| Device Type | Textbox | |||
| General | ||||
| Card Number | Textbox | |||
| Comments | Text Area | |||
| Lot Number | 20 numeric | Textbox | ||
| Other | Text Area | |||
| Report | Text Area | |||
| Return Number | Numeric | |||
| Waiting Time | Numeric | |||
| General - Contact | ||||
| Door Number | Textbox | |||
| Valid email address | Textbox | |||
| Phone No | Valid UK phone no | Textbox | ||
| Postcode | Textbox | |||
| Title | Drop-down List | Mr,Mrs,Ms,Miss,Dr | ||
| Load End | ||||
| Fuel Litres | Numeric | |||
| Parking Ticket Number | Numeric | |||
| Post-Load Checks | Checkbox | Delivery Notes Signed/Printed Full Uniform Worn Failures phoned in Checked back at depot Equipment Returned | ||
| Pallet Networks | ||||
| Return Pallets | Numeric | |||
| Unload Pallets | Numeric | |||
| Risk Assessment | ||||
| Hazards | Checkbox | Existing live pipework, services and plant Adverse weather conditions Chemicals/Substances present in existing System Transport of Items to and from site Tripping/Slipping Fall from height (platform) Transport of vehicles around site Mechanical lifting and moving Use of Substances hazardous to health Use of portable electrical tools Ventilation Contact with hot and cold surfaces Fire (including static electricity) Storage/Stacking Falling from height (ladder) Solitary working | ||
| Person Responsible for Safety | Textbox | |||
| Risk Assessment | Checkbox | Low,Medium,High | ||
| Risk Control | Checkbox | Boots Hard Hat Hi Vis Chemical Boots Goggles Glasses Gloves Chemical Gloves Harness Lanyard Trolley Chemical Suit Ear Defenders | ||
| Services | ||||
| Number of Engineers | Numeric | |||
| Terms and Conditions | ||||
| Likely to use this service again? | Drop-down List | Yes No Maybe | ||
| Suggestions | Text Area | |||
| Tipper | ||||
| Cleaning | Drop-down List | Swept Washed Steamed Disinfected | ||
| Vehicle Type | Drop-down List | 27T | ||
| WAF No | Textbox | |||
| Weighbridge Number | 1-5 digit number, not 0 | Numeric | ||
| Weighbridge Weight | Numeric | |||
UDF Use Cases
Additional Job Details
Jobs of all kinds are subject to the same process in CALIDUS ePOD:
- A list of jobs.
- Seeing the details of a job.
- Starting and Arriving at a job.
- Capturing the details of a job.
- Completing the job.
The standard configuration of C-ePOD allows for the deep configuration of which parts of the process above are used, how the jobs themselves are actioned and how the jobs are completed.
However, in some cases, the data required to be captured at each stage of the job is subject to the particular requirements of the customer's processes themselves.
This section focuses on the arrival and processing of the job itself, and where you can configure additional data capture on the job. Later sections will deal with specific configuration regarding products, items (containers) and services.
You can configure the following areas to have additional data capture through UDF:
- Pre-Job - after arrival but before processing the details of the job.
- Job Details - during execution of the job itself, to be entered before the job is completed.
You can configure these against:
- the site.
- the job group.
After the driver arrives (or when the driver starts the job if Job Arrival is not enabled), you can configure the application for some post-arrival checks.
The use cases for this are:
- Scanning of a location barcode to confirm arrival at the correct location.
- Weighbridge weight and number.
- Arrival photographs.
- Gift Aid registration.
In these cases, you can add specific buttons to these forms, so that the application can validate the data entry. In this case, the system can display alerts and confirmations, allowing the system to be widely configured.
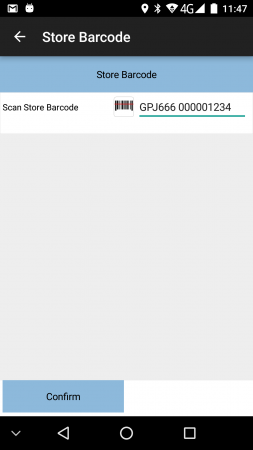
Pre-work - location barcode
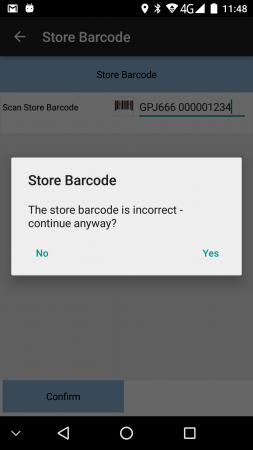
Pre-work - Validation


More details on the operation of this process can be found here: PDA Job Details.
Once the driver starts a job, the first tab of the device contains information on the job, whereas the other tabs are used for the standard completion of the job. Although primarily used as a display area for the job details, you can configure additional job-level data capture here. The user can enter this any time before the job is marked as completed. If you configure the forms a required or the form has required fields in the UDF, the device will prompt the user to enter the details before completion.
Use cases for additional job details:
- Capturing ad-hoc items collected/delivered. For example, a list of pallet types that may be collected at the location for return, with a quantity returned for each type.
- Weighbridge weight and number.
- Photographs taken before or during completion of the job. Furthermore, you can enhance this process by making photos required (where at least one photograph must be taken) or having a required check-box associated with the job details, for example with the text "Have all required photos been taken?"
You can base the requirement to enter these additional details on whether the job is completed without any issues. So, in the case where some items could not be collected or delivered, you can configure it so that the UDF must be entered then, but if the job is completed fully, the user need not enter it. This is primarily used when entering failed delivery, collection checks or feedback.
Furthermore, if CALIDUS ePOD is linked to an external system providing the jobs, you can pre-set Job Details UDF in the jobs when the jobs are sent to C-ePOD. This configuration is used in preference to any Job Details UDF configured in the system. Again, the use here is unlimited, but has been used in the past for the following:
- Displaying summaries of items types being delivered/collected.
- Displaying summaries of additional materials to be delivered (e.g. dry/wet ice, packaging).
- Displaying equipment required in order to complete this job.
- Overriding configuration in very specific jobs.
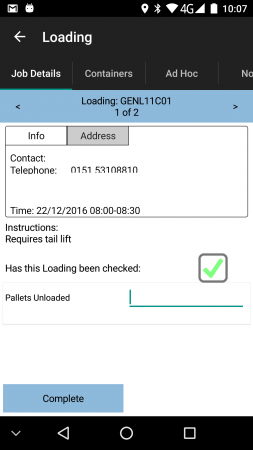
Collection Capturing Pallets Unloaded
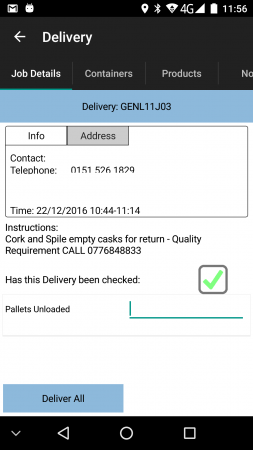
Delivery Capturing Pallets Unloaded


More details on the operation of this process can be found here: PDA Collection and PDA Delivery.
Terms And Conditions
CALIDUS ePOD features an ability to define terms and conditions (T&Cs) and up to 3 check-boxes at the point of customer signature on any job of a particular job group. For many customers, this is perfectly reasonable. If you use UDF however, T&Cs can be greatly expanded and as much data can be captured as is desired.
The application displays T&Cs whenever a signature is captured, on the T&Cs tab.
Terms and conditions can be defined for the following types of signature:
- Customer signatures:
- for collections.
- for deliveries.
- for services.
- Arrival at collections.
- Arrival at deliveries.
- Driver signatures:
- for collections.
- for deliveries.
- for services.
- for jobs at unmanned locations.
- for vehicle defect checks.
These T&Cs may be configured against:
- the site
- the job group (except for vehicle defect checks)
When specified, the application uses these UDF T&Cs in preference to anything configured against the job group. So:
- If you have configured UDF against the job group, this will be used.
- If you have configured UDF against the site, this will be used.
- If you have not configured any UDF, the standard job group configuration will be used.
The UDF configuration of Terms and Conditions is far more flexible than the standard mechanism.
For example:
- UDF is the only way to configure Driver T&Cs.
- A site-level UDF configuration can set the generic T&Cs, with these being over-ridden for certain job groups by configuring specific UDF just for those exceptional job groups.
- Collections, deliveries and services may require different T&Cs - UDF can control this without having to manipulate job groups against jobs.
- Using job groups against jobs could mean that different T&Cs for one type of service could differ to T&Cs of another service.
In most cases, terms and conditions are simply text to be displayed - in this case, you can configure label fields to enter the paragraphs of the terms.
In the case where you require some data entry, standard T&Cs allows for up to 3 checkboxes to be defined - you can't specify any other types of fields (for example, drop-down lists, text entry, etc). UDF allows all this and more:
- All types of fields may be defined, for example, text or numeric entry, check boxes, drop-down lists and even photos can be added.
- You can enable validation to ensure the signatory isn't entering invalid data.
- You can pre-set values in the fields, for example, pre-checking a box for the signatory.
- You can require fields to be entered, for example, "Check this box to agree to the T&Cs above" - not checking the box means that the signature cannot be completed.
![]() Note: At this time, photos may not be taken within Signatures. If the T&Cs is configured to have photos, the signature screen will simply display the text of the label, without the facility to enter the photos themselves.
Note: At this time, photos may not be taken within Signatures. If the T&Cs is configured to have photos, the signature screen will simply display the text of the label, without the facility to enter the photos themselves.
Use cases for data entry in T&Cs:
- Cash payments.
- Email address capture for customer services/promotional material.
- Acceptance of terms and conditions.
- Data capture by the driver (for example, a number of empty pallets picked up, payment received, demurrage, gift aid ID, etc).
- Exit weighbridge weight and number.
- Gift Aid registration.
As mentioned above, you can only configure driver T&Cs through UDF. This can then be used for many different purposes, for example:
- Reminders to drivers of their responsibilities to the company and/or the customer.
- Unmanned location information.
You can configure the mobile device application as standard to require driver or customer signatures upon arrival (with pre-job signatures). Again, a you can configure a single set of T&Cs for these signatures as standard. However, using UDF, you can make these more complex (as shown above in normal signatures) and specific to the driver or customer, where previously you couldn't control this.
Use cases for this functionality are:
- Site Waiver documentation.
- Gatehouse data capture, for example, weighbridge.
- Capturing demurrage time.
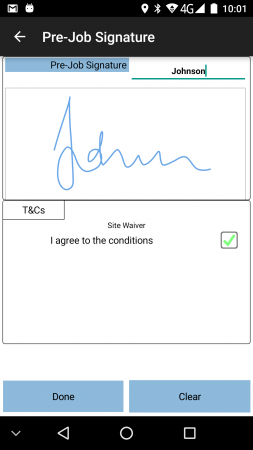
Pre-job Signature
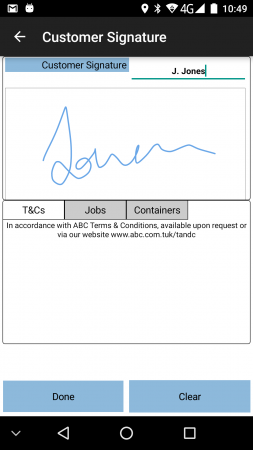
Customer Signature
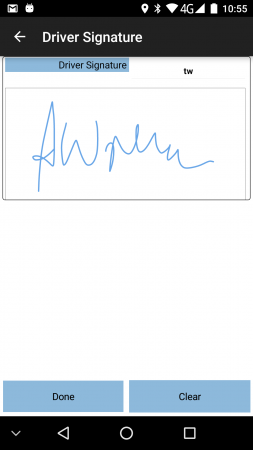
Driver Signature


More details on the operation of this process can be found here: PDA Job Confirmation.
Load Metrics
You can configure load start and end metrics without UDF - in this case, the device will display a standard start/end load message and prompt for ODO readings.
However, there are instances where this start and end of load can be used for much more - UDF configuration of the load start and end metrics pop-up allows the system to be configured to capture much more information.
The Job List screen displays and prompts for entry of load metrics through a pop-up screen.
The application prompts for load start metrics whenever a load is picked up by a user on a device. If the system automatically allocates the load, then the load start metrics will appear as soon as the load is on the device. If the driver has to accept the load before it is allocated, the application will prompt for the load start metrics after the load is accepted.
The application prompts for load end metrics at the end of a load (when the driver has completed all jobs.
The application will not prompt for metrics (start or end) if they have already been filled in.
You can only configure load start and end metrics against the Site.
Use cases for load start metrics:
- Driver equipment requirements.
- Driver reminders.
- ODO readings.
- Arrival/departure weight.
- Driver debrief information (Q&A, accrued costs, fuel drawn, receipts, etc)
- Trailer/seals capture.
Importantly, UDF at Load Metrics can be data-bound, meaning that, even though this is captured as UDF, it can still update the standard C-ePOD data fields, so that customers relying on these standard data elements are unaffected by extending the data entry at load start and end metrics. Specifically, this is used here to:
- Set the trailer on the Load.
- Set the ODO start and end on the Load.
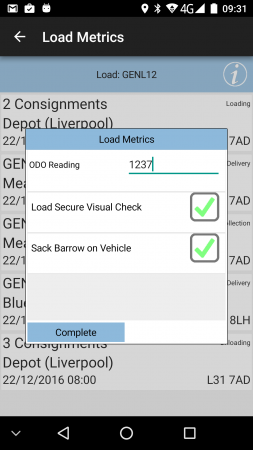
Start Metrics

More details on the operation of this process can be found here: PDA Job List and PDA Job Confirmation.
Service Jobs
Service jobs can consist of the following sections, in addition to the normal job-level processing:
- Info - the key information about the item being worked on.
- Pre-work - optional information required to be entered before the item is worked on.
- Activities - the activities undertaken.
- Installed Products.
- Returned Products.
- MC Refs - IDs or references of the item being worked on.
- Diagnosis - work completion notes and data.
- Post-work - optional information required to be entered after the item has been worked on.
Each of these process steps can be enabled or disabled as standard. The key fields on the Info tab can be modified as standard through the style of the device.
However, UDF can also be configured to enter additional information at the following stages of the process:
- Pre-work.
- Info.
- Diagnosis.
- Post-work.
You can configure these against:
- the Site.
- the job group.
- the product group - the type of item being worked on.
Info UDF is the most flexible when combined with product group entry. For example, you can configure UDF so that, once a particular product type is identified, the device can prompt for additional information. This has been used in the past as follows:
- Garden furniture, determining size, radius, seats, etc.
- Gas burner make/model, determining parts to be used, sub-identifiers being entered.
- Vehicle type and additional information (VIN, SIM, Reg, etc).
Info UDF is added to the Info tab for entry, below any key fields configured for the style of the system.
Pre- and post-work checks are optional and again you can configure them by the product type. The driver can start pre- and post-work checks (if they are configured for the system) by clicking on the provided button on the Info (pre-work) and diagnosis (post-work) tabs.
Use Cases for pre/post-work checks:
- Work permits.
- Site safety checks.
- Installation pre-tests for specific products.
- Installation tests for specific products.
- Customer feedback.
Diagnosis UDF is useful for straight data capture in addition to the standard information. This has been used in the past solely for additional notes entry but could be used to capture any information required for the customer's process.
Diagnosis UDF is added to the Diagnosis tab for entry, beneath any standard fields configured for the style of the system.
More details on the operation of this process can be found here: PDA Service.
Vehicle Defect Checks
You configure vehicle defect checks through UDF. In earlier versions of the product, vehicle checks were configured using a bespoke screen but worked as a (feature-limited) sub-set of UDF. With the switch to full UDF, vehicle defect checks now benefit from the new features of UDF, like multiple photos at any stage.
Vehicle defect checks UDF differs slightly to normal UDF, in that it may be configured with the following additional parameters on the form:
- At End - vehicle checks are instigated at log on (if required), and at the end of every load.
- Signature Required.
- Frequency - in days that the checks must be performed.
The existing Required parameter indicates whether vehicle checks may be postponed rather than being forced to be completed.
The application prompts for vehicle defect checks at the following stages:
- When the driver logs in to the application and that driver is different to the last driver that checked that vehicle, or the check has not taken place in the number of days specified in the duration.
- At the end of a load, if configured to do so.
- When changing vehicles on a load.
- At any time when an ad-hoc vehicle defect check is started, from the menu on the Job List screen.
You can configure these against:
- the site.
- the vehicle description.
In this way, you can configure the system with a standard defect check sheet and a specific check sheet for specific vehicle types, as determined by the description of the vehicle. For example, a Luton truck may have different check requirements to a 7.5T flat, as compared to the same with a tail lift.
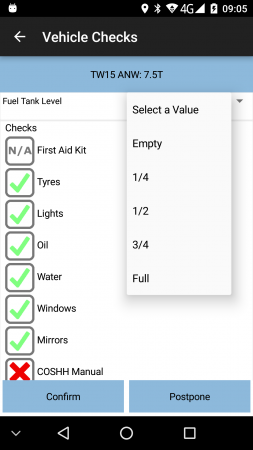
Vehicle Checks

More details on the operation of this process can be found here: PDA Vehicle Checks.
Exception Management
You can configure UDF for entry whenever an exception to the normal process takes place, to capture some more data or provide instructions to the driver.
The exception types are:
- Job cancellation.
- Container cancellation.
- Container clause.
- Product cancellation.
- Product quantity change.
- Service cancellation.
- Service item cancellation.
You can configure these against:
- the site.
- the job group.
- a reason code
Once the driver has entered the reason code, and presses the OK button, if UDF is required, a screen will pop up to enter the details.
![]() Note: The cancellation UDF entered is sent back in the standard UDF fields as follows:
Note: The cancellation UDF entered is sent back in the standard UDF fields as follows:
- For job cancellation, the UDF is saved in the Job UDF field (EPOD_JOB.EPL_UDF_JOBDETS)
- For container cancellation, the UDF is saved in the Container UDF field (EPOD_CONTAINER.EPL_UDF)
- For container clause, the UDF is saved in the Container UDF field (EPOD_CONTAINER.EPL_UDF)
- For product cancellation, the UDF is saved in the Product UDF field (EPOD_PRODUCT.EPL_UDF)
- For product quantity change, the UDF is saved in the Product UDF field (EPOD_PRODUCT.EPL_UDF)
- For service cancellation, the UDF is saved in the Job UDF field (EPOD_JOB.EPL_UDF_JOBDETS)
- For service item cancellation, the UDF is saved in the Service Diagnosis UDF field (EPOD_SERVICE.EPL_UDF_DIAGNOSIS)
Use cases for this functionality are:
- capturing additional information per reason code when a job is cancelled, for example, RTA, customer not in, etc.
- capturing driver notes when a job is cancelled.
- capturing information against a non-delivered item or product.
- displaying additional instructions to the driver.
- EPOD CancellationUDF1.PNG
Cancellation UDF
More details on the operation of this process can be found here: PDA Exception.
Confirming Delivery/Collection
In standard processing, the driver confirms items as delivered/collected or cancelled - there is no additional data entry. The driver can confirm products as delivered/collected fully, confirmed as delivered/collected short or over, or cancelled.
When the driver delivers or collects items or products, your process may required additional information to be entered against that item or product. The UDF system allows for this to be configured.
After a driver confirms an item or product, if there is a UDF configuration, the screen will prompt for it when confirmed. The driver can also enter this manually before confirmation by long-pressing against the line and selecting the UDF form title from the pop-up action list.
If an item is a container of products, and the system is configured to do so, the products will be confirmed, then the container confirmed, at which point the container UDF will be prompted for.
![]() Note: If an item or product is subsequently cancelled after UDF entry, the UDF entered is preserved.
Note: If an item or product is subsequently cancelled after UDF entry, the UDF entered is preserved.
You can configure UDF:
- Containers (items).
- Products.
You can configure these against:
- the site.
- the job group.
- the product type (for product UDF).
![]() Note: UDF is not compatible with Deliver All functionality - UDF will not be prompted for items or products that are confirmed as part of this functionality.
Note: UDF is not compatible with Deliver All functionality - UDF will not be prompted for items or products that are confirmed as part of this functionality.
Use cases for this functionality:
- Vehicle defect check against vehicles collected by the carrier.
- Cone test against Mortar products when delivered.
- Lot/batch capture against the collected item.
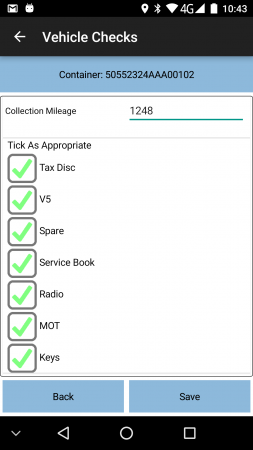
Container UDF
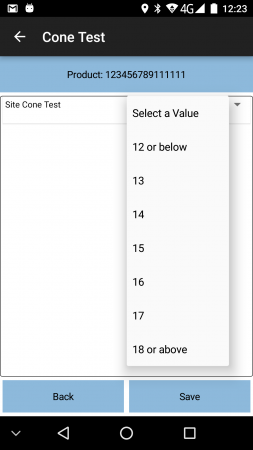
Product UDF


More details on the operation of this process can be found here: PDA Collection and PDA Delivery.
Sub-Forms
Sub-forms are in a category by themselves. They aren't linked to any particular process, but can be used on any other UDF form, by adding a button linked to this form.
Its use cases are predominantly anywhere where there is a lot of data to be entered and only a small amount of space - sub-forms always display on the device in a full screen, triggered when the driver presses the button that links to this sub-form.
Use cases:
- Optional or required form entry at any stage.
- Specifically, Gift Aid Declaration at customer signature.