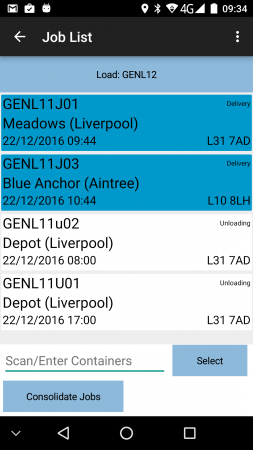
PDA Job List
This screen shows all the jobs on the Load (worklist) that has been assigned to the user.
If the system has been configured for Metric Entry, and a Load is started for the first time on this device, the device will prompt for metrics entry. At its most basic, this screen will prompt for the Odometer reading at the start of the load. however, this Metrics pop-up may be configured to ask for any data through the configuration of user-defined fields (UDF).
Metrics may also be prompted when the last job on the load is complete, at its most basic requesting that this is entered only when the driver has returned to base.
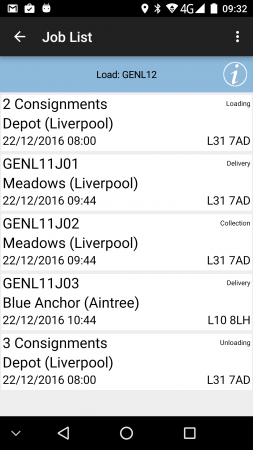
Job list
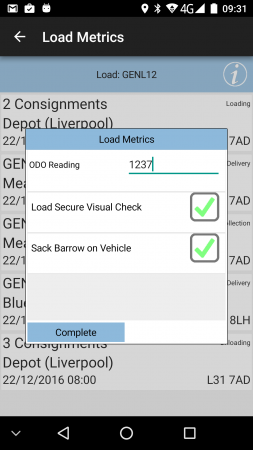
Load Metrics


![]() Note: Typically, the application is configured to automatically start a load when it is displayed on the device. This can be configured (through a Site configuration item "Auto-start Load") so that the load can be downloaded onto the device, but not automatically started. In this case, a Start Load button is provided to start the load, which will at that time prompt for any configured Load Metrics, and inform the system that this load is now in progress.
Note: Typically, the application is configured to automatically start a load when it is displayed on the device. This can be configured (through a Site configuration item "Auto-start Load") so that the load can be downloaded onto the device, but not automatically started. In this case, a Start Load button is provided to start the load, which will at that time prompt for any configured Load Metrics, and inform the system that this load is now in progress.
![]() Note: If this workload is linked to a warehouse load and that warehouse load is not yet completed, the application can be configured to prevent starting the load until that linked load is completed.
Note: If this workload is linked to a warehouse load and that warehouse load is not yet completed, the application can be configured to prevent starting the load until that linked load is completed.
The screen displays a list of all the jobs, containing:
- Job Status (through background or border colour).
- Job Reference - configured to be one of the 5 references available for the job. The system will be configured to display the most appropriate job reference on this screen (and throughout the whole application).
- Job ID - a unique identity of this particular job, assigned by the system when the job is created.
- Job Code - typically the transport or general service reference for the job, which may be shared between any collections or deliveries of items for the customer.
- Customer Reference - any customer reference associated with the transport reference.
- SO Reference - a Sales Order reference.
- External Reference - any external reference provided with the job when created.
- Job Type, one of:
- S - Service.
- C - Collection (and Loading).
- D - Delivery (and Unloading).
- Planned Start/End Date/Time - typically this is the planned arrival time. This can be configured to show the range of start to end time.
- Job Sequence - the planned sequence of the job on the load.
- Customer Name.
- Postcode.
- Container and Product Counts (for Collections/Deliveries).
- Total product weight and total unique product count.
- For Services jobs:
- Service Type - if there is no service itemfor a service, this defaults to "Fleet Inspection"
- Vehicle ID
The layout of the job list can be configured through the style chosen in the system configuration screen.
By default, only all outstanding (i.e. incomplete, pending) jobs on the workload will be shown. This can be changed by switching modes to Show All Jobs from the menu.
If configured, Return to Base or Return to Depot jobs may also be displayed. In the case where jobs or items on jobs are cancelled, or unplanned Ad Hoc Collections are created by the driver, the job list may show a Return to Base job, which will contain all of these non-delivered or collected items. These jobs can be easily recognised, as they typically begin with "RTB" or "RTD".
The Load Information can also be displayed using the Info icon on the top right of the screen, and also through the menu. Note that, in Landscape orientation, this information is already visible. The pop-up Load Information displays:
- The total number of jobs on the load
- The driver or engineer name
- The selected vehicle
- The planned start and end date and time of the load.
- Whether the load is ready or not (for warehouse loads).
- For WEBFLEET PRO devices, this screen can be configured to display a button which, when clicked, will switch the device to display the WEBFLEET orders list.
- Any information required when first receiving the load. Note that, if this is the case, this information is automatically displayed upon starting the load.
The Load Information pop-up can be removed by pressing the Info icon again.
If the jobs have been consolidated together for one location (for example, all Loading jobs at the depot may be consolidated together for loading as one job), these will appear as 1 row on this job list, showing that there are multiple consignments that require completing together. The details of the individual jobs can be seen in the Job Details screen, following.
Depending on the system style chosen, the screen may display the status of the jobs on the load through a coloured outline, as follows:
- Red - Cancelled
- Green - Completed
- Blue - Completed (with amendments)
- Yellow - In Progress
- None - Pending/Incomplete
This status is also displayed prominently in the Job Details screen.
Jobs are shown in a sequence derived from:
- The Sequence provided when the job was created. Any jobs with a zero on blank sequence will be shown at the end.
- The Planned Start Date and Time.
- The Job Type - deliveries or services at this location first, then vehicle swaps (if configured), then collections.
![]() Note: Although all jobs can be viewed at any time, the Job Details screen can be configured to prevent users from starting the jobs. See the Job Details screen for more information on this.
Note: Although all jobs can be viewed at any time, the Job Details screen can be configured to prevent users from starting the jobs. See the Job Details screen for more information on this.
Long-pressing against the line will display some options from a pop-up menu:
- Details - show the Job Details screen.
- Cancel - the selected job or jobs will be cancelled. The application will display an Exception screen and prompt for entry of a reason code indicating why this job was cancelled.
- Group Jobs Together - if configured for Consolidation, this option allows the selected job to be quickly grouped with another - see Consolidation/Deconsolidation for details.
- Break Group - if configured and the selected row is a consolidated group of jobs, this option will break the group back into individual jobs and refresh the job list.
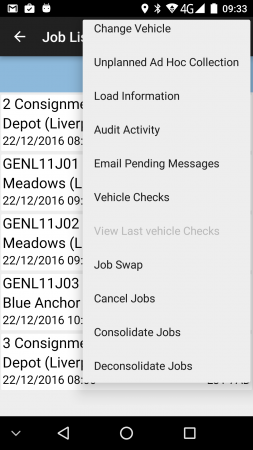
The Menu button can be used here to allow the following options:
- Refresh Load - Forces a check with the server to check that the workload is up to date. This can also be achieved quickly by long-pressing on the Load label at the top of the Job List.
- Show All/Outstanding Jobs - this option toggles between showing all or only incomplete jobs.
- Log Out/Re-logon - use this to close this screen and return to the Login screen.
- Change Vehicle - Close this screen and return to the Login screen - only the Vehicle may be changed.
- Unplanned Ad Hoc Collection - If the system is configured for this, create and start an Unplanned Ad Hoc Collection from the last location visited.
- Load Information - display the load information pop-up screen.
- Vehicle Checks - complete the configured vehicle defect checks at any time using this option.
- View Last Vehicle Checks - view the last vehicle defect checks completed at any time using this option.
- Job Swap - If transferal of jobs from user to another is configured to be allowed, this option will start the process of transferring jobs.
- Cancel Jobs - this option allows many jobs to be cancelled in bulk.
- Consolidate/Deconsolidate Jobs - if consolidation is configured for the site, these options will start the process of manually consolidating or deconsolidating jobs.
There are also some bug-reporting options available on this pop-up menu, which may be asked to be used from time to time by the OBSL or client support staff:
- Audit Activity - the application writes many informational messages to help find issues with the application. If requested by the OBSL Support Team, this option can be used to view and email this auditing data to the support team, to help resolve issues with the mobile device application. See the Audit Activity screen for details on this function.
- Email Pending Messages - if the system is not correctly receiving data from the device, this option can be used to email all the data to the OBSL Support Team, so that it can be manually added. This option will open the email client on the device and attach the pending data automatically.
 Warning: The pending messages on the device will be cleared when this option is selected, so ensure that the email is sent, or important data may be lost.
Pressing the Back button or the Return button in the top-left of the application will prompt for exit options:
- Yes - Exit the application.
- No - Stay in this screen
- Log Out - Logs the current user out of the application and returns to the login screen.
If you attempt to exit the application while there are still pending messages remaining to be sent back to the server application, the application will prompt you to wait for the messages to be sent back.
The application will display a pop-up window showing the progress of the outstanding pending messages which the system will attempt to send immediately. Once all of the pending messages have been processed the application will exit. If the outstanding pending messages have not been sent after a short interval, a warning message will be displayed offering the option to exit the application anyway. This allows you exit despite the fact that there are outstanding pending messages. ![]() Note: You should inform your manager before choosing this option.
Note: You should inform your manager before choosing this option.
Unplanned Ad Hoc Collection
If the system is configured for this, the menu option will create and start an Unplanned Ad Hoc Collection from the last location visited. If a location has not been visited yet, or the last location visited was a depot (loading/unloading stop), unplanned collections will not be allowed. If allowed, a job will be created and added to the Job List, and the job will be automatically shown in the Job Details screen, marked as started.
If configured, the device will also ask the user whether an Unplanned Ad Hoc collection is required after completing all jobs at an address.
Unplanned Ad Hoc collections that have been generated in this way are easily recognisable, as the Job Code will always begin "AHC".
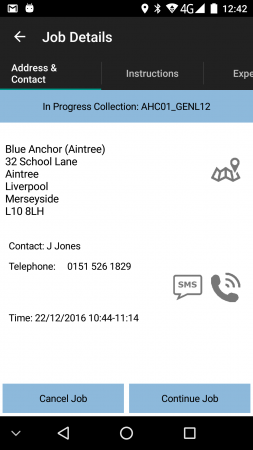
A generated Ad Hoc Collection
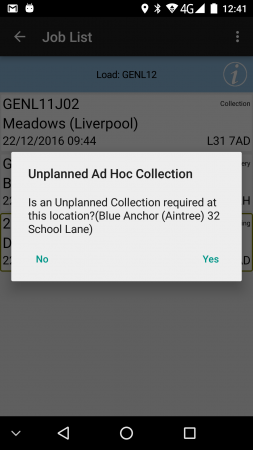
Prompt to create an Ad Hoc Collection


Job Swap
A user that has been provided a load can swap jobs from another user's load - this is available from the menu on the Job List screen.
Job Swap menu from Job List
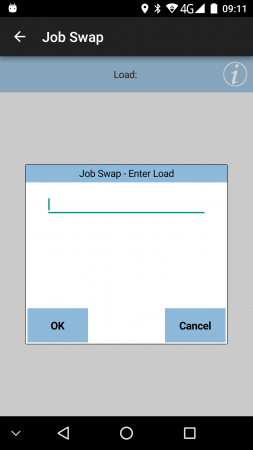
Job Swap - Enter Swap Load


The user will then be prompted to enter the Load from which the jobs are being swapped.
![]() Note: A user who has not been provided a Load can swap jobs from another driver's load - see New Load/Job Swap for details of this process.
Note: A user who has not been provided a Load can swap jobs from another driver's load - see New Load/Job Swap for details of this process.
The device will display a list of jobs from the indicated load.
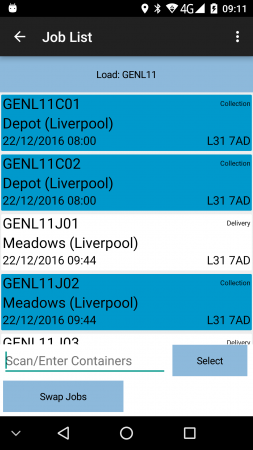
Job Swap List

The user can select the jobs to be swapped, or can enter a container ID to select the job delivering that container. ![]() Note: The application's in-built scanner function can be activated to scan container barcodes by long-pressing on the text field.
Note: The application's in-built scanner function can be activated to scan container barcodes by long-pressing on the text field.
Once all jobs have been selected for swapping, the user will click Swap Jobs. This will copy the jobs from one load to the other. For Delivery jobs, this will create a Collection jobs on the driver's load. These must be completed as normal collections to indicate that all the items have been swapped correctly.
The two loads will be updated in the Admin system to show that the jobs have been swapped.
Swapped jobs (deliveries or collections) will be completed as normal jobs, as shown in the following sections.
Consolidation/Deconsolidation
If configured, Jobs may be consolidated together by the user.
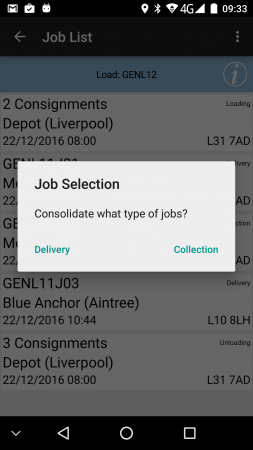
Select Job Type
Consolidating jobs


Jobs can be consolidated together by:
- long-pressing a job and selecting Group Jobs Together.
- pressing the menu and choosing Consolidate Jobs.
Only jobs of the same type (collections or deliveries) may be consolidated together. Services may not be consolidated. If the workload contains collection and delivery jobs, the application will request the user to select which types of jobs are being consolidated from a pop-up request.
Once selected, the job list will display all the jobs available to be consolidated. In order to consolidate jobs, each job must be selected from the list by pressing on it, or entering a container ID from the job to be consolidated. ![]() Note: The application's in-built scanner function can be activated to scan container barcodes by long-pressing on the text field.
Note: The application's in-built scanner function can be activated to scan container barcodes by long-pressing on the text field.
Once selected, the job will be highlighted on the job list. If consolidation is started by using the Group Jobs Together option from a job, this job will already be highlighted on the list.
Once more than 1 job is selected, the Consolidate Jobs button will be available - clicking this will consolidate the selected jobs together, and the job list will be re-displayed, showing the jobs as a single consolidated row.
![]() Note: It is at the user's discretion as to which jobs are consolidated together - the application will not make any checks against the address or contact information.
Note: It is at the user's discretion as to which jobs are consolidated together - the application will not make any checks against the address or contact information.
Consolidated jobs will be delivered or collected together, acting as a single job, but allowing the user to see the information of each consolidated job.
Consolidations may be broken into their component jobs by:
- long-pressing a consolidated row and selecting Break Group.
- pressing the menu and choosing Deconsolidate Jobs.
![]() Note: Jobs may be also deconsolidated during the collection and delivery process, through the options available there.
Note: Jobs may be also deconsolidated during the collection and delivery process, through the options available there.
If the Break Group option is selected, the selected consolidated row will be immediately broken into its component jobs and the job list re-displayed.
If the Deconsolidate Jobs option is selected, a list of all jobs that are consolidated on the workload will be displayed. Each job to be broken out may be selected individually by either selecting the job from the list, or entering a container ID from the job to be consolidated. ![]() Note: The application's in-built scanner function can be activated to scan container barcodes by long-pressing on the text field.
Note: The application's in-built scanner function can be activated to scan container barcodes by long-pressing on the text field.
Once selected, the job will be highlighted on the job list.
When at least 1 job is selected, the Deconsolidate Jobs button will be available - clicking this will deconsolidate the selected jobs, and the job list will be re-displayed.
Cancel Jobs
This menu option allows many jobs to be cancelled in bulk.
Once selected, the job list will display all the jobs available to be cancelled. Each job must be selected from the list by pressing on it, or entering a container ID from the job to be consolidated. ![]() Note: The application's in-built scanner function can be activated to scan container barcodes by long-pressing on the text field.
Note: The application's in-built scanner function can be activated to scan container barcodes by long-pressing on the text field.

Selecting jobs to Cancel

Once selected, the job will be highlighted on the job list.
When at least 1 job is selected, the Cancel Jobs button will be available - clicking this will display an Exception screen and prompt for entry of a reason code indicating why this job was cancelled.