Access Control / User Maintenance: Difference between revisions
No edit summary |
m (Minor formatting change) |
||
| (50 intermediate revisions by 4 users not shown) | |||
| Line 1: | Line 1: | ||
This screen allows an Administrator to create a Menu structure at a Group Level. This allows a user to be associated to a group, which will give them enough visibility (screens, tabs) for them to perform their daily duties. Other functions can also be performed using this screen such as:- | |||
* Creating New Users. | |||
* Creating multiple profiles for a user. | |||
* Creating and amending new Groups. | |||
* Editing User Profiles. | |||
* Changing the passwords of Users. | |||
All these options will be explained in more detail below. | |||
== | == Accessing the Screen == | ||
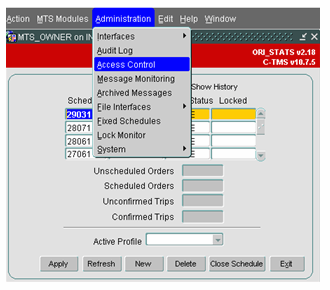
To gain access to the screen you must be an Administrator. A Standard user will not have visible of this menu option. It can be found by selecting the 'Administration' option followed by 'Access Control'.<center> | |||
[[Image:ctrl_1.png]] | |||
</center> | |||
==Access Control Main screen== | |||
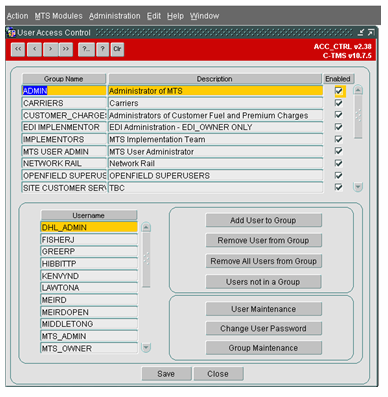
This screen is view only and shows the existing User Groups and Users. Users can be associated to more than one group. | |||
To view the Users for each group, the relevant Group Line should be highlighted. | |||
There are a series of buttons to allow the user to Drill down further to add or edit data, expanded below.<center> | |||
[[Image:ctrl_2.png]] | |||
</center> | |||
== | ==User Maintenance == | ||
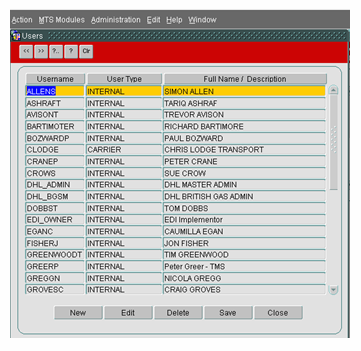
Administrators are given the ability to create users and administer user passwords. When setting up a new user, the Username, User Type, Description and Password are required. Once a user has been created, there are a number of mandatory User Parameters which are also created and cannot be deleted. <center> | |||
[[Image:ctrl_3.png]] | |||
</center> | |||
===Creating a New User=== | |||
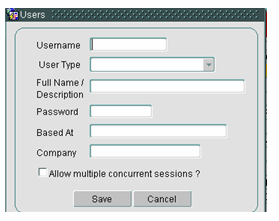
*Click the '''New''' Button. The user is then populated with the screen below: | |||
<center> | |||
[[Image:ctrl_4.png]] | |||
</center> | |||
*Fill in the details on the Users screen, User Type being Internal and Based at starting with country of Residence e.g. UK. | |||
*Click '''Save'''. | |||
* The check box 'Allow Multiple concurrent sessions' allows a user to have several sessions to be opened without a warning being populated. | |||
== | ===Editing a New User=== | ||
Within the 'Edit' function, the Administrator can temporarily disable a user's account or can force a user to change their password. A number of parameters allow multiple selections, i.e., take for example the Carrier user parameter, a user may only be able access one carrier, another user may be able access two carriers. This can be set up quite simply in this form.<center> | |||
[[Image:ctrl_5.png]] | |||
</center> | |||
=== Change User Password=== | |||
The Administrator can change the password of any user - this may be because the user has forgotten it.<center> | |||
[[Image:ctrl_6.png]] | |||
</center> | |||
== | ===User Parameters=== | ||
By selecting the 'User Parameters' tab, the Administrator can limit the amount of data that is displayed to the user, for example, if a particular user should only see data belonging to a particular Cost Centre, then a user parameter can be added with a value selected from a list where appropriate. | |||
A | A number of parameters allow multiple selections, i.e. take for example the Carrier user parameter, A user may only be able access one carrier, another user may be able access two carriers. This can be set up quite simply in this form. More details and a list of user parameters are referenced in the [[User Parameters]] section. | ||
{{Note}} For new users, you should: | |||
*Click '''Edit''' for the user you have just created. | |||
*Edit users BASED_AT, COST_CENTER, ENTRY_FORM and SCHED_GROUP and click '''OK'''. | |||
=== Default Printers=== | |||
On selecting the 'Default Printers' tab an individual user can be allocated a default printer. | |||
==Group Maintenance== | |||
In order to determine which functions a group of users can perform the Administrator must identify the C-TMS business functions required. Once the menu structure has been identified, the Functions, Menus, Tabs, Reports, Extracts and Imports will need to be allocated in order to restrict/expand a user's group access to part or all functionality contained within.<center> | |||
[[Image:ctrl_7.png]] | |||
</center> | |||
== | === Creating a New Group === | ||
*Click Group Maintenance then click '''New'''. | |||
* Give the Group a Name and Description and check Enabled. | |||
*For each tab add or remove processes using the '''Add All'''/'''Remove All''' buttons or double clicking a process to add one at a time. | |||
*Click '''Save'''. | |||
== | ===Editing a Group=== | ||
*For the ADMIN Group in the Menus tab uncheck 'In Menu?' for Interface Errors and then click '''Save'''. | |||
*Exit Form and Look for this at Administration > Interfaces. | |||
*Will not be available. | |||
*Put the Menu back where it was and click '''Save'''. | |||
*Check Administration > Interfaces to see it is back. | |||
The | === Group Maintenance – Accessible Functionality=== | ||
The screen has a series of tabs that allows the administrator to modify the features that the users in this group can access. | |||
* Functions - functionality within screens that is accessible to the users in the group. | |||
*Menus - menu items that are accessible to the users in this group. | |||
*Tabs - tabs within screens that are accessible to the users in this group. | |||
*Reports - Reports that are accessible to the users in this group. | |||
*Extracts - Extracts that are accessible to the users in this group. | |||
* Imports - Imports that are accessible to the users in this group. | |||
Lists of all available tabs and functions can be found in [[Access Control - Accessible Functionality]]. | |||
A list of all the accessible menus can be found in [[C-TMS Menu Hierarchy]]. | |||
The Imports are variable data that is maintained in [[Imports]] maintenance. | |||
Available [[Extracts]] and [[Reports]] are covered in their respective sections. | |||
Each screen works similarly: | |||
*A top panel shows the functionality that is accessible to the users in the group. | |||
*A bottom panel shows the functionality that is currently not accessible to the users in the group. | |||
To make functionality accessible, double-click the item in the bottom panel and it will be added to the top panel. | |||
To make functionality inaccessible, double-click the item in the top panel and it will be removed and shown in the bottom panel. | |||
Example - tabs: | |||
This tab allows the administrator the ability to control which tabs a group has access to. For example, the 'Bookings' group has access to the [[Trip Manipulation]] form, but they do not necessarily need to see anything to do with finance. Therefore, the administrator can restrict access to the Finance tab to the Bookings group. All forms which have tabs can be controlled in this way, except the Access Control form, which assumes that the administrator has access to ALL the tabs. | |||
==Users and Groups== | |||
<center> | |||
[[Image:ctrl_8.png]] | |||
</center> | |||
===Adding a User to Group=== | |||
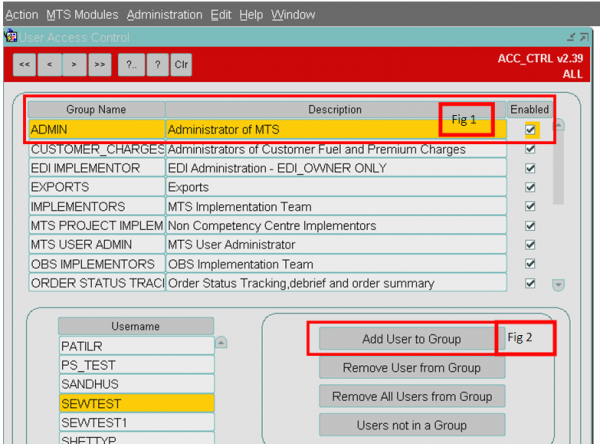
Any number of users can be added to a group, this is done by highlighting the appropriate group and pressing '''Add User to Group'''. A list of users not already in the group will be displayed; it is then a matter of selecting the username. | |||
To add a user to a group take the following steps: | |||
* Highlight the required Group that you want the user to be added to. | |||
*Click the '''Add User to a Group''' button. A new form will be displayed. | |||
<center> | |||
[[Image:Acc_Control_3.png|600px]] | |||
</center> | |||
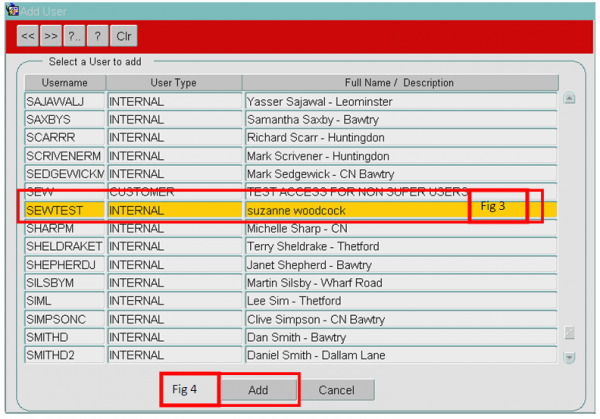
*Highlight the required user to be added. | |||
*Click the '''Add''' button. | |||
<center> | |||
[[Image:Acc_Control_4.png|600px]] | |||
</center> | |||
===Remove User from Group=== | |||
Users can be removed from a group at any time just by highlighting the User and clicking the button. | |||
To Remove a User from a group take the following steps: | |||
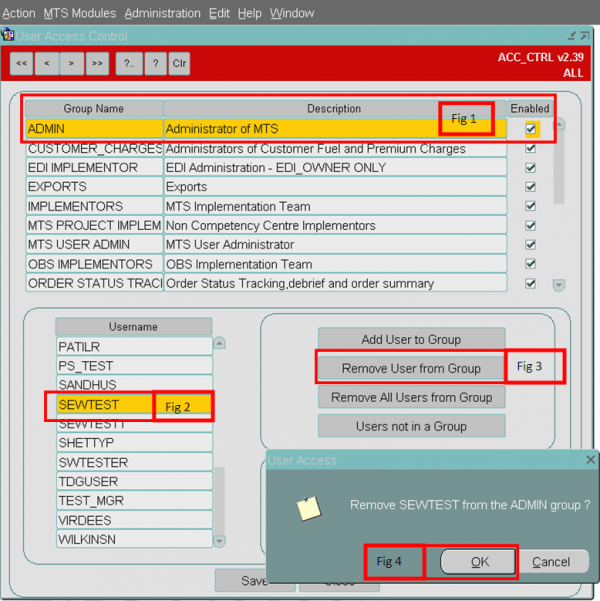
*Highlight the required Group. | |||
*Highlight the required User. | |||
*Click the '''Remove user from Group''' button. | |||
*A pop up screen will be displayed asking the user to clarify the removal of the user from the group. Click the '''OK''' button to remove the user. | |||
<center> | |||
[[Image:Acc_Control_2.png|600px]] | |||
</center> | |||
===Remove All Users from Group=== | |||
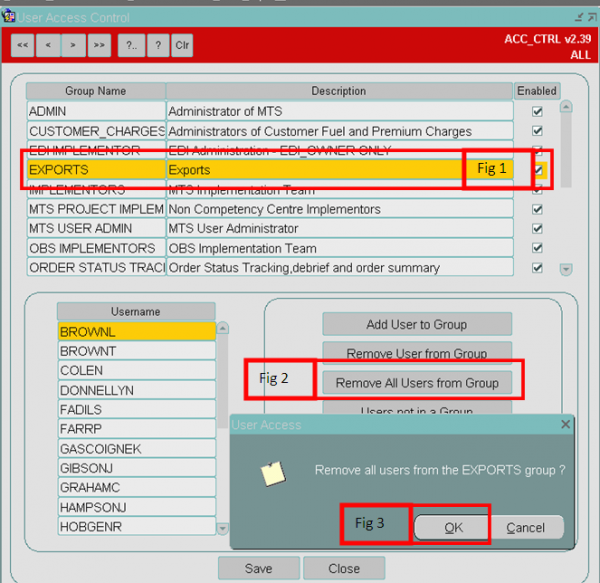
This button will remove all the users from a group in one action. | |||
*Highlight the required Group. | |||
* Click the '''Remove All Users from Group''' button. This will open a box. | |||
*Click '''OK''' to proceed and remove all the users. | |||
<center> | |||
[[Image:Acc_Control_5.png|600px]] | |||
</center> | |||
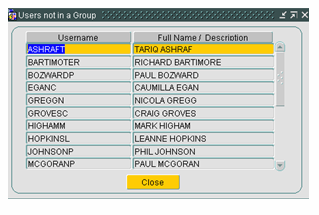
=== Users not in a Group=== | |||
A list of users who do not belong to any group can be viewed. <center> | |||
[[Image:ctrl_9.png]] | |||
</center><noinclude> | |||
[[Category:Maintenance|100]] | |||
[[Category:C-TMS Modules|D-100]] | |||
[[Category:C-TMS User Guide|BD-100]] | |||
[[Category:C-TMS Admin|130]] | |||
[[Category:TEST|D-100]] | |||
</noinclude> | |||
Latest revision as of 14:07, 26 July 2024
This screen allows an Administrator to create a Menu structure at a Group Level. This allows a user to be associated to a group, which will give them enough visibility (screens, tabs) for them to perform their daily duties. Other functions can also be performed using this screen such as:-
- Creating New Users.
- Creating multiple profiles for a user.
- Creating and amending new Groups.
- Editing User Profiles.
- Changing the passwords of Users.
All these options will be explained in more detail below.
Accessing the Screen
To gain access to the screen you must be an Administrator. A Standard user will not have visible of this menu option. It can be found by selecting the 'Administration' option followed by 'Access Control'.
Access Control Main screen
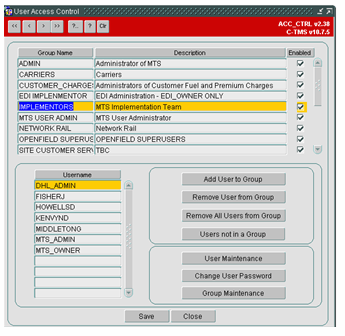
This screen is view only and shows the existing User Groups and Users. Users can be associated to more than one group.
To view the Users for each group, the relevant Group Line should be highlighted.
There are a series of buttons to allow the user to Drill down further to add or edit data, expanded below.
User Maintenance
Administrators are given the ability to create users and administer user passwords. When setting up a new user, the Username, User Type, Description and Password are required. Once a user has been created, there are a number of mandatory User Parameters which are also created and cannot be deleted.
Creating a New User
- Click the New Button. The user is then populated with the screen below:
- Fill in the details on the Users screen, User Type being Internal and Based at starting with country of Residence e.g. UK.
- Click Save.
- The check box 'Allow Multiple concurrent sessions' allows a user to have several sessions to be opened without a warning being populated.
Editing a New User
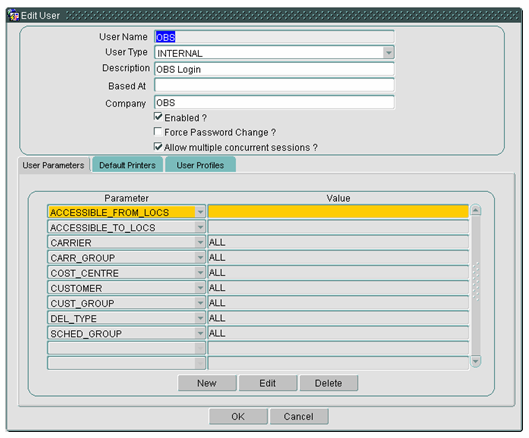
Within the 'Edit' function, the Administrator can temporarily disable a user's account or can force a user to change their password. A number of parameters allow multiple selections, i.e., take for example the Carrier user parameter, a user may only be able access one carrier, another user may be able access two carriers. This can be set up quite simply in this form.
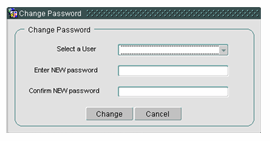
Change User Password
The Administrator can change the password of any user - this may be because the user has forgotten it.
User Parameters
By selecting the 'User Parameters' tab, the Administrator can limit the amount of data that is displayed to the user, for example, if a particular user should only see data belonging to a particular Cost Centre, then a user parameter can be added with a value selected from a list where appropriate.
A number of parameters allow multiple selections, i.e. take for example the Carrier user parameter, A user may only be able access one carrier, another user may be able access two carriers. This can be set up quite simply in this form. More details and a list of user parameters are referenced in the User Parameters section.
![]() Note: For new users, you should:
Note: For new users, you should:
- Click Edit for the user you have just created.
- Edit users BASED_AT, COST_CENTER, ENTRY_FORM and SCHED_GROUP and click OK.
Default Printers
On selecting the 'Default Printers' tab an individual user can be allocated a default printer.
Group Maintenance
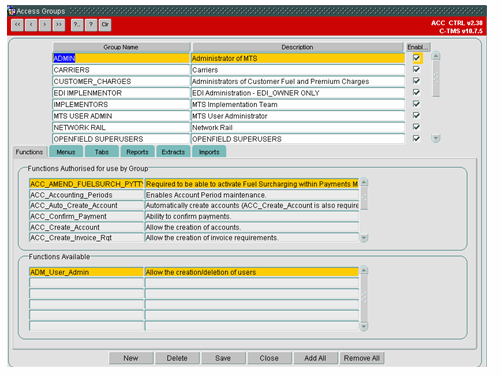
In order to determine which functions a group of users can perform the Administrator must identify the C-TMS business functions required. Once the menu structure has been identified, the Functions, Menus, Tabs, Reports, Extracts and Imports will need to be allocated in order to restrict/expand a user's group access to part or all functionality contained within.
Creating a New Group
- Click Group Maintenance then click New.
- Give the Group a Name and Description and check Enabled.
- For each tab add or remove processes using the Add All/Remove All buttons or double clicking a process to add one at a time.
- Click Save.
Editing a Group
- For the ADMIN Group in the Menus tab uncheck 'In Menu?' for Interface Errors and then click Save.
- Exit Form and Look for this at Administration > Interfaces.
- Will not be available.
- Put the Menu back where it was and click Save.
- Check Administration > Interfaces to see it is back.
Group Maintenance – Accessible Functionality
The screen has a series of tabs that allows the administrator to modify the features that the users in this group can access.
- Functions - functionality within screens that is accessible to the users in the group.
- Menus - menu items that are accessible to the users in this group.
- Tabs - tabs within screens that are accessible to the users in this group.
- Reports - Reports that are accessible to the users in this group.
- Extracts - Extracts that are accessible to the users in this group.
- Imports - Imports that are accessible to the users in this group.
Lists of all available tabs and functions can be found in Access Control - Accessible Functionality.
A list of all the accessible menus can be found in C-TMS Menu Hierarchy.
The Imports are variable data that is maintained in Imports maintenance.
Available Extracts and Reports are covered in their respective sections.
Each screen works similarly:
- A top panel shows the functionality that is accessible to the users in the group.
- A bottom panel shows the functionality that is currently not accessible to the users in the group.
To make functionality accessible, double-click the item in the bottom panel and it will be added to the top panel.
To make functionality inaccessible, double-click the item in the top panel and it will be removed and shown in the bottom panel.
Example - tabs:
This tab allows the administrator the ability to control which tabs a group has access to. For example, the 'Bookings' group has access to the Trip Manipulation form, but they do not necessarily need to see anything to do with finance. Therefore, the administrator can restrict access to the Finance tab to the Bookings group. All forms which have tabs can be controlled in this way, except the Access Control form, which assumes that the administrator has access to ALL the tabs.
Users and Groups
Adding a User to Group
Any number of users can be added to a group, this is done by highlighting the appropriate group and pressing Add User to Group. A list of users not already in the group will be displayed; it is then a matter of selecting the username.
To add a user to a group take the following steps:
- Highlight the required Group that you want the user to be added to.
- Click the Add User to a Group button. A new form will be displayed.
- Highlight the required user to be added.
- Click the Add button.
Remove User from Group
Users can be removed from a group at any time just by highlighting the User and clicking the button.
To Remove a User from a group take the following steps:
- Highlight the required Group.
- Highlight the required User.
- Click the Remove user from Group button.
- A pop up screen will be displayed asking the user to clarify the removal of the user from the group. Click the OK button to remove the user.
Remove All Users from Group
This button will remove all the users from a group in one action.
- Highlight the required Group.
- Click the Remove All Users from Group button. This will open a box.
- Click OK to proceed and remove all the users.
Users not in a Group
A list of users who do not belong to any group can be viewed.
