Administration - Access Control: Difference between revisions
(Minor formatting change) |
(Minor formatting change) |
||
| Line 1: | Line 1: | ||
{{Doc_Title|System=Training Guide|Title=Access Control|Reference=ADMINISTRATION|Version=4.0|Date=9th May 2024|Sysver=12.45|Client=C-TMS}} | {{Doc_Title|System=Training Guide|Title=Access Control|Reference=ADMINISTRATION|Version=4.0|Date=9th May 2024|Sysver=12.45|Client=C-TMS}} | ||
__NOTOC__ | |||
<!-- NEW PAGE --> | <!-- NEW PAGE --> | ||
= ADMINISTRATION - ACCESS CONTROL = | = ADMINISTRATION - ACCESS CONTROL = | ||
Revision as of 12:31, 9 May 2024
![]()
C-TMS
Access Control
Training Guide - 12.45
9th May 2024 - 4.0
Reference: ADMINISTRATION
ADMINISTRATION - ACCESS CONTROL
This screen allows an Administrator to create a Menu structure at a Group Level. This allows a user to be associated to a group, which will give them enough visibility (screens, tabs) for them to perform their daily duties. Other functions can also be performed using this screen such as:-
- Creating New Users.
- Creating multiple profiles for a user.
- Creating and amending new Groups.
- Editing User Profiles.
- Changing the passwords of Users.
All these options will be explained in more detail below.
Accessing the Screen
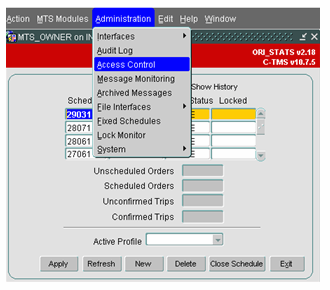
To gain access to the screen you must be an Administrator. A Standard user will not have visible of this menu option. It can be found by selecting the 'Administration' option followed by 'Access Control'.
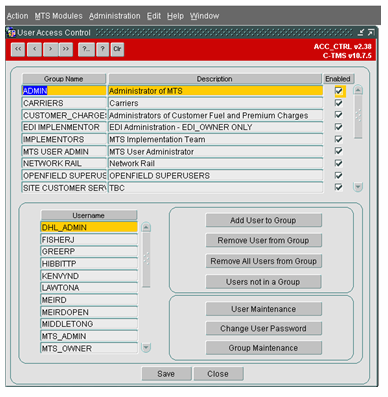
Access Control Main screen
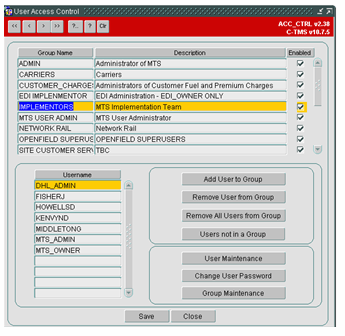
This screen is view only and shows the existing User Groups and Users. Users can be associated to more than one group.
To view the Users for each group, the relevant Group Line should be highlighted.
There are a series of buttons to allow the user to Drill down further to add or edit data, expanded below.
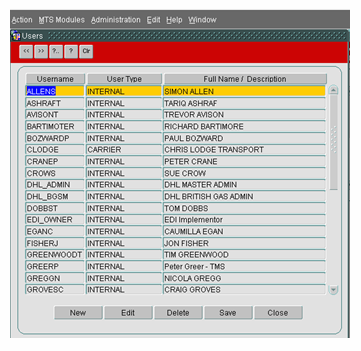
User Maintenance
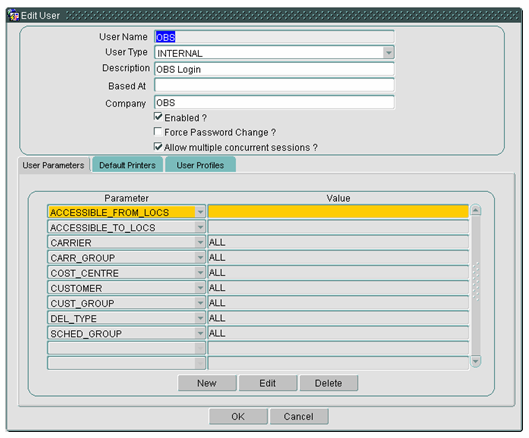
Administrators are given the ability to create users and administer user passwords. When setting up a new user, the Username, User Type, Description and Password are required. Once a user has been created, there are a number of mandatory User Parameters which are also created and cannot be deleted.
Creating a New User
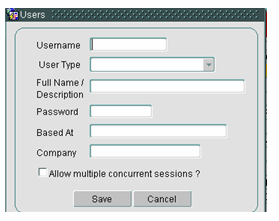
- Click the New Button. The user is then populated with the screen below:
- Fill in the details on the Users screen, User Type being Internal and Based at starting with country of Residence e.g. UK.
- Click Save.
- The check box 'Allow Multiple concurrent sessions' allows a user to have several sessions to be opened without a warning being populated.
Editing a New User
Within the 'Edit' function, the Administrator can temporarily disable a user's account or can force a user to change their password. A number of parameters allow multiple selections, i.e., take for example the Carrier user parameter, a user may only be able access one carrier, another user may be able access two carriers. This can be set up quite simply in this form.
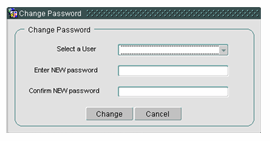
Change User Password
The Administrator can change the password of any user - this may be because the user has forgotten it.
User Parameters
By selecting the 'User Parameters' tab, the Administrator can limit the amount of data that is displayed to the user, for example, if a particular user should only see data belonging to a particular Cost Centre, then a user parameter can be added with a value selected from a list where appropriate.
A number of parameters allow multiple selections, i.e. take for example the Carrier user parameter, A user may only be able access one carrier, another user may be able access two carriers. This can be set up quite simply in this form. More details and a list of user parameters are referenced in the User Parameters section.
![]() Note: For new users, you should:
Note: For new users, you should:
- Click Edit for the user you have just created.
- Edit users BASED_AT, COST_CENTER, ENTRY_FORM and SCHED_GROUP and click OK.
Default Printers
On selecting the 'Default Printers' tab an individual user can be allocated a default printer.
Group Maintenance
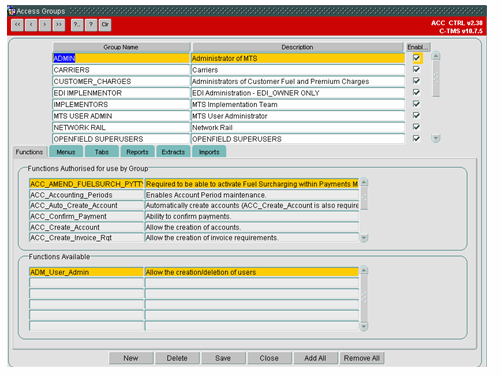
In order to determine which functions a group of users can perform the Administrator must identify the C-TMS business functions required. Once the menu structure has been identified, the Functions, Menus, Tabs, Reports, Extracts and Imports will need to be allocated in order to restrict/expand a user's group access to part or all functionality contained within.
Creating a New Group
- Click Group Maintenance then click New.
- Give the Group a Name and Description and check Enabled.
- For each tab add or remove processes using the Add All/Remove All buttons or double clicking a process to add one at a time.
- Click Save.
Editing a Group
- For the ADMIN Group in the Menus tab uncheck 'In Menu?' for Interface Errors and then click Save.
- Exit Form and Look for this at Administration > Interfaces.
- Will not be available.
- Put the Menu back where it was and click Save.
- Check Administration > Interfaces to see it is back.
Group Maintenance – Accessible Functionality
The screen has a series of tabs that allows the administrator to modify the features that the users in this group can access.
- Functions - functionality within screens that is accessible to the users in the group.
- Menus - menu items that are accessible to the users in this group.
- Tabs - tabs within screens that are accessible to the users in this group.
- Reports - Reports that are accessible to the users in this group.
- Extracts - Extracts that are accessible to the users in this group.
- Imports - Imports that are accessible to the users in this group.
Lists of all available tabs and functions can be found in Access Control - Accessible Functionality.
A list of all the accessible menus can be found in C-TMS Menu Hierarchy.
The Imports are variable data that is maintained in Imports maintenance.
Available Extracts and Reports are covered in their respective sections.
Each screen works similarly:
- A top panel shows the functionality that is accessible to the users in the group.
- A bottom panel shows the functionality that is currently not accessible to the users in the group.
To make functionality accessible, double-click the item in the bottom panel and it will be added to the top panel.
To make functionality inaccessible, double-click the item in the top panel and it will be removed and shown in the bottom panel.
Example - tabs:
This tab allows the administrator the ability to control which tabs a group has access to. For example, the 'Bookings' group has access to the Trip Manipulation form, but they do not necessarily need to see anything to do with finance. Therefore, the administrator can restrict access to the Finance tab to the Bookings group. All forms which have tabs can be controlled in this way, except the Access Control form, which assumes that the administrator has access to ALL the tabs.
Users and Groups
Adding a User to Group
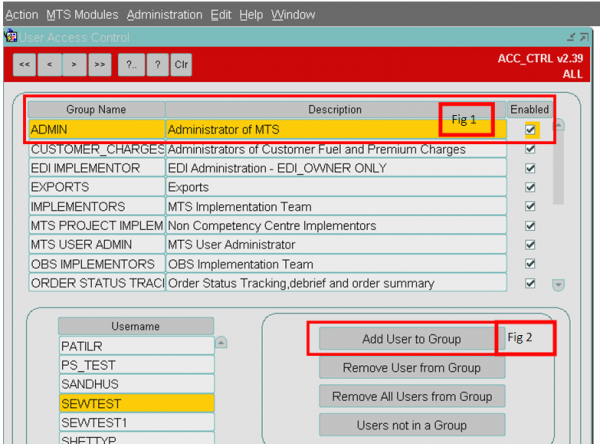
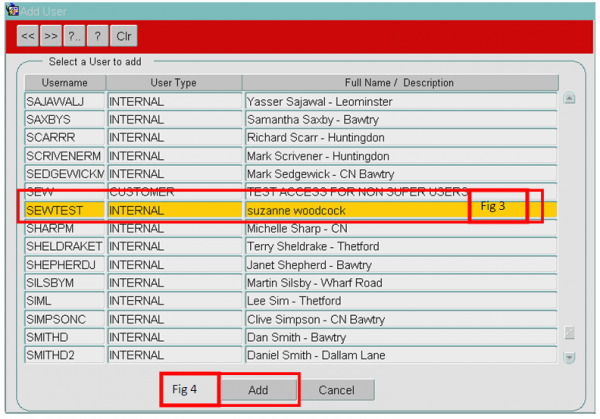
Any number of users can be added to a group, this is done by highlighting the appropriate group and pressing Add User to Group. A list of users not already in the group will be displayed; it is then a matter of selecting the username.
To add a user to a group take the following steps:
- Highlight the required Group that you want the user to be added to.
- Click the Add User to a Group button. A new form will be displayed.
- Highlight the required user to be added.
- Click the Add button.
Remove User from Group
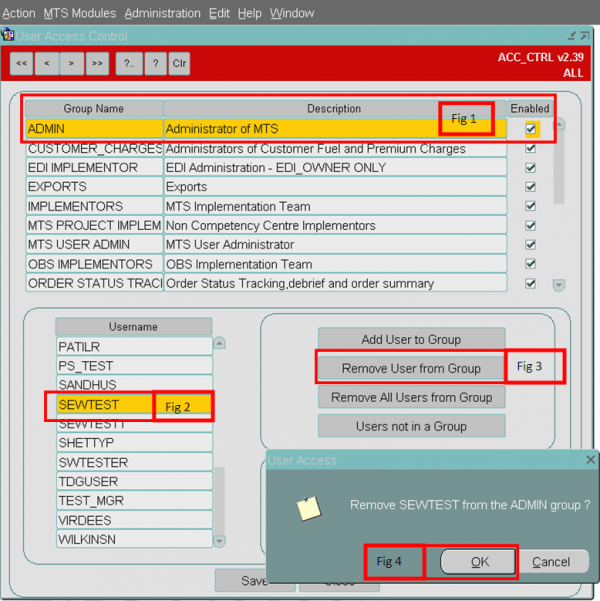
Users can be removed from a group at any time just by highlighting the User and clicking the button.
To Remove a User from a group take the following steps:
- Highlight the required Group.
- Highlight the required User.
- Click the Remove user from Group button.
- A pop up screen will be displayed asking the user to clarify the removal of the user from the group. Click the OK button to remove the user.
Remove All Users from Group
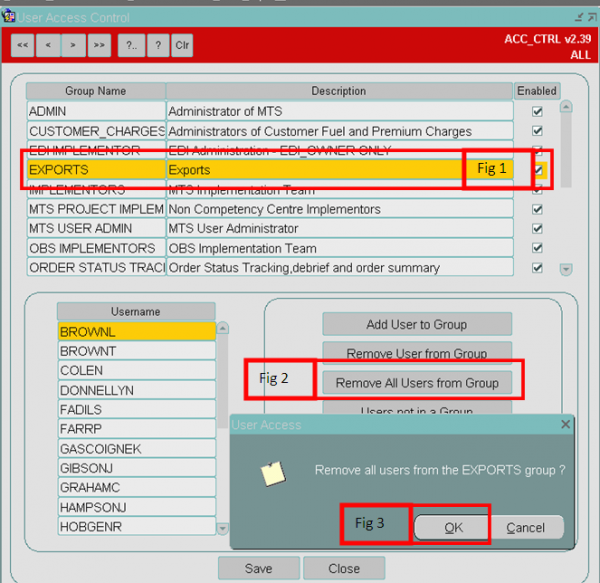
This button will remove all the users from a group in one action.
- Highlight the required Group.
- Click the Remove All Users from Group button. This will open a box.
- Click OK to proceed and remove all the users.
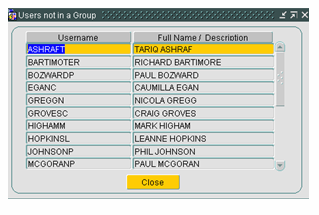
Users not in a Group
A list of users who do not belong to any group can be viewed.
AUDIT LOG
The C-TMS Audit Log Screen provides the users with informational messages regarding the processes on C-TMS.
C-TMS Audit Log can be accessed from the C-TMS Modules menu.
Once selected the form as shown below will be displayed.
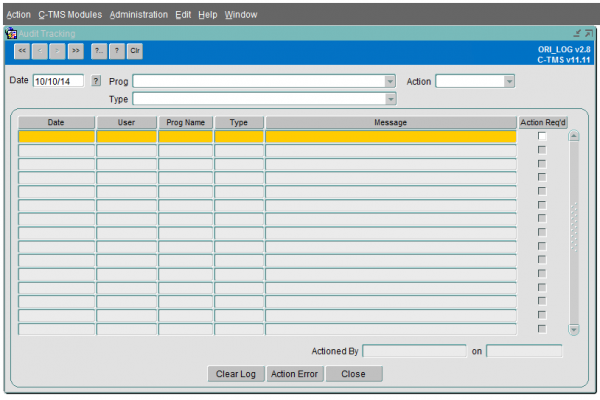
Audit log search
Enter the date for which you require the audit information. Click on the question mark to return the information. The information can be filtered on:
- The program that generated the audit log
- The type of record
- Whether the record is actioned or un-actioned
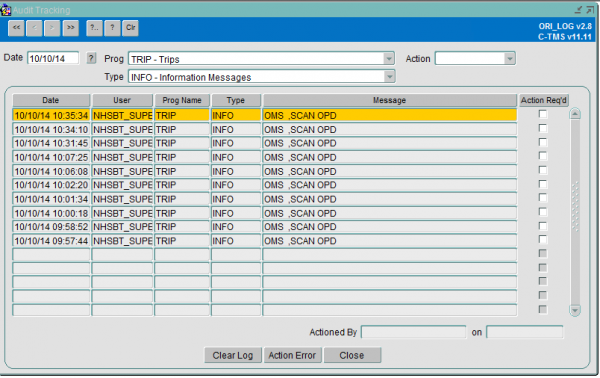
View Message
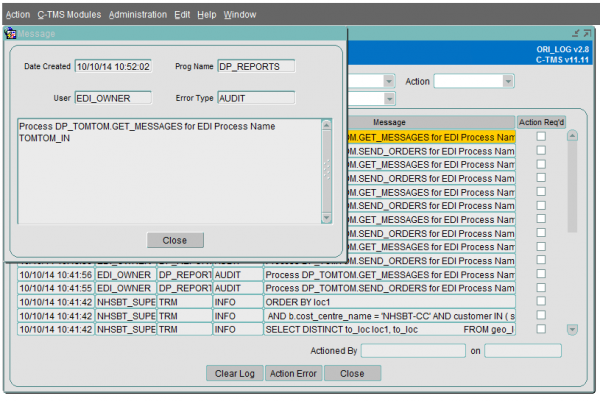
The message field can be scrolled to the right to view any more descriptive messages. In this case you can right click on the message and a new button View Message is shown as below.
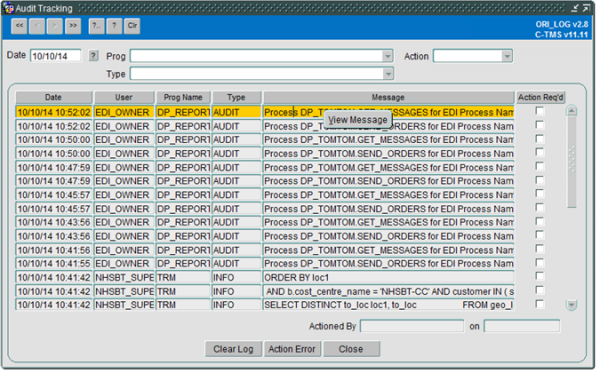
By clicking on the View Message button the whole message can be viewed as shown:
Action a Log message
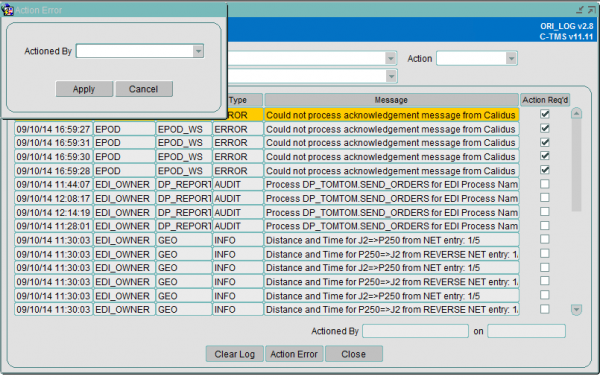
A log message can be marked to indicate that a remedial action was taken. This is indicated by the Action Required checkbox being ticked. To record that you have rectified the error you click the Action Error button and a pop-up box appears as below:
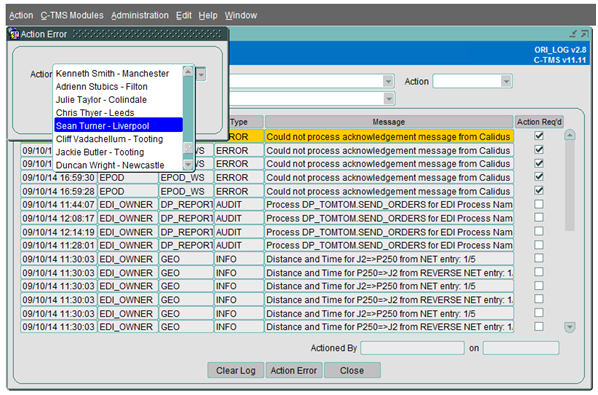
Choose the person who has actioned the error from the drop down list and press the Apply button.
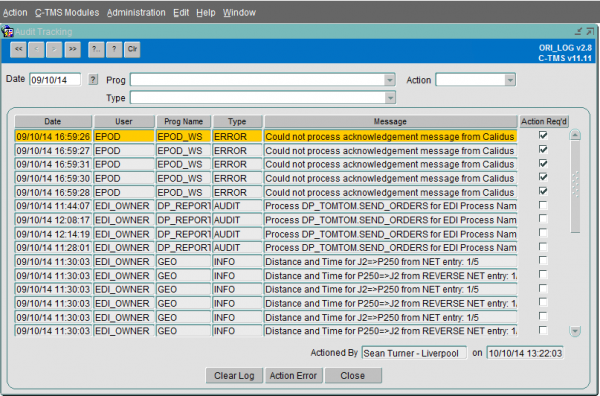
The record is updated and the actioned by fields on the bottom right of the screen are updated:
To clear down the audit log records press the Clear Log button.
Further Configuration
The following are system parameters affecting this function:
| Parameter | Description | Level |
|---|---|---|
| ADM_EXCLUDE_AUDIT_LOG | Processes that will be excluded from writing audit log records. | SYSTEM |
| ADM_EXCLUDE_PACKAGE_MSG | Packages whose adm log messages are not to be written | SYSTEM |
| ADM_LOG_ARC_DEL_DAYS | Number of days that ADM_LOG_ARCHIVE messages should be kept for | SYSTEM |
USER PARAMETERS
| Restricts the visibility of orders in the 'Order Well' of the Trip Planning/Manipulation forms - both ACCESSIBLE_FROM_LOCS and ACCESSIBLE_TO_LOCS parameters must be used together. Only orders matching the assigned 'LOCATION IDs' for both 'FROM' and/or 'TO' will be displayed. A value of 'ALL' can be used for either 'FROM' or 'TO' location as long as one of the parameters is set to a valid location. If both parameters are left blank then ALL orders will be visible (Subject to other parameter settings). | Entered values unrestricted - Location IDs Cannot add a new instance if parameter already exists for specified value Multiple LOCATION IDs can be entered by comma separated values without any spaces. | ||||||||
| Entered values unrestricted - Location IDs Cannot add a new instance if parameter already exists for specified value Multiple LOCATION IDs can be entered by comma separated values without any spaces. | |||||||||
| Enables the visibility of all trips with any OWNING DEPOT value. Cannot be used in conjunction with parameter BASED_AT and is generally a superuser only parameter.
Enables the visibility of all DEPOTs in the Fixed Routes Execution screen and other DEPOT ID selection dropdowns. |
|||||||||
| Restricts the visibility of order and trip data. Only trips with an OWNING DEPOT matching the assigned value will be displayed (subject to other parameter settings). This does not control data entry for OWNING DEPOT values. If this parameter is used with the SCHED_GROUP parameter, it will restrict visibility of order data to only show orders at status SCHED_COLL with a CURRENT_DEPOT/FROM_LOC matching the specified value.
Restricts the visibility of Fixed Routes data in the Fixed Routes Maintenance screen. Only Fixed Routes with a DEPOT matching the specified will be displayed. |
|||||||||
| Controls the data entry validation of trip data. When creating or amending a trip, only the specified CARRIER ID values will be accepted. Setting this parameter to ALL will allow entry of any CARRIER ID against a trip. | |||||||||
| Controls the data entry validation of trip data. When creating or amending a trip, only CARRIER IDs associated to the CARRIER GROUP of the specified value will be accepted. Setting this parameter to ALL will allow entry of any CARRIER ID against a trip (subject to other parameter settings). | Cannot add a new instance if parameter already exists with a value of 'ALL' Cannot add a new instance if parameter already exists for specified value |
||||||||
| This parameter controls the system parameter settings available for the SMTP_ORDER_SENDER and SMTP_TRIP_SENDER parameter. If these system parameters are set to be 'Config by' CONTROL_TOWER, then the available 'Config Value' will match the assigned value/s. This enables dynamic control of the email senders address, as used in the MTS Carrier Maintenance emailing functionality. | |||||||||
| Restricts the visibility of order and trip data, also controls the data entry validation for COST CENTRE fields. Only orders and trips with a COST CENTRE matching the assigned value will be displayed. When creating or amending an order or trip, only the specified COST CENTRE values will be accepted. Setting this parameter to ALL will display all orders and trips and allow entry of any COST CENTRE value against them (subject to other parameter settings). | |||||||||
| Restricts the visibility of order data, also controls the data entry validation for CUSTOMER ID fields. Only orders with a CUSTOMER ID matching the assigned value will be displayed. When creating or amending an order, only the specified CUSTOMER ID values will be accepted. Setting this parameter to ALL will display all orders and allow entry of any CUSTOMER ID value against them (subject to other parameter settings). This parameter has no impact on trip data. | |||||||||
| Restricts the visibility of order data, also controls the data entry validation for CUSTOMER ID fields. Only orders with a CUSTOMER ID associated to the CUSTOMER GROUP of the specified value will be displayed. When creating or amending an order, only the CUSTOMER IDs associated to the CUSTOMER GROUP specified will be accepted. Setting this parameter to ALL will display all orders and allow entry of any CUSTOMER ID value against them (subject to other parameter settings). This parameter has no impact on trip data. | |||||||||
| A default delivery type for callout jobs when creating a scheduled callout job from call logging. | |||||||||
| A default service level for callout jobs when creating a scheduled callout job from call logging. | |||||||||
| A default delivery type for inspection jobs when creating from call logging. | |||||||||
| A default service level for inspection jobs when creating from call logging. | |||||||||
| Restricts the visibility of order data, also controls the data entry validation for DELIVERY TYPE fields. Only orders with a DELIVERY TYPE matching the assigned value will be displayed. When creating or amending an order, only the specified DELIVERY TYPE values will be accepted. Setting this parameter to ALL will display all orders and allow entry of any DELIVERY TYPE against them (subject to other parameter settings). This parameter has no impact on trip data. | |||||||||
| This parameter controls whether the selected form opens automatically when first logging in to the system. The form will open over the top of the existing ORI_STATS screen. | |||||||||
| Enables the delimiter for MTS CSV Export files to be controlled at user level. Under standard functionality all CSV Export files would be comma spirited ','. The data delimiter in all CSV Export files will be set to the value specified. A blank value will be ignored and will use the default comma ',' . | |||||||||
| Whether this user is authorised to use the call logging system only as an external user, with some limited functionality. | |||||||||
| This parameter controls the DEPOT selection which is available in Fixed Routes Maintenance and Fixed Routes Execution screens. It enables execution or amendment of a Fixed Route with a DEPOT matching the specified value. It can be overridden by the parameter ALL_DEPOTS. | |||||||||
| Restricts visibility of order and trip data in the Order Tracking and Order Debrief screen. If set to 'Y' the display is restrict to only show trips which contain orders that have been generated form Lane Based Order functionality for Order Lanes which the user has been setup to use. | |||||||||
| Allowed to collect orders from all locations. | |||||||||
| If set this will automatically populate the Order Line Product Qty to the specified value for manual order creation. This will auto generate the first order line and will also be applied to any additional order lines created. | |||||||||
| If set this will automatically populate the Order Line Product Type to the specified value for manual order creation. This will auto generate the first order line and will also be applied to any additional order lines created. | |||||||||
| This parameter controls a warning message in the Order Tracking screen which will display on entry of the form for overdue trips - not completed/delivered. | |||||||||
| This parameter controls the display of the label within the 'Source/Destination' field in the Order Tracking screen. The field will show the order transactions labelled from the perspective of the order 'From' location ('From : SOURCE') or the order 'To' location ('To : Destination'). This has no impact on the visibility of any order or trip data, it is purely for labelling description control. | |||||||||
| Restricts the visibility of order data. Only orders with a PLANNING REGION associated to either the 'FROM' or 'TO' location of the order matching the specified value will be displayed (subject to other parameter settings). This parameter has no impact on trip data. | |||||||||
| "Restricts the visibility of order data, also controls the data entry validation for GROUP NAME fields. Only orders with a GROUP NAME matching the assigned value will be displayed. When creating or amending an order, only the specified GROUP NAME values will be accepted. Setting this parameter to ALL will display all orders and allow entry of any GROUP NAME value against them (subject to other parameter settings).
Will also restrict trip data depending on the setting of parameter TRM_TRIP_FILTER." |
|||||||||
| This parameter controls the display of the 'DUs' and 'Volume' fields in the Order Entry Targets screen. If set to 'N' the fields will not display. | |||||||||
| Restricts the visibility of trip data. This parameter controls the trip filter checkbox in the Trip Planning/Manipulation forms and specifies whether the BASED_AT and/or SCHED_GROUP parameter will control the display of trips. It will include trips with stop LOCATION IDs which match the specified BASED_AT values, and/or include trips which contain orders having GROUP NAMEs which match the specified SCHED_GROUP values. | |||||||||
| This parameter is redundant and not referenced in any MTS functionality. |
