Sales Order Process
This document is intended to show the full Sales Order operational processes within the Calidus WMS 3PL system. This includes optional processes and alternative mechanisms of taking the orders through each stage.
SOP Flow Within the Warehouse - Order Status
The Sales Order Process goes through a number of stages.
Each stage is represented by a different status, and must be followed in order:
- 0 - Entered (Order header entered only – no detail lines). This does not affect stock on the system.
- 1 - Committed. The product will be flagged as having a committed quantity, this may affect availability for future orders.
- 4 - Allocated. This is where the system will specify a particular pallet in the warehouse determined on the order type (see Order Entry).
- 5 - Pick List. The next status after allocation. Shows that the order has had a pick list printed.
- 6 - Pick Confirmed. After pick list, the pick confirmation process ‘moves’ the stock virtually from its allocated location to a predefined marshalling location. The user can change the location at this point.
- F/G - Awaiting Customer POD Confirmation/ Depot POD Confirmation. (set against Partners/ Customers.) The stock moves from the marshalling location to a POD location if setup in Default locations.
- 9 - Complete. At this point, the stock has been ‘removed’ from the system (if you have setup to downdate at despatch rather than pick confirmation) .
Other Statuses which are not as commonly used are:
- I – Awaiting Invoice
- 3 – Back Order
- H – Held
- S – Suspended
- C – Cancelled
- E – Enquiry
Standard Sales Order Process
Sales Order Entry (SOS1110)
This screen allows you to create or amend the header record for the sales order.
All information entered on this screen relates to the customer details for this order and the delivery information. The header can be created either manually or via EDI.
The screen has multiple tabs and options available.
Order Details Tab
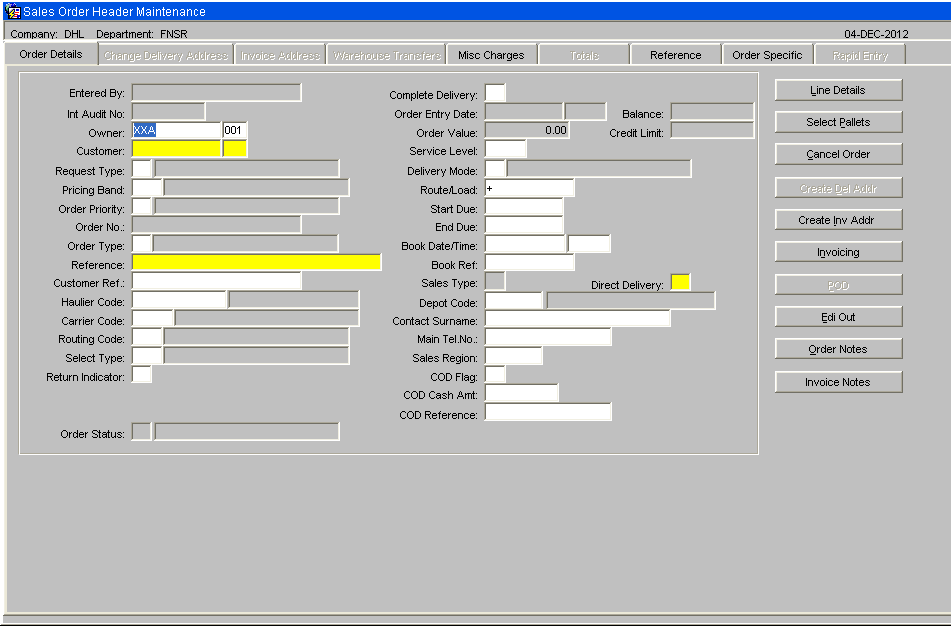
| Field Name | Description | Options |
|---|---|---|
| Entered By | The user name (login) of the person who is entering the order | No entry allowed – will default to the login id |
| Int Audit No | The internal system generated audit number | No entry allowed – system generated |
| Owner ** | The owner code of the order – note, if you have owner prompt maintenance default set to ‘N’ you can enter any owner other than that logged in under as long as it is created against the user id | Must have been set up in owner maintenance – LOV available |
| Customer ** | The customer code that defines who and where the order will be sent to | Must have been set up in customer maintenance – LOV available |
| Request Type ** | The type of order – this will determine what processing can be used during the outbound cycle | S – Sales Order (default)
C – Collection Order |
| Pricing Band | Used for invoicing (not migrated) | Blank |
| Order Priority ** | Used for cross docking and for prioritising orders. Can be used during pick wave to group high priority orders together. Note, if the start due date is set to today + 1 the order will be classed as an express order and a warning message will appear notifying you the system will default the order priority to ‘1’ for express orders | Must have been set up in order priority maintenance – LOV available |
| Order No ** | Can either be a system generated order or a manually entered one | To determine which one is used, you need to set the ‘system generated o/n’ flag in owner maintenance |
| Order Type ** | U Under bond IWT
T Transfer between warehouse S Ships Store O Other N Navy ships K Kit Assembly H Home Use E Export D Diplomatic Privilege C Community A Authorised Destruction||H – home use | |
| Reference ** | A unique identifier for this order (normally a customer order number) - the system will warn you if another order exists with the same order reference | 20 character free text field |
| Customer Ref | An additional customer reference that relates to this order (not mandatory or validated) | 20 character free text field |
| Haulier Code | The haulier code for the order | Must have been created in haulier maintenance |
| Carrier Code | The carrier code for this order. Note, if this field is populated and the owner related flag on carrier maintenance is set to ‘Y’ an IFTMIN and IFTMBF message will be generated | Must have been created in carrier codes maintenance – LOV available |
| Routing Code | Client specific functionality for Ihub/Ohub functionality and auto carrier population – not migrated | N/A |
| Select Type | An additional field used to group orders together – not migrated | N/A |
| Return Indicator | Client specific functionality to determine whether the order requires returns form production at packing. The value entered here is validated against a returns matrix which dictates what text is produced | X,C,N,A or blank |
| Order Status | Displays the status of the order as it moves through the sales order process | 0 – Entered
4 – Allocated 5 – On pick list 6 – Pick Confirmed F – Awaiting POD Confirmation 9 – Complete I – Invoiced |
| Complete Delivery | Client specific functionality which prevents an order from being allocated if the complete delivery flag is set to ‘Y’ and there is not enough stock to fulfil the order – used in conjunction with edi allocation of sales orders | Y,N or left blank |
| Order Entry Date | This field is for information only and indicates when the order was created. | N/A |
| Balance | If pricing is in use this information-only field will show the balance outstanding on the order. | N/A |
| Order Value | If pricing is in use, this information-only field will display the order value. | N/A |
| Credit Limit | If pricing is in use, this information-only field will display the customer’s credit limit. | N/A |
| Service Level | Used in conjunction with carrier code and routing code – defines the carrier’s service level this order needs to be delivered on | Must have been created in service level maintenance |
| Delivery Mode ** | Indicates how this order will be delivered. Note, if you enter ‘T’ the order will be designated as a trunking order and will have to be despatched through the trunking screen | T – trunking
|
| Route/Load | If the customer code contains a postcode linked to routing information then a route/load can be selected. Will default to the first route code including this customer’s post code. | Must have been created in route codes maintenance – LOV available – note, if the order has been assigned to a route and load in pick wave, the load number will also display |
| Start Due | The date the order is due to be delivered | Must be a valid date |
| End Due | The last date the order has to be delivered by | Must be a valid date |
| Book date/Time | If the order must be delivered according to a booking, enter the date and time. | Must be a valid date and time or left blank |
| Book Ref | If the order is to be delivered as a booking, enter the booking reference | 10 character free text field or left blank |
| Sales Type | Used for client specific telesales functionality – not migrated | Will default to ‘I’ no entry allowed |
| Direct Delivery | An additional field used specify whether orders will be delivered direct to the end point – not migrated | Will default to ‘N’ |
| Contact Surname | The surname of the person expecting the delivery – this text will appear on the pick labels | 25 character free text field – will default to the customers address |
| Phone | The telephone number of the customer receiving the order | 15 character free text field or left blank |
| Sales Region | Used in load allocation functionality to specify a route load (not migrated) | N/A |
| COD Flag | Determines whether the order is ‘cash on delivery’ – if yes, the information entered will appear on the waybill and the IFTMIN edi message | Y, N or left blank |
| COD Cash Amount | If a COD order, the amount of money to be paid – will appear on the waybill and the IFTMIN | 0 – 9999999.99 |
| COD Reference | If a COD order, the reference number for the COD transaction – will appear on the waybill and the IFTMIN | 35 character free text field or left blank |
Change Delivery Address Tab
It is possible to change the delivery address while the order header is at status 0: Entered. Once line details have been entered and the order saved this tab is no longer available for amendment.
Select the Yes radio button of the Change Address field to make the right-hand panel available for data entry.
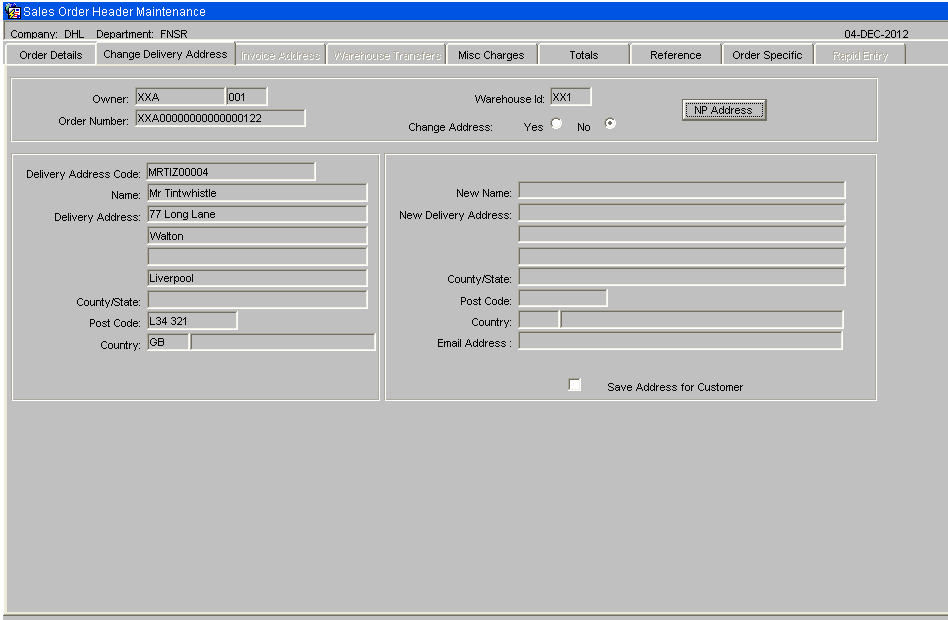
| Field Name | Description | Options |
|---|---|---|
| New Name ** | Enter the new name of the customer | 35 character free text field |
| New Delivery Address ** | Enter up to three address lines, excluding the county or state; lines 1 & 2 are mandatory | 3 lines of up to 35 characters per line |
| County / State | Enter the county or state | 35 character free text field |
| Postcode | Enter the postcode | 10 character free text field |
| Country ** | Select the country code | Must have been created in countries maintenance - LOV available |
| Save Address for Customer | Check this box to save the address | |
| Buttons | ||
| NP Address | Allows the user to view, amend or add to the notify party address |
Miscellaneous Charges Tab
If SOP invoicing is to be used, this screen allows you to add and amend miscellaneous charges for this order.
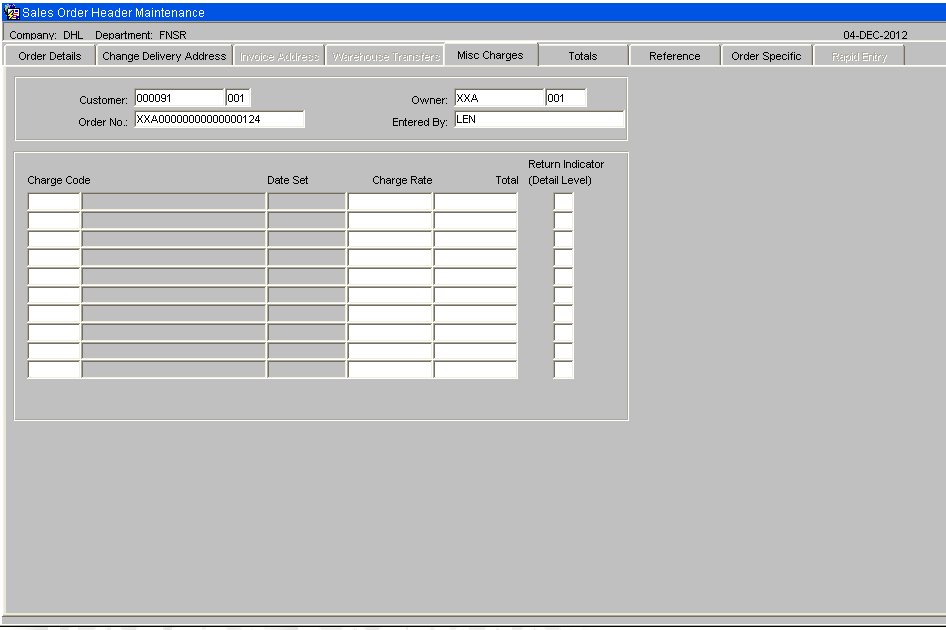
| Field Name | Description | Options |
|---|---|---|
| Charge Code ** | The charge code to be applied to this order | Must have been created in charge codes maintenance – LOV available |
| Charge Rate ** | The charge rate (%) to be applied to this order | Will default to the rate set against the charge code |
| Total | The total charges raised against the order | System generated calculation |
| Return Indicator (Detail Level) | Specifies at order detail level whether that line has text to be reported on the returns form – the text to be produced is validated against the returns matrix | Check box |
Totals Tab
This screen displays the totals per product type on the order
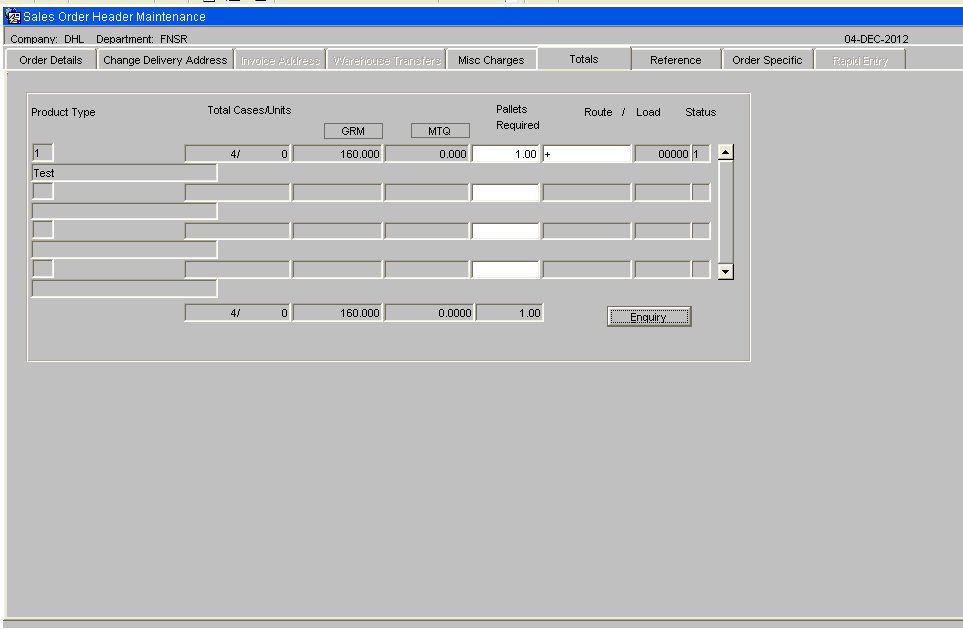
| Field Name | Description | Options |
|---|---|---|
| Product Type | The product type of the order detail line. | |
| Total Cases/Units | The total number of cases and units for that product type. | |
| Total Weight | The total weight of the products under that product type . | |
| Total Volume | The total volume of the products for that product type . | |
| Pallets Required | Uses the same calculation as the number of pallets required for the IFTMBF based on the number of cases per product on a pallet. | |
| Route | Will display the defaulted route code for that customer – this can be changed at a detail level. If the order has been assigned to a load in pick wave, the load number will display also. | |
| Status | Displays the current status of the order . | |
| Buttons | ||
| Enquiry | The Enquiry button will take the user to the sales order enquiry screen ENQSOON01A. | |
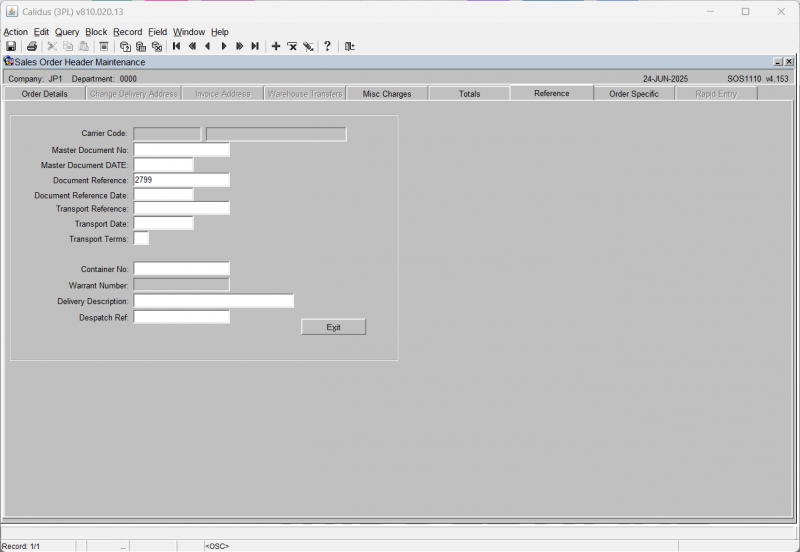
Reference Tab
Allows the user to enter reference text for documentation relating to the order
| Field Name | Description | Options |
|---|---|---|
| Carrier Code | Will default to the carrier code entered at order header | |
| Master Document No | The master airway bill number for the order – will appear on the waybill and the IFTMIN. Can be entered or will auto populate once assigned in Trunking/consolidation screen. | |
| Master Document Date | The date the master airway bill number was assigned | |
| Document Reference | The house airway bill number for the order – will appear on the waybill and the IFTMIN. Can be entered or will auto populate once assigned in Trunking/consolidation screen. | If no MAWB entered, will default to the system generated order no. |
| Transport Reference | The reference number for this order assigned by the carrier. | |
| Transport Date | The date the order is due to be shipped . | |
| Transport Terms | Who pays for the transport of the order. Note, if ‘3’ is entered an additional field will display prompting for the account number of the carrier. | Options are:-1. Consignor – 2. Consignee – 3. Third Party |
| Container No | The container number the goods are being shipped onto – this will appear on the waybill and IFTMIN. | |
| Warrant Number | ||
| Delivery Description | ||
| Despatch Ref | ||
| Buttons | ||
| Exit | Return to the Order Details tab | |
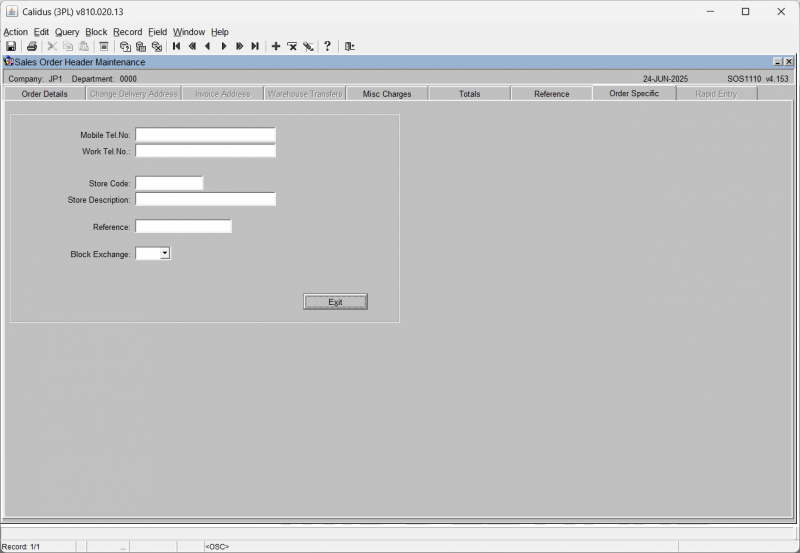
Order Specific Tab
This screen allows you to enter some order-specific information against the order.
| Field Name | Description | Options |
|---|---|---|
| Mobile Tel no | ||
| Work Tel No | ||
| Store Code | ||
| Store Description | ||
| Reference | ||
| Block Exchange | No, Yes | |
| Buttons | ||
| Exit | Return to the Order Details tab | |
Options
The following buttons are available from the Order Details tab:
| Button Name | Description |
|---|---|
| Line Details | Takes the user to the detail screen in order to enter stock codes and quantities to be ordered (see SOS1117). |
| Cancel Order | If pressed, the order will be cancelled. The status will change to ‘C’ and no further processing will be allowed. |
| Create Del Addr | If pressed, the user is taken to a similar screen as the ‘Change Delivery Address’ tab – the user can add additional delivery addresses here for the customer. This is the Partner Address Maintenance screen PFS1810. |
| Create Inv Addr | If pressed, the user is taken to a similar screen as the ‘Change Delivery Address’ tab – the user can add additional invoice addresses here for the customer. This is the Partner Address Maintenance screen PFS1810, preset for address type INV. |
| Invoicing | Displays the invoicing charges currently applied to the order on screen WHS7093. The user also has the ability to enter additional charges (see SOP Invoicing guide for details) |
| POD | Allows the user to enter POD information |
| EDI Out | |
| Order Notes | Allows the user to enter pick, despatch and carrier instructions that will appear on the pick list, despatch note and carrier labels. This will be through a pop-up screen SOS1111, with multiple tabs for each of the instructions. |
| Invoice Notes | Allows the user to enter text that will be produced on the invoice print. This will be through a pop-up screen SOS1135. |
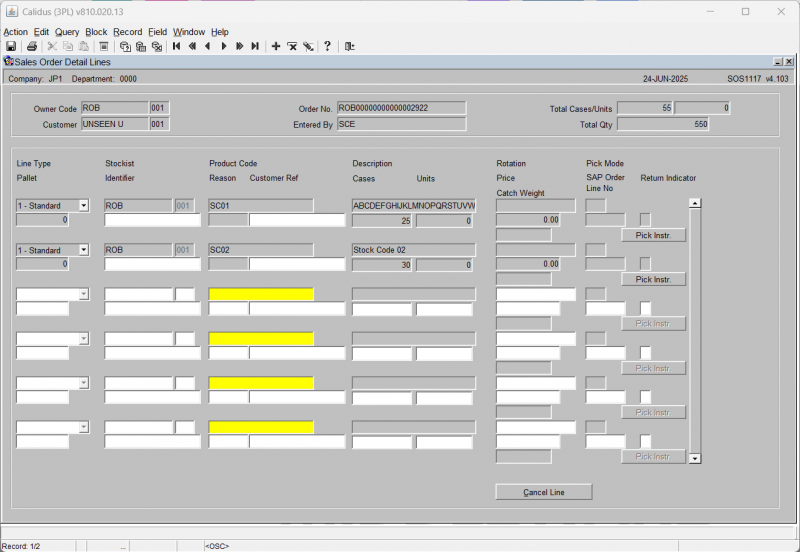
Sales Order Details (SOS1117)
The detail screen holds the product and quantity information for the order.
Each line can also have different processing values (line Type) which dictates how the stock is allocated at a later stage.
Information messages will provide details of the amount of available stock, if the order quantity exceeds the available quantity and for the calculated price.
| Field Name | Description | Options |
|---|---|---|
| Line Type | The line type allows stock preferences within a product to be specified, for example, stock with particular rotation details. | Default is ‘1’ which allows the system to dictate which pallet should be used based on the allocation rules. (See Allocation). |
| Stockist | The owner code of the order. Note, if you have owner prompt maintenance default set to ‘N’ you will be able to enter any owner code assigned to your user id. | |
| Product Code | The product code and description of the stock being order. | Must have been setup in Stock Codes Maintenance. |
| Description | The description of the product selected | display only |
| Rotation | If using line type ‘3’ the rotation field will become enabled for you to enter a system rotation. | Must have been booked onto the system previously |
| Pick Mode | The picking mode to be used if pallet levelling is in operation (not used) | |
| Pallet | If using line type ‘4’ the system pallet id field will become enabled for you to order by a specific pallet id. | Must have been booked onto the system previously . |
| Identifier | If using line type ‘5’ the Identifier field will become enabled for you to order by customer rotation. | |
| Reason | If the customer allows the ordering of held stock, a reason code can be entered here. If the stock code exists on the WMS held under that reason code, the order can be raised (not migrated) | Must have been setup in reason codes maintenance . |
| Customer Ref | A customer specific reference number for the order. | |
| Cases | The quantity of cases to be ordered . | |
| Units | If the two unit of measure flag is set to ‘Y’ in owner maintenance, the units field will become enabled. The user can then order in either cases or units. | |
| Price | The price of the stock. Will default to the price set up in stock maintenance, or can be overridden here if owner maintenance SOP/Charging tab is set to ‘Y’ for price change allowed. | |
| SAP Order Line No: | Client specific functionality to uniquely identify the order line (used for outbound commercial invoice. | |
| Return Indicator | Check this box to indicate if this item can be returned. | Will default to returns matrix for detail level text on the returns form. |
| Buttons | ||
| Pick Instr. | The Pick Instr. Button takes the user to an additional pop-up screen where they can enter picking instructions. These will appear on the pick list. | |
| Cancel | The Cancel Line button enables the user to cancel an individual line instead of the whole order. | |
You can exit back to the Sales Order Header maintenance screen using the Exit toolbar button, the X in the corner of the screen or by pressing F4.
Rapid Order Entry
As an alternative to the standard order entry screen there is also an option of using the Rapid Order Entry Screen, which allows for an order to be created with the minimum of data entry.
This is a variant tab on the existing Sales Order Header Maintenance screen, which can only be accessed direct from the menu.
All orders will automatically be created with a Line Type of '1' by default.
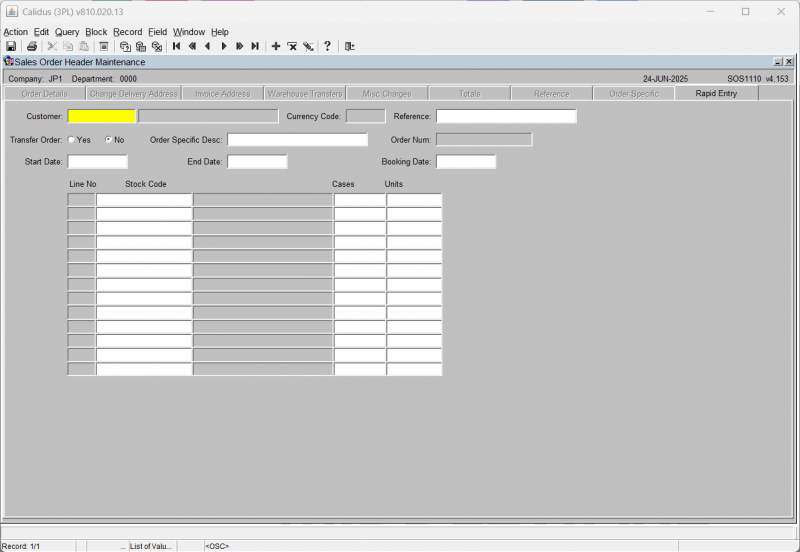
| Field Name | Description | Options |
|---|---|---|
| Customer Code ** | The customer code | An LOV is available |
| Reference | The customer reference | |
| Transfer Order | Whether this is considered a transfer order | Option select - Yes or No, defaulting to No |
| Order Specific Desc | An order specific description field - an alternative reference. | |
| Start Date | Start Date, End Date and Booking Date will all default to the current system date as you tab through them, but can be modified. | |
| End Date | Start Date, End Date and Booking Date will all default to the current system date as you tab through them, but can be modified. | |
| Booking Date | Start Date, End Date and Booking Date will all default to the current system date as you tab through them, but can be modified. |
Once the header section has been completed then you must enter in the stock details,
| Field Name | Description | Options |
|---|---|---|
| Line No | The unique order line number. | This is automatically generated for you when the line is created. |
| Stock Code | The stock being ordered.
The description of the stock code is displayed once selected |
An LOV is available |
| Cases | The quantity of cases to be ordered. | Enter as required |
| Units | If the two unit of measure flag is set to ‘Y’ in owner maintenance, the units field will become enabled. You can then order in either cases or units. | Enter as required |
Once complete, the order will then be moved through the system via the normal processes.
![]() Note: It is only possible to create orders using this option. To amend or view existing orders then the standard Order Entry Screen must be used (SOS1110).
Note: It is only possible to create orders using this option. To amend or view existing orders then the standard Order Entry Screen must be used (SOS1110).
Additional Functionality within Rapid Order Entry
Placing orders automatically on Hold dependent on customer authorisation
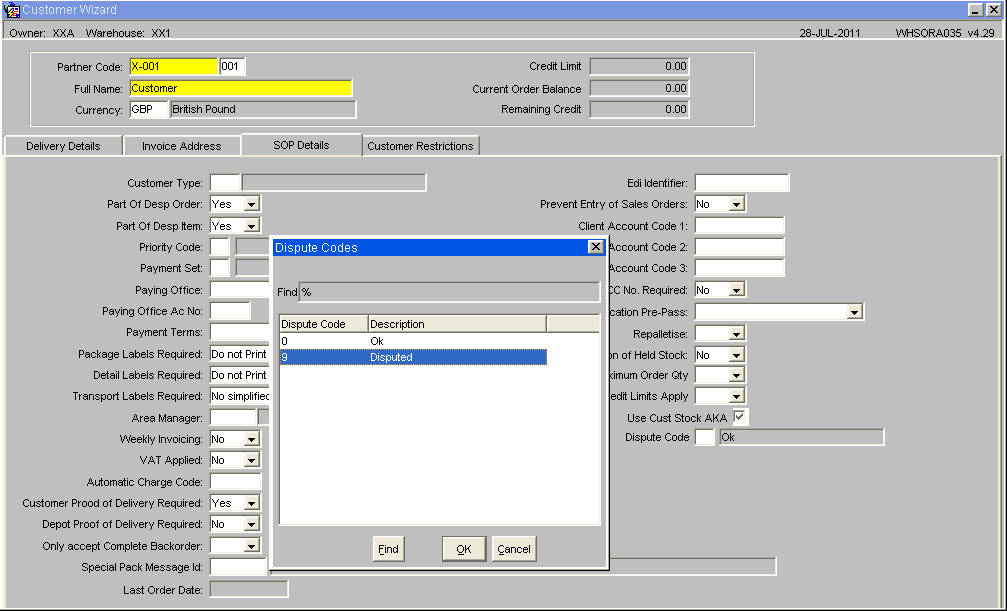
By setting the Dispute Code to '9' (Disputed), then all orders created for this customer will automatically be placed on hold.
To release orders for allocation the user will need to use the Change Order Status Screen (SOS1270).
There is also the option to create an internal job that will automatically delete any orders at status Held after a pre-determined number of days. See EDI Setup and Processing.
![]() Note: The Hold function will only work when using the Rapid Order Entry screen - this functionality has not been built in to the standard order entry screen.
Note: The Hold function will only work when using the Rapid Order Entry screen - this functionality has not been built in to the standard order entry screen.
Order Allocation
Orders can be allocated via either the Pick Wave Maintenance or from the Order Allocation screen.
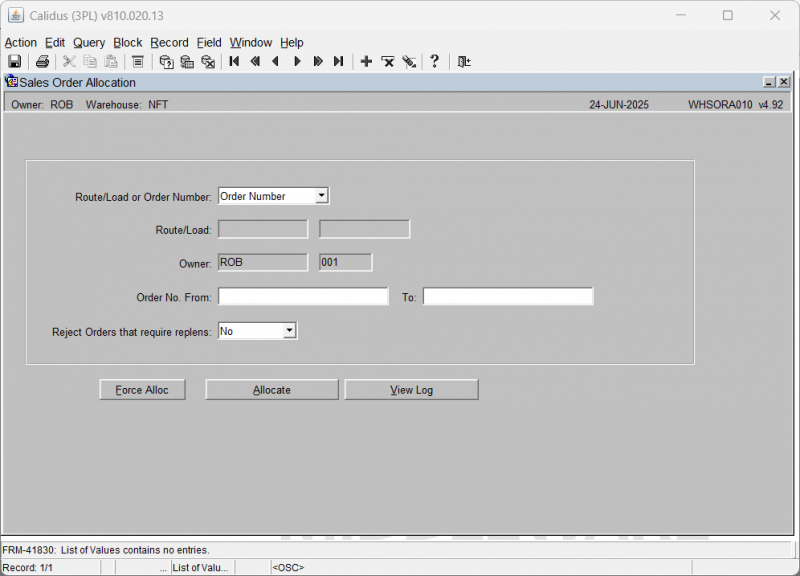
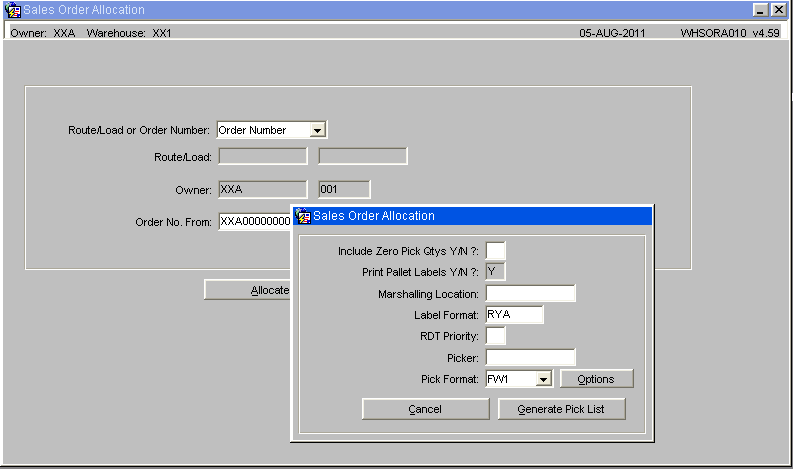
Sales Order Allocation (WHSORA010)
To enable an order to be processed through the warehouse, the first step is to allocate stock to the order placed.
Allocation can be organised by a route/load number, by a specific order number or, by a range of order numbers.
The following screen details the information required to enable the allocation process to begin. You may also generate a pick list from here.
![]() Note: The sequence in which stock is allocated is governed by the allocation rules as set up in Owner Maintenance.
Note: The sequence in which stock is allocated is governed by the allocation rules as set up in Owner Maintenance.
| Field Name | Description | Options |
|---|---|---|
| Route/Load or Order Number | Selection method dependent on how orders are allocated. | Note, as pick wave has the ability to allocate from its own screen, allocation will very rarely happen from here for a route/load. |
| Route/Load | If Route/Load is the selected method, enter the route and load number here. This option will disable Order Number From / To entry. | LOVs are available. |
| Owner | If Order Number is the selected method, enter the owner code. This option will disable Route / Load entry. | May default according to user profile; otherwise select. |
| Order Number From / To | Enter either a range of orders or a single order | LOV available |
| Reject Orders that require Replens | Whether orders that require replenishment moves will not be allocated in this run. | DDL, Options No (the default) or Yes |
| Buttons | ||
| Allocate | Starts the Allocation process | |
| View Log | Allows the user to view a log file of the allocation process. The log file can be automatically sent to screen or called via the button. The options are controlled in Warehouse Set Up and Owner Ware Parameters | |
| Force Alloc | ||
Dependent on the setting for Allocation Rule 4 in Owner Maintenance Sales Order Tab it is possible to run the pick list option once the allocation run has completed
| Field Name | Description | Options | |
|---|---|---|---|
| Include Zero Picks | Whether zero pick lines are to be inclueded on the pick note | Yes/No | |
| Print Pallet Labels Y/N | Are pallet labels to be produced | Yes/No, default is taken from Owner Maintenance / Format tab | |
| Marshalling Location | The marshalling location the order or route load is to be picked to | Mandatory field, can be defaulted in (Location set in System Parameters or Owner Ware Parameters) or can be selected from a LOV. Must be a valid Marshalling Location | |
| Label Format | If picking labels are required, enter the picking label format here. | ||
| RDT Priority | If the WCS system is enabled for this warehouse, the RDT priority will be prompted for here. | ||
| Picker | If the WCS system is enabled for this warehouse, the Picker will be able to be entered here, allocating these pick tasks directly to that picker. | An LOV is available. | |
| Pick Format: | What pick list format is to be used. | Select from the DDL provided. |
| Buttons | Description |
|---|---|
| Cancel | Cancel the pick list operation. This can then be run manually through the Pick List Generation screen |
| Generate Pick List | Perform the pick list processing and generate the pick list. If WCS is enabled for this warehouse, the picking tasks will be interfaced to the system for picking. |
| Options | Options for the pick format |
Pick Wave Maintenance (LAS0312)
The pick wave maintenance screen allows the user to ‘group’ orders together as a route load. The various selection criteria you see here (Order status, order priority, product type etc) are mandatory determined by whether the owner rules – PW01-PW13 are set.
Selection Tab
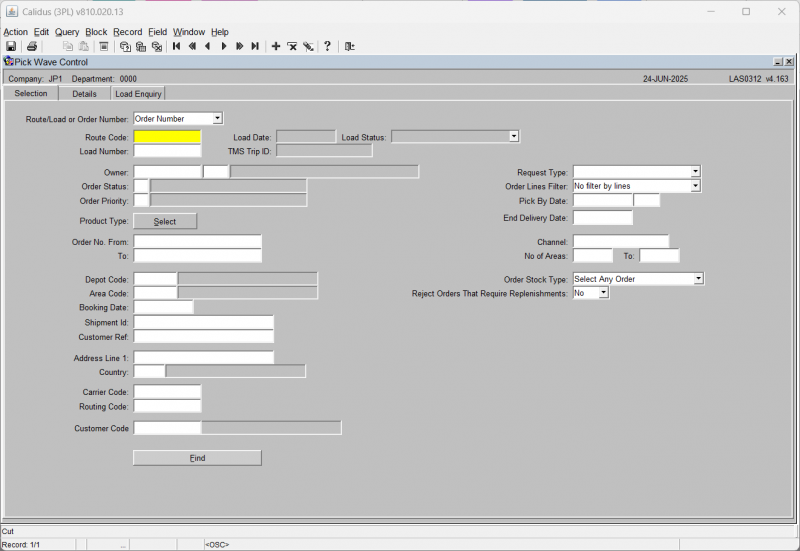
| Field Name | Description | Options |
|---|---|---|
| Route/Load or Order Number | A selection of whether to find routes/loads/orders and in what way. By selecting Route/orders, you can create new loads from this screen. | Select from the DDL provided - Route/Load or Order Number |
| Route ** | The route code the orders will be assigned to. | The route code must exist in route codes maintenance.
This is always required, even when entering by Order Number. An LOV is available. |
| Load Date | The date of the load that was generated | Only enabled when selecting by Route/Load. |
| Load Status | The status of the load generated | Select from the DDL provided: All, Despatched, Open, Being Picked, Pick Confirmed.
Only enabled when selecting by Route/Load. |
| Load | The unique load number | If one is not entered, a new load will be generated. The load number will be automatically generated once orders have been assigned to the route.
If selected, then an LOV is available to select any existing load numbers. |
| TMS Trip ID | If CTMS is being used, then the TMS trip ID can be provided here instead of the load number. | Only enabled when selecting by Route/Load. |
| Owner ** | The owner code of the orders | Must exist in owner maintenance – if owner prompt maintenance default is set to ‘N’ you may use any owner set up against your login id |
| Order Status | Allows the user to select orders based on the order status - I.e. all orders not yet allocated = status | Must be a valid order status |
| Order Priority | Allows the user to select orders based on the order priority | Must have been created in order priority maintenance – LOV available |
| Product Type | Allows the user to select orders based on the product type within each order detail | A pop-up window will show all of the product types.
These must have been created in product types maintenance Tick boxess are provided to select multiple product types |
| Order No. From / To | Allows the user to select orders within an order number range | An LOV is available |
| Depot Code | The Depot Code of the Order, and he description if selected | An LOV is available |
| Area Code | Area code for where the stock is to be picked from, and the area description if selected. | Only valid for orders which are at status 4 allocated, and will have a location code to pick the stock from. Used to aid with picking efficiency
An LOV is available |
| Booking Date | The booking date of the order | Display only, note, the orders will be sequenced by booking date then order number order |
| Shipment id | Shipment id of the order | Free text field |
| Customer Ref | Allows the user to select orders on the customer reference field | - |
| Address Line 1 | Allows the user to select orders on the address line of the customers address | - |
| Country | Country Code | LOV on valid country codes |
| Carrier Code | Allows the user to select orders on the carrier code of the order entered in order maintenance | Must have been created in carrier codes maintenance – LOV available |
| Routing Code | Allows the user to select orders on the routing code entered in order maintenance | Must have been created in routing codes maintenance – LOV available |
| Customer Code | Allows the user to select orders on the customer code of the order entered in order maintenance. | An LOV is available. |
| Request Type | Allows the user to select orders on the select type entered in order maintenance | Must have been created in select types maintenance – LOV available |
| Order Lines Filter | Selection criteria for single or multiple line orders to aid with picking speeds | Select from the DDL provided:
|
| Pick By Date | The Pick By Date on the order header. | Valid date |
| End Delivery Date | The End Delivery Date on the order header | Valid date |
| Channel | ||
| No of Areas | ||
| Order Stock Type | Select from the DDL provided:
| |
| Reject orders that require replenishments | Select from options Yes or No (the default |
| Buttons | Description | Options |
|---|---|---|
| Find | This button starts the process of finding the orders based on the selection criteria entered | - |
Once found, the loads and orders matching the selection criteria are displayed in the Details tab.
Details Tab
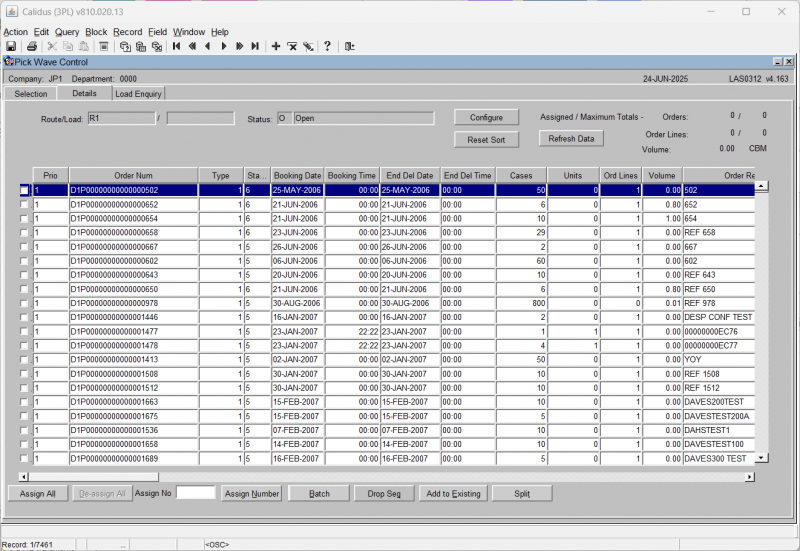
![]() Note: By clicking on the buttons above the columns it is possible to re-sort the data to improve the order display and to aid with selection.
Note: By clicking on the buttons above the columns it is possible to re-sort the data to improve the order display and to aid with selection.
| Display Values | Description | Options |
|---|---|---|
| Assigned/maximum totals | This field will display how many order lines have been assigned so far out of the maximum allowed | Display only, the maximum orders and order line levels are set in Owner Maintenance, Sales Order Tab |
| Orders | The total number of orders allowed for a route load | Display only |
| Ord Lines | The total number of order lines for that order | Display only |
| Buttons | Description | Options |
|---|---|---|
| Configure | To allow the screen to be configured to a specific operation or user | This will display the Program Layout Configuration screen WHS0909, where you can select the columns displayed in this form. |
| Reset Sort | Will reset the sort sequence to the values that were originally returned | |
| Refresh Data | Requery the orders and loads again using the existing criteria entered in the Selection tab. | |
| Assign All | Allows the user to assign all orders selected to the route load | |
| Deassign All | Allows the user to de-assign all orders selected from the route load | |
| Assign Number | Will create a Pick Wave with the number of orders entered in the Assign Number field | |
| Batch | Will create multiple Pick Waves, each pick wave will have the number of orders entered in the Assign Number field | If there are a 100 orders displayed from the original selection criteria, if you then enter 10 into the Assign Number field and select Assign Batch, then ten Pick Waves will be created each with 10 orders. |
| Drop Seq | Allows you to modify the drop sequence within the selected load. A new window will open showing the orders in the load, which may then be modified through the entry of the new sequence column. You can then save your changes with the Save button, or reset to the pre-existing sequence. Saving will return you to the Details tab. | |
| Add to Existing | Allows the user to move orders to existing route loads as long as the status matches | - |
| Send to Allocation | Enables the user to allocate the orders selected | This option will only be enabled if the orders selected are at status ‘1’ |
| Split | Split selected orders from an existing load. |
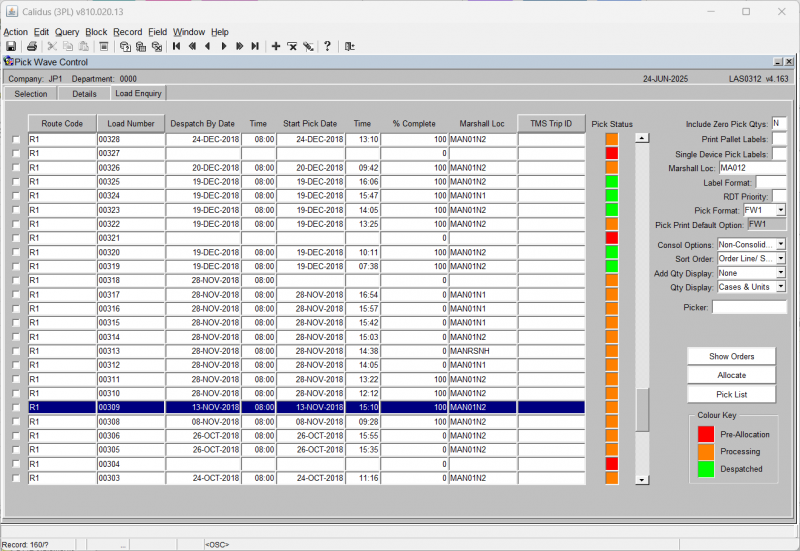
Load Enquiry Tab
This allows you to see loads that have already been created, and manage them.
| Field Name | Description | Options |
|---|---|---|
| Route Code | The Route Code | |
| Load Number | The load number | |
| Despatch By Date/Time | When the orders on this pick wave are expected to be despatched. | |
| Start Pick Date/Time | When the orders on this pick wave are expected to start picking | |
| % Complete | The percentage complete of all of the lines/pages on the pick wave. | |
| Marshall Loc | The assigned marshalling location | |
| TMS Trip ID | The TMS Trip ID (if CTMS is in use). | |
| Pick Status | A RAG column showing the basic status of the processing of the pick wave. The key is displayed on the bottom right of the form. |
You have the facility to action the existing loads here.
| Button Name | Description |
|---|---|
| Show Orders | Show all orders on this load in the Details tab of the form |
| Allocate | Allocate the selected load(s) using the options specified (see below) |
| Pick List | Pick List the load(s) specified. |
The options required for allocation and pick listing are generally defaulted from settings, but must be entered.
| Field Name | Description | Options |
|---|---|---|
| Include Zero Pick Qtys | Whether zero pick lines are to be inclueded on the pick note | Yes/No |
| Print Pallet Labels | Are pallet labels to be produced | Yes/No, default is taken from Owner Maintenance / Format tab |
| Single Device Pick Labels | Whether a single device is used for all labels | Yes/No |
| Marshall Loc | The marshalling location the order or route load is to be picked to | Mandatory field, can be defaulted in (Location set in System Parameters or Owner Ware Parameters) or can be selected from a LOV. Must be a valid Marshalling Location |
| Label Format | If picking labels are required, enter the picking label format here. | |
| Pick Format | What pick list format is to be used. | Select from the DDL provided. |
| Pick Print Default Option | The default pick list format for this owner. | Display Only |
| Consol Options | Whether and how to consolidate pick lines into picked pallets. | Select from the DDL Provided:
|
| Sort Order | How the orders are sorted. | Select from the DDL provided:
|
| Add Qty Display | Whether and how additional quantities are displayed | Select from the DDL provided:
|
| Qty Display | How pick quantities are displayed. | Select from the DDL provided:
|
| Picker | If the WCS system is enabled for this warehouse, the Picker will be able to be entered here, allocating these pick tasks directly to that picker. | An LOV is available. |
Pick List Report (WHSORA020)
If not sending an order to pick within the pick wave functionality, the Pick List screen can be used to produce the pick list print and advance the status of the order from ‘4’ to ‘5’.
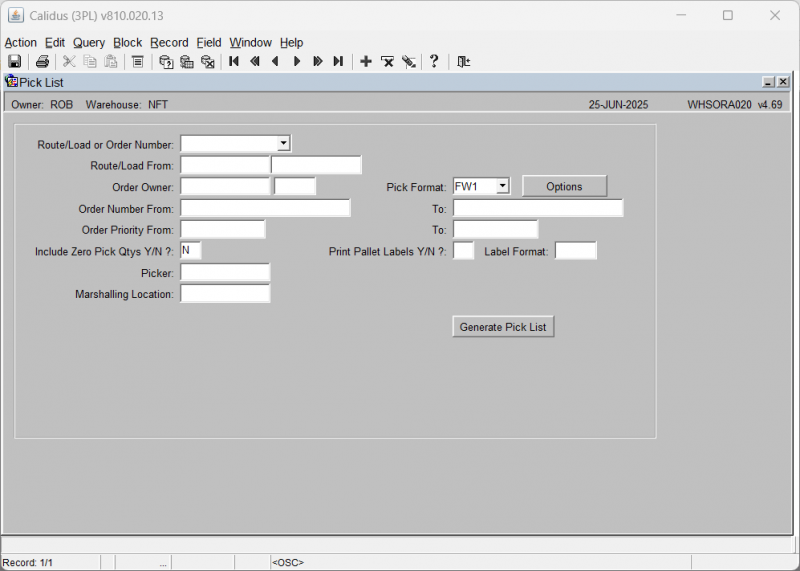
Field Information:
- Route/Load or Order Number: Select whether the process is to produce the pick list by order number sequence or route/load number. The selection criteria here will determine whether the Route/Load From or Order Number From/To fields are enabled.
- Order Owner: The owner code of the orders to be printed. This will default to current owner.
- Order Priority From/To: Allows you to select a subset of orders from within the method selected.
- Include Zero Pick Qtys Y/N?: Indicate if the pick list should contains lines that could not be allocated.
- Picker: For RF purposes, enables you to enter a valid employee code in order to send the order to a specific picker via RF.
- Marshalling Location: Allows you to define a different marshalling location to the default if required. Must have been set up as a use type ‘6’ location in Location Codes Maintenance.
- Pick Format: A pre defined pick list format hard coded. This will default to the pick format set up in Owner Maintenance
- Print Pallet Labels Y/N?: Specifies whether pick labels are to be produced. This will default to the value set in owner maintenance, format tab.
- Label Format: Select a format for the pick labels if required. This must be a pre defined hard coded label format.
- Generate Pick: Click the Generate Pick button to begin printing. This will take you through the printing process.
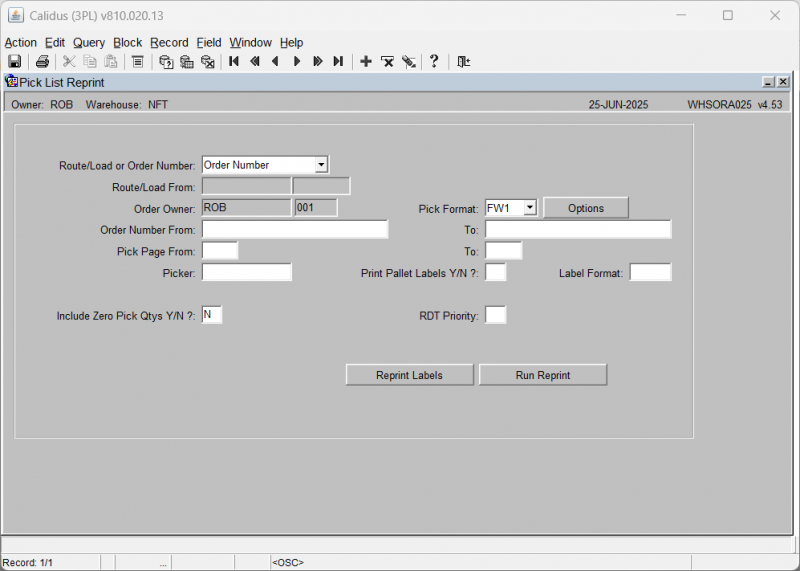
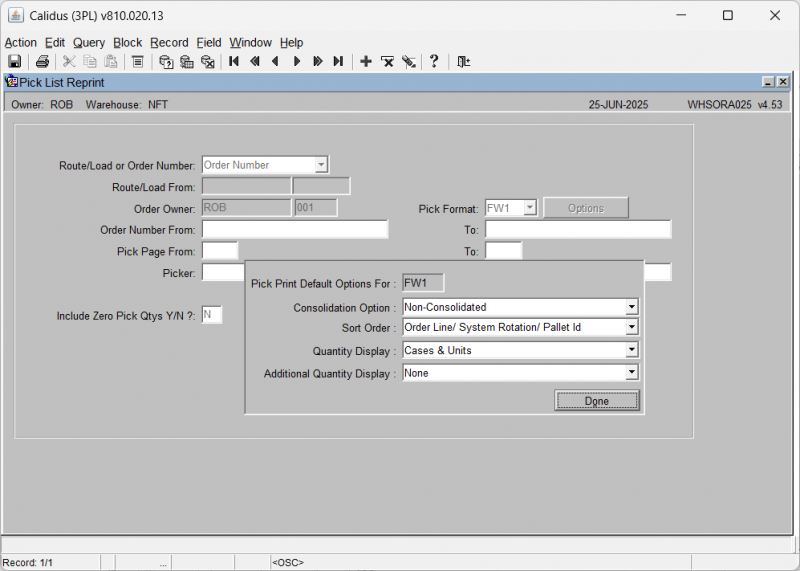
Pick List Reprint Report (WHSORA025)
This screen is used to re-generate a pick list again if required. This is only normally used if an error occurred at first print.
![]() Note: The order has to be status ‘5’ for this to work.
Note: The order has to be status ‘5’ for this to work.
Field Information:
- Route/Load or Order Number: Select whether the user is to produce pick list by order number sequence or route/load number. The selection criteria here will determine whether the Route/Load From or Order Number From/To fields are enabled .
- Order Owner: The owner code of the orders to be printed. Will default to current owner .
- Pick Page From/To: Enables the user to select specific pages within a pick list.
- Picker: For RF purposes, enables the user to enter a valid employee code in order to send the order to a specific picker via RF.
- Include Zero Pick Qtys Y/N?: Indicate if the pick list should contains lines that could not be allocated .
- Pick Format: A pre defined pick list format hard coded. Will default to the pick format set up in Owner Maintenance .
- Print Pallet Labels Y/N?: Specifies whether pick labels are to be produced. Will default to the value set in owner maintenance, format tab.
- Label Format: Select a format for the pick labels if required. Must be a pre defined hard coded label format.
- RDT priority: used for RF purposes. Determines what the priority of this pick is in relation to others.
Buttons:
- Reprint Labels - this reprints the labels associated to the selected orders or route/load, in the label format selected.
- Run Report - this re-runs the pick list in the format selected.
- Options - this allows you to specify some additional options for the standard format.
Additional options:
- Pick Print Default Options for - This shows the format for which the options are being configured, as selected in the previous window.
- Consolidation Option - Select from a DDL, options:
- Non-Consolidated (the default)
- Consolidated
- Sort Order - How the orders are sorted. Select from the DDL provided:
- Order Line/System Rotation/Pallet ID
- Product Type/Stock Code/System Rotation/Pallet ID
- Aisle Seq/Pick Seq/Order Line/System Rotation/Pallet ID
- Aisle Seq/Pick Seq/Product Type/Stock Code/System Rotation/Pallet ID
- Quantity Display - How pick quantities are displayed. Select from the DDL provided:
- Cases & Units
- Unit Equivalent Quantity
- Additional Quantity Display - Whether and how additional quantities are displayed. Select from the DDL provided:
- None (the default)
- Volume and Weight (Net)
- Volume and Weight (Gross)
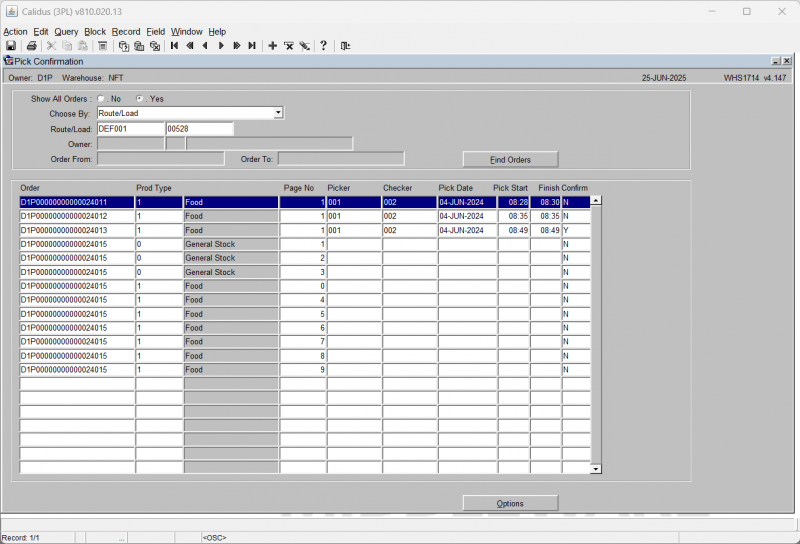
Pick List Confirmation (WHS1714)
Once the picker has completed picking, this screen enables the warehouse supervisor to confirm the pick details.
Select Route/Load or Order Number to pick confirm a range of orders or an individual order. Once completed, the order will move onto status ‘6’ and the stock will move from its original picking location to a marshalling location.
Field Information:
- Show All Orders: Allows you to select orders at status ‘5’ only or all orders at status ‘5’ and above.
- Y = status 5 and over
- N – status 5 only
- Choose By: Enables the selection of orders to confirm by route/load or by order number. Route load will enable the route/load field, order number will enable the order from/to fields.
- Route/Load: The route and load containing the orders you wish to confirm. An LOV is available in both fields. This is only prompted for if you Choose By Route/Load.
- Owner: The owner code of the orders you wish to confirm. Will default to the current owner
- Order From/To: The range of orders that you wish to confirm. An LOV is available in both fields. This is only prompted for if you Choose By Order Number.
The Find Orders button will trigger the population of orders in the table based on the selection criteria entered.
The table then displays:
- Order: Display only, the order number of the order to be confirmed
- Prod Type: the product type of the order line. Display only
- Page No. The pick list page number. Note, if a page number ‘0’ is seen, this is a zero allocation. Display only.
- Picker: The employee code of the person who picked the order. Must have been setup in employee codes maintenance.
- Checker: The employee code of the person who verified the picked order. Must have been setup in employee codes maintenance.
- Pick Date: The date the order was physically picked.
- Pick Start: The time the order started to be picked.
- Finish: The time the order pick was completed.
- Confirm: Displays the current confirmation status of the order – note it is possible to ‘toggle’ this status between assigned and unconfirmed if you want to only assign certain lines.
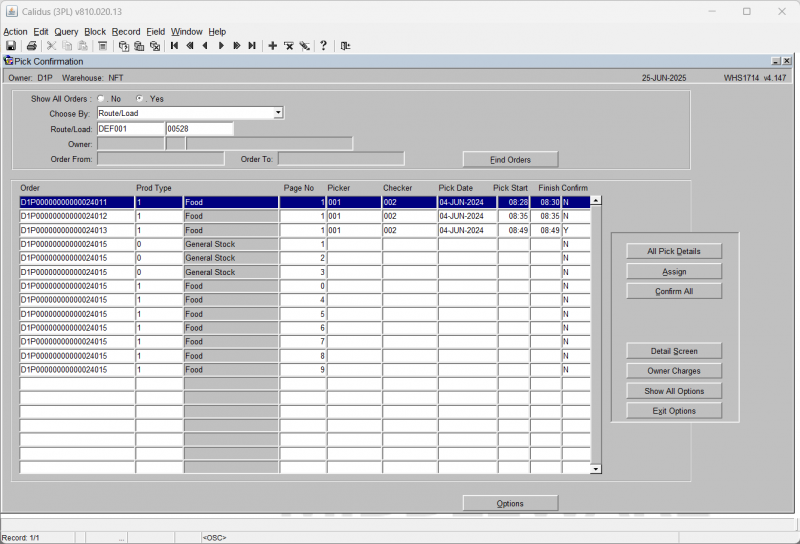
When you click the Options button, the screen as shown is displayed.
This gives you additional options during pick confirmation. Options are:-
- All Pick Details: This will display a popup screen allowing you to enter Picker, Checker, Pick Date, Start and End times for all lines. You can then Enter them or Cancel entry and return to the main screen.
- Assign: This flags the order as ready for confirmation.
- Confirm All: After confirmation, this option completes confirmation of all assigned orders.
- Detail Screen: Takes you into the order line level information to make amendments - see below for details.
- Owner Charges: This will take you to the Detail Handling Charges screen WHS0168. Here you will be able to enter charges for the order.
- Show All Options: shows additional options - see below for details.
- Exit Options: Takes you back to the main screen.
When you click the Show All Options button the screen as shown is displayed.
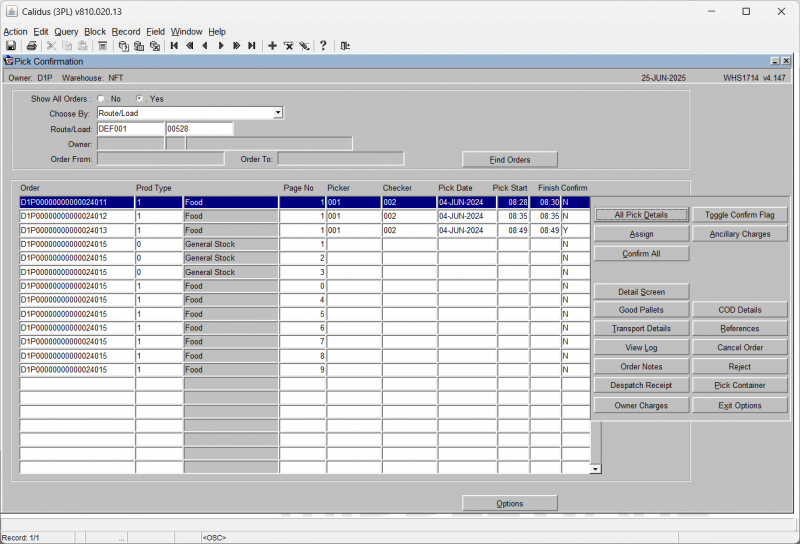
This gives you additional options during pick confirmation. Options are:
- Good Pallets: Produces a pop up box to allow you to enter how many good and bad pallets are on the orders/route load. This information will be produced on the outbound documentation. You can also Refresh the automatically produced values here.
- Transport Details: The screen will display a pop-up window asking for entry of Trailer No, Container Seal No, Freight Reference, Freight Charge Terms (a DDL is provided) and the Load Ref for the selected orders. When entered, you can click Return to return to the main window.
- View Log: The screen will display a pop-up window showing a log of all the confirmation details that have been processed. You can browse through this (if there are any errors that need to be corrected) and return to the main window using the Exit button.
- Order Notes: The Customer Invoice and Delivery Details screen SOS1111 will display. This allows you to enter Picking, Despatch and Carrier Instructions for the selected order.
- Despatch Receipt: This will give you the option of printing labels for despatch receipt. You can select the number of labels required, then Print. If not required, you can Close to return to the main window.
- Toggle Confirm Flag: Changes individual lines from ‘C’ to ‘N’ and vice versa allowing the user to confirm specific order lines.
- Ancillary Charges: Allows you to enter additional charge information for the order(s). Note that you can only run this if the warehouse down-dates stock at pick conformation. If not (i.e. it downdates at Despatch instead) then this option will not be allowed here.
- COD Details: Allow you to add or amend COD Amount and Reference information entered at order entry. When complete, you can click Return to return to the main window.
- References: The screen will display a popup window to enter the Container Number for the selected orders. When complete, you can click Return to return to the main window.
- Cancel Order: This option will cancel the selected order, after requesting confirmation from you.
 Warning: If Edi PICK messages are to be used, this will trigger a zero quantity cancellation pick message.
 - Reject: As per the Toggle Confirm Flag button, this sets the status of all orders at status ‘C’ back to ‘N’
- Pick Container: This displays a popup screen showing the container ID into which the goods have been picked. You can change this here. You can then Save or Exit Without Saving.
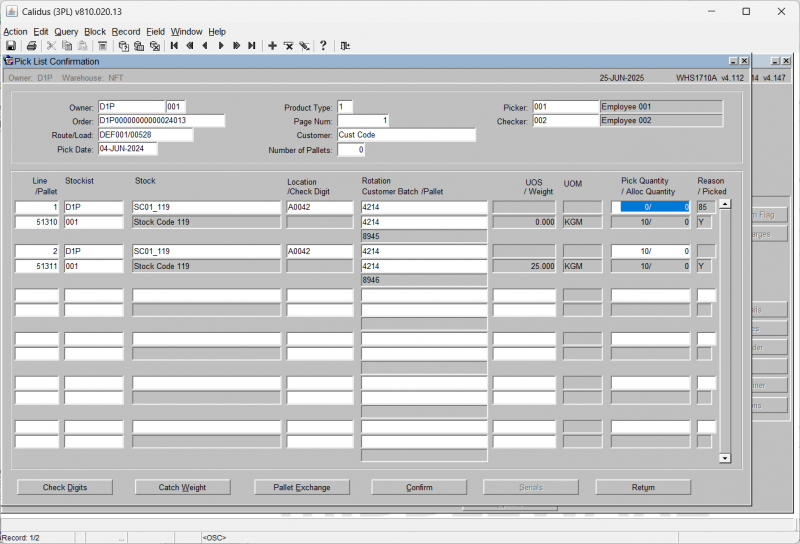
Pick List Confirmation Details (WHS1710A)
In this screen, you can make changes to the quantities picked.
Note, this screen can also be used to append an order line.
This means that if an employee has gone to the location but there is no stock, but has found alternative stock, they can zero off the original line and append a new pallet on.
This will zero the picked quantity in the original location and increase the amount in the new location.
NOTE, this will free the original stock.
If there is no stock there, or it is damaged, Stock Control should put this pallet on hold or adjust the pallet until an investigation can be carried out.
Otherwise the stock will be once more available for future orders.
In order to append a line, you need to click the + button in the toolbar. The cursor will then move to the next line for entry. The Line numbers must be sequential. The header information will be defaulted from the previous screen.
Field Information:
- Line: The line number of the order for this product / pallet combination. Display only unless appending a new line.
- Pallet: The system pallet id of the stock line to be confirmed / amended. Display only unless appending a new line.
- Stockist: The owner code and sub code of the stock line to be confirmed / amended. Display only unless appending a new line.
- Stock: The owner code and sub code of the stock line to be confirmed / amended. Display only unless appending a new line.
- Location: The location code of the stock line to be confirmed / amended. Display only unless appending a new line.
- Check Digit: Allows the user to enter check digits. Only enabled if check digits are turned on in System Parameters.
- Rotation: The system rotation of the stock line to be confirmed / amended. Display only unless appending a new line.
- Customer Batch: The customer rotation (batch) of the stock line to be confirmed / amended. Display only unless appending a new line.
- Customer Pallet: The customer's pallet ID (or SSCC ID) of the stock line to be confirmed/amended. Display only.
- UOS: The defined Unit of Sale for the customer. Display only.
- Weight: The weight of the item, and the weight unit (usually KGM). Display only.
- UOM: The Unit of Measure. Display only.
- Pick Quantity: The quantity to be pick confirmed. Note, this cam be amended to a value equal or less that the amount shown i.e. for a short pick of 1, the quantity above would be taken to 1.
- Alloc Qty: The quantity of stock allocated to the order. Any amendments can only be made up to this quantity. Display only.
- Reason: A reason code for the amendment of the pick quantity – the field will only be enabled if the pick quantity has been changed or if a new line is being appended.
- Picked: An indicator as to whether the line has already been marked as picked and confirmed.
Buttons:
- Check Digits: The Check Digits button will take you to the C/D field in order to enter check digits.
- Catch Weight: Allows you to enter the catch weights of each pallet (or carton) if required. Determined by the catch weight flag of the product in stock maintenance.
- Pallet Exchange: Allows you to 'substitute' one pallet for another (similar to substitution at pick confirmation.)
- Confirm: Pick confirms the specific page.
- Serials: Determined by the serial numbering flags on stock maintenance, this button will take you either to a serial number selection or entry screen. For more details on serial entry, see the Goods receipt user guide.
- Return: takes you back to the main pick confirmation page.
Despatch Confirmation (WHS1910)
The despatch confirmation screen allows the user to despatch the order from the warehouse. In system terms, the stock will be removed from the marshalling location and warehouse. A negative stock transaction will take place with a type of 'SALE'.
![]() Warning: This is an incomplete guide.
Warning: This is an incomplete guide.
The screen is located in Warehousing/Sales Allocation & Picking/Despatch by Route/Load
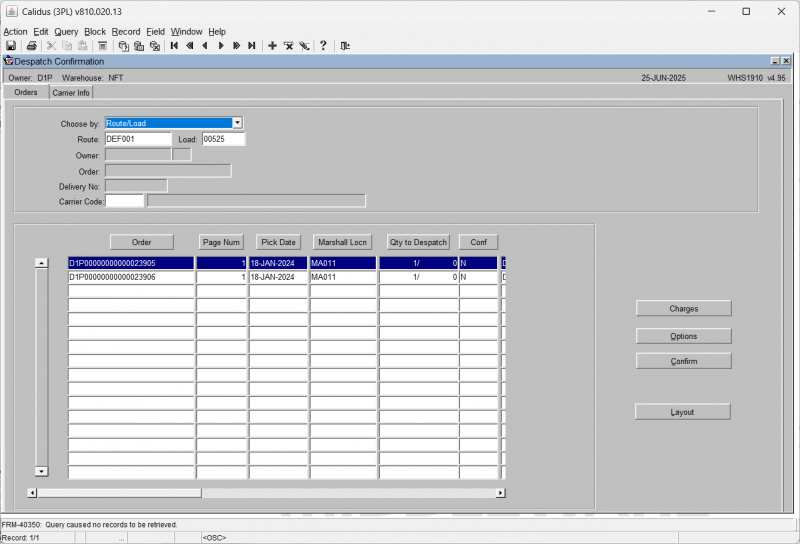
The standard screen is shown below:
The screen will begin by showing the Orders tab.
To despatch a route or order you must first select either Carrier, Route/Load or Order Number from the Choose By drop down box.
- If you select Route/Load, you will be prompted to enter the route and load. A lookup is provided that allows you to select unconfirmed or confirmed loads,
- If you select Order Number, you will be prompted for Owner and Order.
- The Owner will default, but you can change this to another owner if you want to - an LOV is provided.
- The Order provides an LOV to help you find the order you are after.
- If you select Carrier, you will be prompted to enter the carrier code. An LOV is provided.
Enter the carrier, route/load or order number you wish to despatch and press the Execute Query button. The screen will display matching records in the table below, as in the screenshot above, where this was selected by Route/Load.
The fields displayed are:
- Order (always displayed)
- Route/Load
- Page Num
- Pick Date
- Marshall Locn
- Qty to Despatch
- Conf
- Route Code
- Load No
- Order Num
- Booked Date
Note that you can change the fields in this table using the Layout button provided. You will be taken to the Program Layout Configuration screen WHS0909 to select the fields, widths, order, etc.
You can view, enter or amend handling charges using the Charges button - you will be taken to the Detail Handling Charges screen WHS0168, where you can automatically apply charges, produce a miscellaneous invoice or enter charges.
Further optional are available to you using the Options button, which will display a new panel of options:
- Deassign Order - this will deassign the selected order from this load.
 Warning: There is no confirmation when you press this - be sure this is what you want to do.
 - Delivery Refs
- Commercial Invoice Input
You can close this panel with the Exit Options button provided.
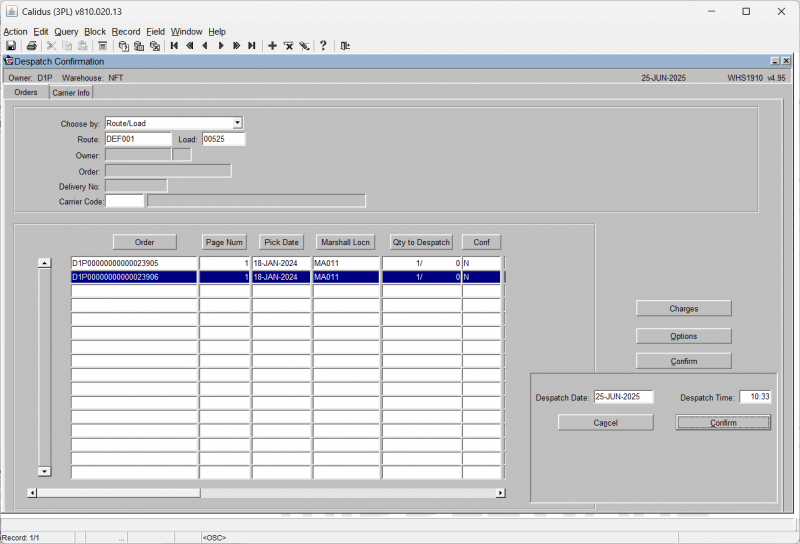
To despatch the order, press the Confirm button.
The system will now require a date and time (these can be in the past). If you press the TAB key over each of the fields, the date and time will default to the current system date/time.
Press the Confirm button to confirm the despatch (you can cancel the despatch using the Cancel button). The screen will confirm that despatch confirmation is complete.
The order has now been despatched and will have a system status of 9.
Optional Processes
In addition to the standard Sales Order Process there are also additional value added processes that can be enabled as required by the client.
Multi-Level Order Packing (WHS1945)
As an optional process it is also possible to capture packing details for an order, which includes reference or tracking numbers, production of specific carrier labels, interfacing to external systems including carrier systems and the production of all required packing notes at different packing levels.
Dependent on the values set in the Order Packing Maintenance certain parameters will automatically be set when the user enters the Packing Screen.
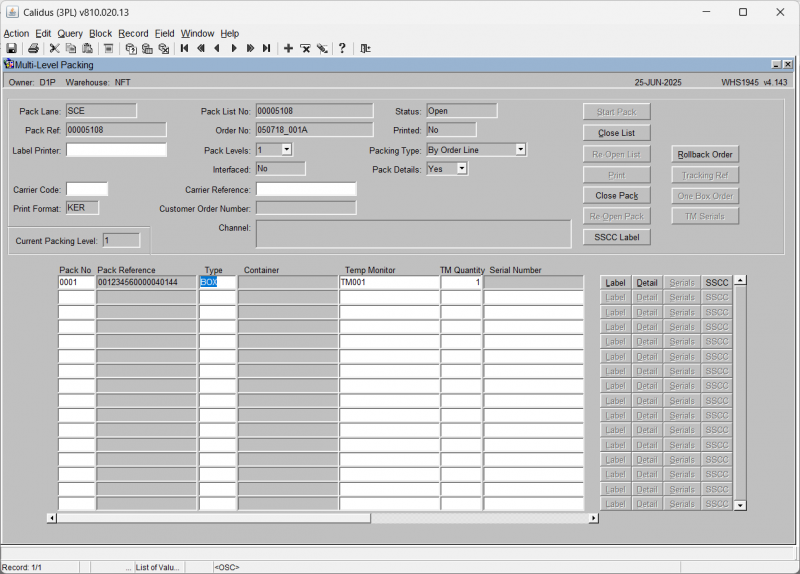
| Field Name | Description | Options |
|---|---|---|
| Pack Lane | Specifies which pack lane the order will be packed into. Note, this field is system generated and no entry is allowed. | Pack lane population is specified by the setup in packing parameters maintenance – |
| Pack Ref | Depends on the number of levels of packing, the pack ref will be populated with the reference number of the outside carton. This will be system generated. Entry will only be allowed if querying a previously entered pack. | The generation of the pack ref is specified by the setup in packing parameters maintenance |
| Pack List No | A unique system generated pack list number. Entry will only be allowed if querying a previously entered pack. | Based on the last number type ‘PACK’ in warehouse document numbering maintenance |
| Order No | The order number to be packed | Note, the order number will only be enabled if packing is set to ‘single order packing’ in packing parameters maintenance |
| Printed | Has the pack list been printed? | Y or N – display only |
| Label Printer | The defined label printer for pack labels at this station. | May default. An LOV is provided to select a printer. |
| Pack Levels | The number of different sub levels of packing i.e. carton within a box within a crate etc | 1 – 9 – number of packing level determined by the default pack levels flag in packing parameters maintenance |
| Packing Type | How the goods will be packed. Note, if despatching by shipment pallet, this has to be set to ‘By Pallet’ | By Order Line
By Stock Code By Pallet By Rotation - determined by the default pack levels flag in packing parameters maintenance |
| Interfaced | Used for client specific functionality to determine whether a pack has been scanned through the transport system and the relevant edi file uploaded | Y or N – display only |
| Pack Details | Specifies whether you require detail level packing information | Y or N - determined by the default pack levels flag in packing parameters maintenance |
| Carrier Code | If carrier information is required, the carrier code. | |
| Carrier Reference | If carrier information is required, the carrier reference. | |
| Print Format | The Pack List format being used | Defaulted from settings |
| Customer Order Number | The customer's order number for the order selected | Display only. |
| Pack No | The number of detail records for the pack. This will be system generated by the number of pack references generated. | 0001 – 9999 |
| Pack Reference | The pack ref will be populated with the reference number of the outside carton. This will be system generated. Entry will only be allowed if querying a previously entered pack. | The pack ref will either be populated with the SSCC number if used or a sequential number based on the pack list no. |
| Type | The package type the goods will be packed into Based on pallet types. | Must have been created in pallet types maintenance – LOV available |
| Container | ||
| Temperature Monitor | If temperature monitors are required, the TM Type. | An LOV is provided |
| TM Quantity | If temperature monitoring is required, the quantity of TMs. | |
| Serial Number | If unique TM monitoring is required, the serial number of the TM | |
| Net | The net weight of the pallet and products for this pack ref | System generated |
| Gross | The gross weight of the pallet and products for this pack ref | System generated |
| Volume | The volume of the pallet and the products associated with the pack ref. | System generated
Based on the LxWxH of the products and the pallet type selected |
| Packed Cases | The quantity of cases to be packed based on the order detail records associated with the pack ref. System generated – will change if the packed quantities are amended. | Display only |
| Packed Units | The quantity of cases to be packed based on the order detail records associated with the pack ref. System generated – will change if the packed quantities are amended. | Display only |
| Haz | Field that displays whether the product(s) to be packed are hazardous or not | Y or N – based on the hazardous flag on stock maintenance – display only |
| Full Pallet Pick | Field that displays whether the quantity to be packed equals a full pallet | Y or blank – based on a calculation on quantity of cases to a pallet in stock maintenance |
| Status | The status of the pack. This will be updated when the user clicks ‘Confirm Pack’ | O – Open
C – Closed |
| Buttons | ||
| Label | Produces a label for the pack. | |
| Detail | Takes you to the detail (the contents) of the pack. | |
| Serials | If Serials are required for this stock code, this button will allow you to identify them. | |
| SSCC | If SSCC is required, this will allow you to enter the information. | |
| Button | Description |
|---|---|
| Start Pack | Starts the packing process for the required order |
| Close List | Sets the pack status to ‘C’ and enables the printing of the pack list and pack labels. If required, updates client specific tables with carrier information |
| Re-Open List | If configured, allows you to re-open a closed pack list. |
| Allows you to reprint the pack list and pack labels if required | |
| Close Pack | Closes the specific pack selected |
| Re-open Pack | Sets the status of the pack back to ‘O’ and allows you to re-close the pack |
| SSCC Label | Allows you to print detail level labels if required |
| Detail | Takes you to the detail level screen |
| Rollback Order | Rollback the whole order so that you can start again. |
| Tracking Ref | The Tracking Reference |
| TM Serials | If required, shows you the Temperature Monitor serials. |
The process is highly configurable and complex, and requires training.
In general, however, the process to pack an order is as follows:
- The screen automatically starts expecting you to enter a new order to pack.
- If you want to find an existing order or pack list, click Enter Query, enter an order reference or known pack list number and then Execute Query.
- Enter an Order Reference - an LOV is available.
- The screen will display details of the order.
- Click Start Pack - you will start defining the box you are packing into.
- The unique Pack No and pack reference will be generated for you.
- You will be prompted to select the Pallet Type - an LOV will automatically show.
- If temperature monitors are required, you will be forced to enter one now.
- If Serial Numbers are required, you may enter them now.
- Optionally click
- Label - print the pack label.
- SSCC - enter SSCC information for the pack.
- Click Detail - this allows you to identify the lines packed and shows the Order Packing Detail screen WHS1946, below.
- Enter all details packed in this pack.
- Optionally enter any additional details such as serials.
- Optionally produce pack labels.
- Close the pack
- Create as many packs are required.
- Once complete, close the list.
- Print the packing list and pack labels as required.
Multi-Level Order Packing Detail (WHS1946)
Multi-level order packing allows you to break down lines across orders into a single pack.
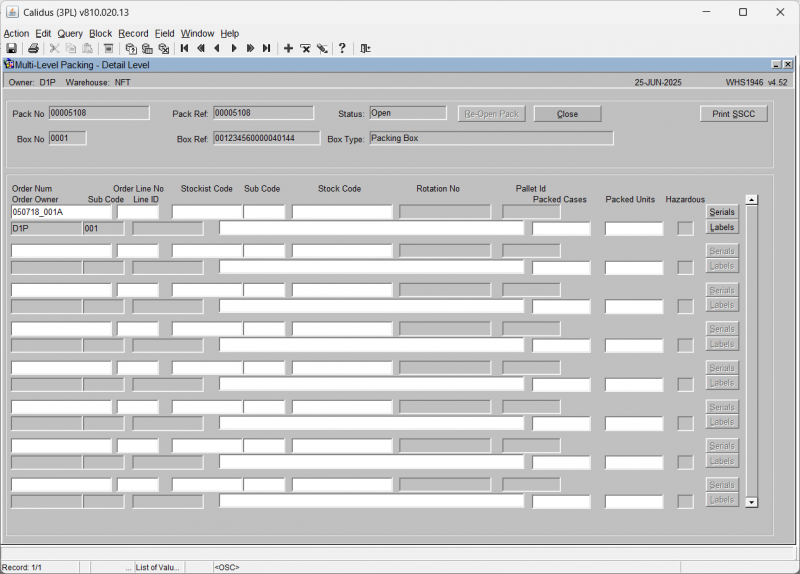
| Field Name | Description | Options |
|---|---|---|
| Pack No | The pack number the details are associated with | Display only |
| Box No. | Relates to line number in the header screen | Display only |
| Pack Ref | The pack reference (pack detail reference) of the pack header | Display only |
| Box Ref | The pack reference (pack detail reference) of the box | Display only |
| Status | The pack status – this will change from ‘Open’ to ‘Closed’ when the close button is pressed | Display only |
| Box Type | The description of the packing material. Will default to the description of the pallet type entered in the pack header screen | Display only |
| Order Num | The order number to be packed | Dependant on the ‘pack by’ flag will determine whether the order number will be displayed or entered |
| Order Line No | The line no of the product within the order detail record | Display only |
| Stockist Code/Sub Code | The owner code and sub code of the product within the order detail record | Display only |
| Stock Code | The stock code of the order to be packed. The description will also be displayed. | Display only |
| Rotation No | The rotation number (batch) of the product to be packed | Display only |
| Pallet Id | The pallet id to be packed | Dependant on the ‘pack by’ flag will determine whether the order number will be displayed or entered |
| Order Owner / sub code | The owner code and sub code of the product within the order detail record | Display only |
| Line ID | The Line ID | Display only |
| Packed Cases | Quantity of cases to be packed | Cannot exceed the total number of picked cases for the pallet |
| Packed Units | Quantity of units to be packed | Cannot exceed the total number of picked units for the pallet |
| Hazardous | Field that displays whether the product(s) to be packed are hazardous or not | Y or N – based on the hazardous flag on stock maintenance – display only |
| Buttons | ||
| Serials | Takes the user to an additional screen in order to add/amend serial numbers for the product, if required | |
| Labels | Allows the user to print packing detail labels | |
| Button | Description |
|---|---|
| Re-Open Pack | Reopens the pack once closed to enable the user to make changes to the pack details |
| Close | Closes the pack ready for the main pack to be closed |
| Print SSCC | Print an SSCC label if required |
Order Packing Maintenance (WHS1944)
The Order Packing Maintenance screen allows for the parameters for the packing screen to be defined, including user prompts and formatting of of any documentation that will be produced from the system.
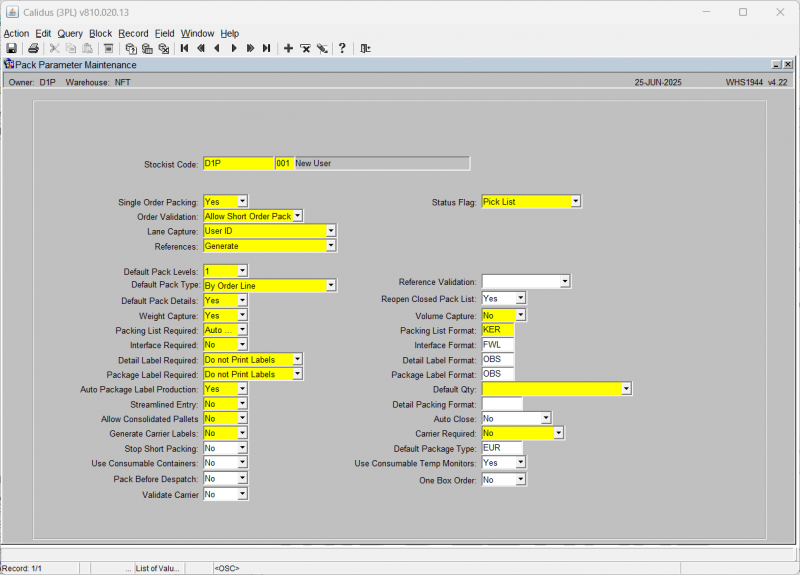
| Field Name | Description | Options | Generic Value |
|---|---|---|---|
| Stockist Code | The Owner code for the packing operation | LOV available to select a valid owner code | Will default to the working Owner Code |
| Single Order Packing ** | Whether to allow multiple orders to be packed together | Yes or No | Defined by client (Normally Yes) |
| Status Flag ** | Orders status to allow packing | Pick List
Pick Confirmed Pick Confirmed with Order Priority||Defined by client | |
| Order Validation ** | Whether to allow the order to be sent to the customer short packed | Prompt on Closure
Force Full Order Pack Allow Short Order Pack||Defined by client | |
| Lane Capture ** | To capture who or where the order was packed for auditing | Location
User Id Not Required||Defined by client | |
| References ** | How to generate reference numbers for the pack | Generate
Manual Not Required||Defined by client | |
| Default Pack Levels ** | Number of levels that you can pack down to i.e. a pack within a pack would have a level of 2 | 1-9 | Defined by client |
| Default Pack Type ** | How to select and identify the product for packing | By Order
By Order Line By Pallet By Rotation By Stock Code||Defined by client | |
| Default Pack Details ** | Whether capture packing details | Yes or No | Defined by client (default is Yes) |
| Weight Capture ** | To indicate whether weight is to be automatically calulated and displayed for the pack. Net weight is the sum of the stock packed, and the gross weight is the sum of the stock packed plus the weight of the package type. | Yes or No | Defined by client |
| Packing List Required ** | Indicate whether a pick list is to be produced and if so how | Auto Print List
Multiple Copies Do Not Print List Auto Print Multiple Copies Print List||Defined by client | |
| Interface Required ** | Functionality not migrated | Yes or No | Defined by client |
| Detail Label Required ** | To produce Detailed Labels and at what level | Print at all Levels
Do Not Print Labels Print Labels||Defined by client | |
| Package Label Required ** | To produce Package Lables and at what level | Print at all Levels
Do Not Print Labels Print Labels||Defined by client | |
| Auto Package Label Production ** | Whether the user is to be prompted to manually generate Package Labels or for the system to automatically produce the labels | Yes or No | Defined by client |
| Streamlined Entry ** | Designed to move the user through both the header and the detail packing screens with the minimum of data entry | Yes or No | Defined by client |
| Allow Consolidated Pallets ** | Functionality not migrated | Yes or No | Defined by client |
| Generate Carrier Labels ** | Whether a carrier label is to be produced | Yes or No | Defined by client |
| Stop Short Packing | Whether an order can be short packed | Yes or No | Defined by client |
| Use Consumable Containers | Does the client require/allow the use of consumable containers? | Yes or No | Defined by client |
| Pack Before Despatch | Must pack be completed before despatch confirmation is allowed? | Yes or No | Defined by client |
| Validate Carrier | Must the carrier be validated during packing? | Yes or No | Defined by client |
| Reference Validation | Does the packing system require validation of SSCC IDs? | SSCC Validation | |
| Reopen Closed Pack List | Is the user allowed to re-open a closed pack list? | Yes or No | |
| Volume Capture ** | To indicate whether volume is to be automatically calulated and displayed for the pack. The calculation is for the product only and does not include the package type. | Yes or No | Defined by client |
| Packing List Format ** | Format of the Packing List | Formats Include -
FWL (default) SIG (client specific)||Defined by client if required | |
| Interface Format | Functionality not migrated | Formats Include -
FWL (default) |
Defined by client if required |
| Detail Label Format | Format of the Detailed Label | Formats Include -
FWL (default) |
Defined by client if required |
| Package Label Format | Format of the Package Label | Formats Include -
FWL (default) |
Defined by client if required |
| Default Qty ** | Whether to pack by the pack type or by a case at a time. | Remaining to Pack
Single Case |
Defined by client |
| Detail Packing Format | Format of the Detailed Packing List | Formats Include -
FWL (default) SIG (client specific)||Defined by client if required | |
| Auto Close | If set to Yes, the system will automatically close the pack once the final product has been packed. Dependent on printing requirements and setup, labels and notes will also be automatically produced. | Yes or No | Defined by client |
| Carrier Required ** | If set to yes the user will be prompted to add a Carrier Code and Carrier Reference, another screen will be displayed displaying a list of carrier codes and services to be selected from, if required carrier labels can also be produced. (Client specific) | Yes or No | Defined by client (default is No) |
| Default Package Type | A value must be entered if packing with RF | LOV on Pallet Types | Defined by client if required |
| Use Consumable Temp Monitors | |||
| One Box Order | Yes or No |
Shipment Pallets
Shipment Pallets are used in combination with or stand-alone from Packing and/or WCS functionality.
Shipment Pallet Label Production
Setup: In order to use the shipment pallet despatch functionality, a shipment label must first be produced. These labels use the last number type ‘SHPP’ in warehouse document numbering to determine the range to be incremented by 1. These labels are then put onto the despatch pallet and used to scan packs onto in order to despatch packs rather than orders.
Warehouse Document Numbering (WHS9020)
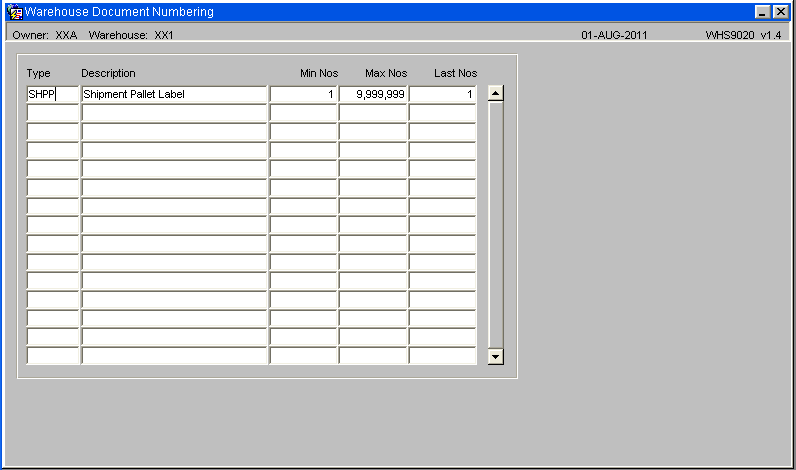
Ensure a Type value of SHHP has been entered.
Default Printer Maintenance (WHS0002)
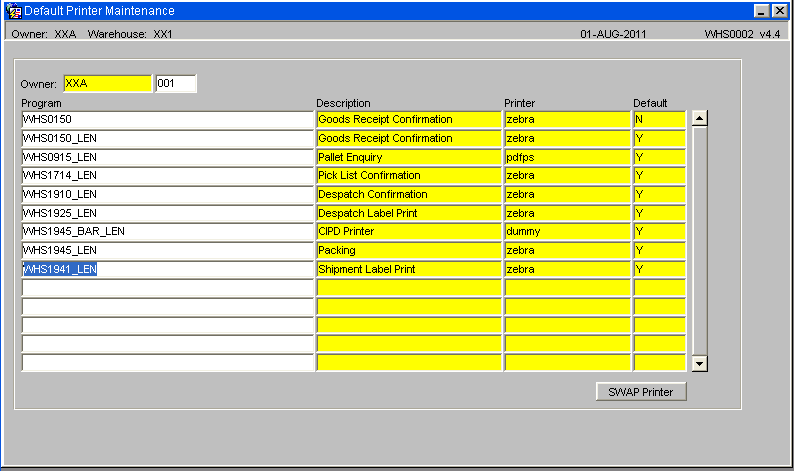
Ensure a Default Printer value has been set up for all relevant users - see Default Printers Maintenance (WHS0002)
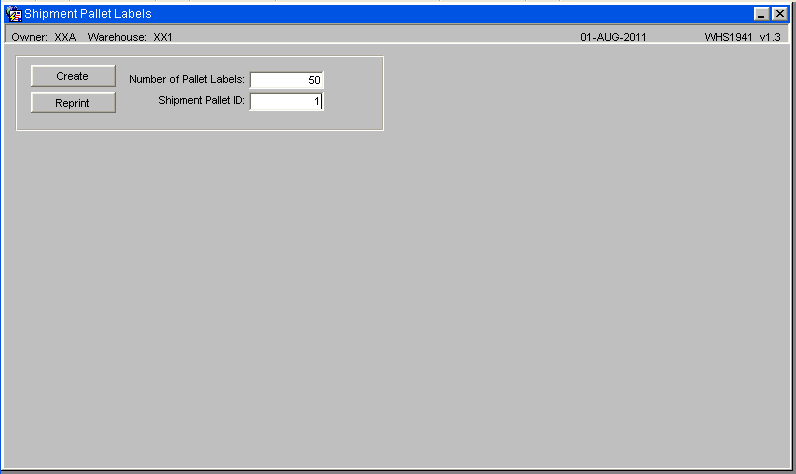
Shipment Label Print (WHS1941)
This screen allows you to print shipment pallet labels.
To produce the labels, enter the number of labels required followed by the start number.
| Field Name | Description | Options |
|---|---|---|
| Number of Pallet Labels | The number of shipment pallet labels to be produced | 0 – 999 |
| Shipment Pallet Id | The specific shipment pallet id a label is to be reproduced for | Must be within the SHPP last number range (i.e. already had a label produced for it) |
| Buttons | Description |
|---|---|
| Create | Updates the last number in warehouse document numbering and generates the labels |
| Reprint | Reprints the selected number of labels or the label of the specific shipment pallet id selected |
Shipment Pallet Maintenance (WHS1942)
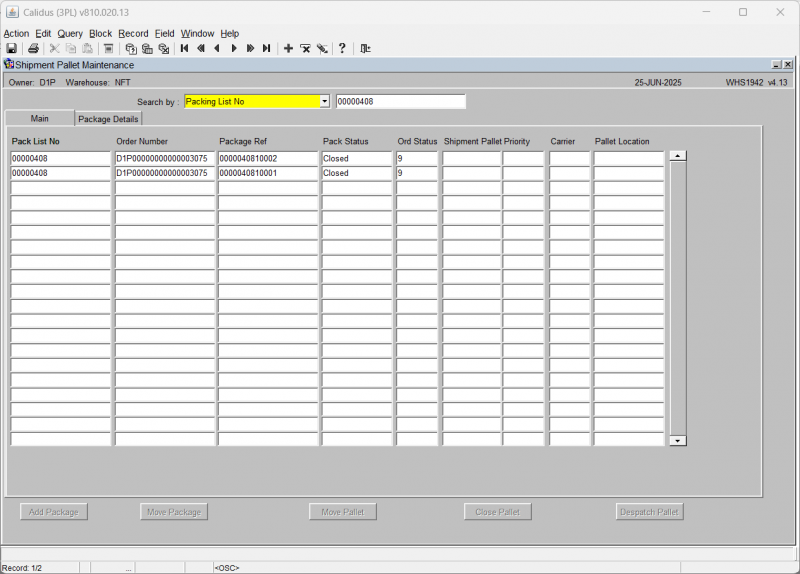
This screen allows you to maintain shipment pallets created from packing.
| Field Name | Description | Options |
|---|---|---|
| Search By | Determines how the selection of packages will be made. The next field will display the shipment pallet number related to the selection criteria | Pack List No
Order Number Package Id Shipment Pallet |
| Pack List No | Displays the pack list no assigned to the shipment pallet | Display only |
| Package Ref | Displays the pack ref of the order assigned to the shipment pallet | Display only |
| Pack Status | Displays the pack status for the pack list | Display only |
| Shipment Pallet | The shipment pallet number the package is assigned to | Display only |
| Pallet Location | The default shipment pallet location the package has been stored in prior to despatch | Must have been created in location codes maintenance |
| Interfaced | Displays the interface status of the package as to whether the carrier interface has been populated (client specific) | Y or blank |
| Order Number | The order number relating to the package id | Display only |
| Order Status | The status of the order | Display only |
| Invoice | Determines whether a commercial invoice has been received for the order (client specific) | Y or blank |
| Priority | The order priority of the package – note, dependant on the settings for the sharing of order priorities, some order priorities cannot be mixed on a shipment pallet | Display only |
| Carrier | The carrier code of the order associated with the package id | Display only |
| Buttons | Description | Options |
|---|---|---|
| Add Package | Enables the user to add specific packages to the selected shipment pallet | A popup box will appear prompting for pack ref – LOV available |
| Move Package | Allows the user to move selected packages onto other existing shipment pallets | - |
| Move Pallet | Moves all packages for this shipment pallet onto another existing shipment pallet | - |
| Close Pallet | Closes the shipment pallet ready for despatch | If using commercial invoice, the pallet cannot be closed until all packs for the pallet have received a commercial invoice |
| Despatch Pallet | Despatches the pallet and sets all related orders to status 9 | No despatch documentation is produced |
Shipment Pallet Details Tab (WHS1942)
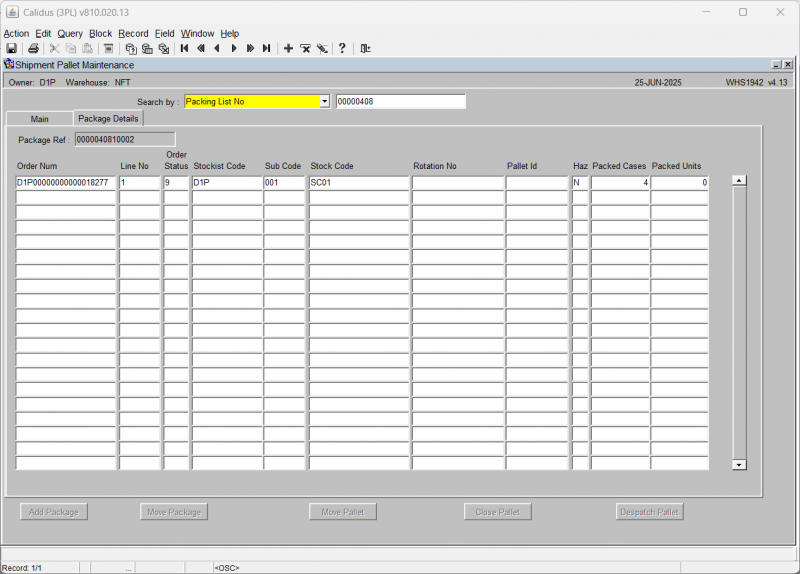
| Field Name | Description | Options |
|---|---|---|
| Order Num | The order number of the selected pack ref | Display only |
| Line No | The order detail line no for the package | Display only |
| Rotation No | The system rotation (batch) for this package | Display only |
| Pallet Id | The system pallet id for this package | Display only |
| Haz | Displays a flag to determine whether the product on the package is hazardous or not | Y or N |
| Packed Cases | The quantity of cases for the pack ref | Display only |
| Packed Units | The quantity of units for the pack ref | Display only |
| Stockist Code/Sub Code | The owner code and sub code of the order | Display only |
| Stock Code | The product code of the goods packed on this pack ref | Display only |
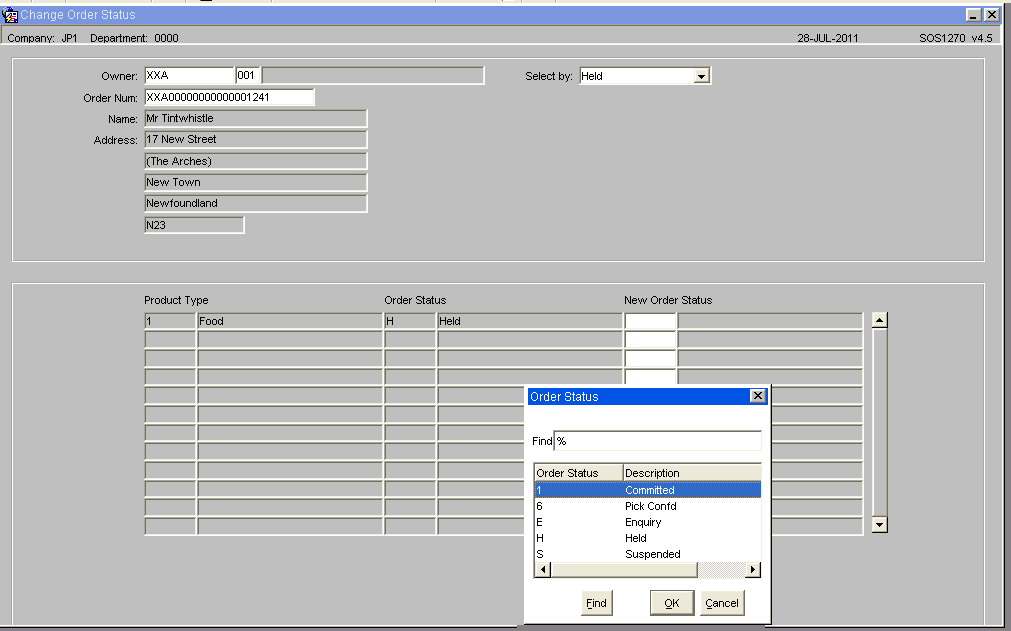
Change Order Status (SOS1270)
The Change Order Status screen allows the user to Hold or release an order dependent on its status.
Field Information
- Select by: - Drop down list that allows the user to select an Order Status (current values include Held, Committed or Pick Confirmed)
- Order Num: - Allows you to enter the number directly or to call a LOV that will display orders at the relevant status dependent on the 'Select by' value
Once the order number has been selected the name and address details will be displayed in the header section, the detail section will display the Product Types for the order and the user can then select a new order status. Upon saving the changes the system will validate the new status and update the record.
NB:The system will validate the Order Status change to ensure that it is a valid change, i.e. it will not be possible to set an order from Committed to Pick Confirmed.
Split Order (SOS5100)
Using the Split Order's screen it will be possible for orders to be split to allow for multiple despatches. Upon entry into the form the user will be able to query an order number at status 1 and a list of the order lines and product codes and order quantities will be displayed. The user will then be able to choose order lines to be split onto a new sales order using radio buttons. Once the user has chosen all the order lines they wish to be transferred, they will be expected to click a "Confirmation" button to create the new order.
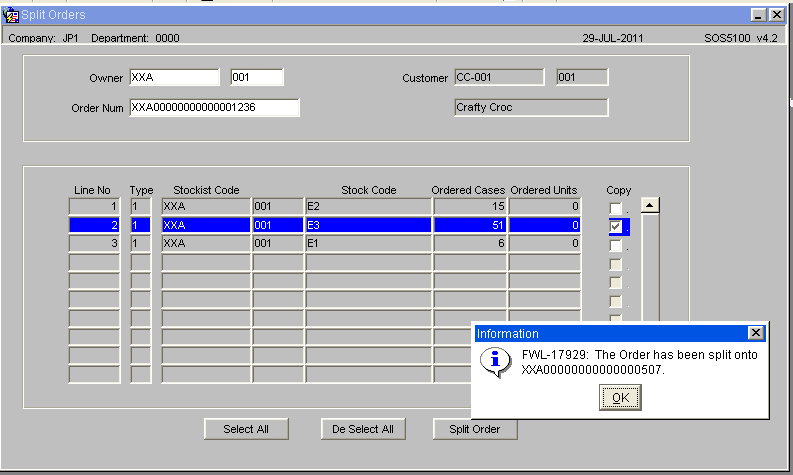
Upon confirmation, the order lines chosen will be removed from the current order and a new system order number will be created. The user will be informed of the new system order number. The new order will contain the same header details as the original. The address and order level text details will be duplicated. The total ordered qty, weight and volume will be recalculated for both orders. The order entry date, time and order taker user id will be transferred from the original order number. If the original order is assigned to a route/load, then the new order will also be assigned. Any relevant EDI jobs will process the order as standard.
It will not be possible to split an order that has gone beyond status '1', i.e. has been allocated. Once the new order has been created, it will not be possible to transfer the order lines back to the original order.
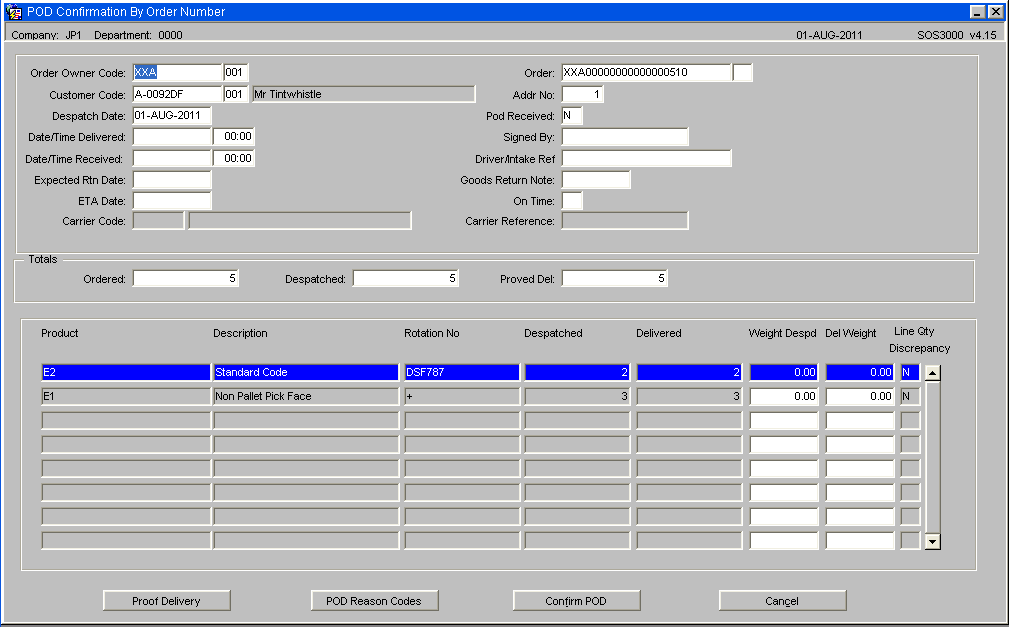
POD Confirmation (SOS3000)
An optional process, if a record for Proof of Delivery is required, the following screen can be used to confirm how many cases/units have actually been delivered to the end customer.
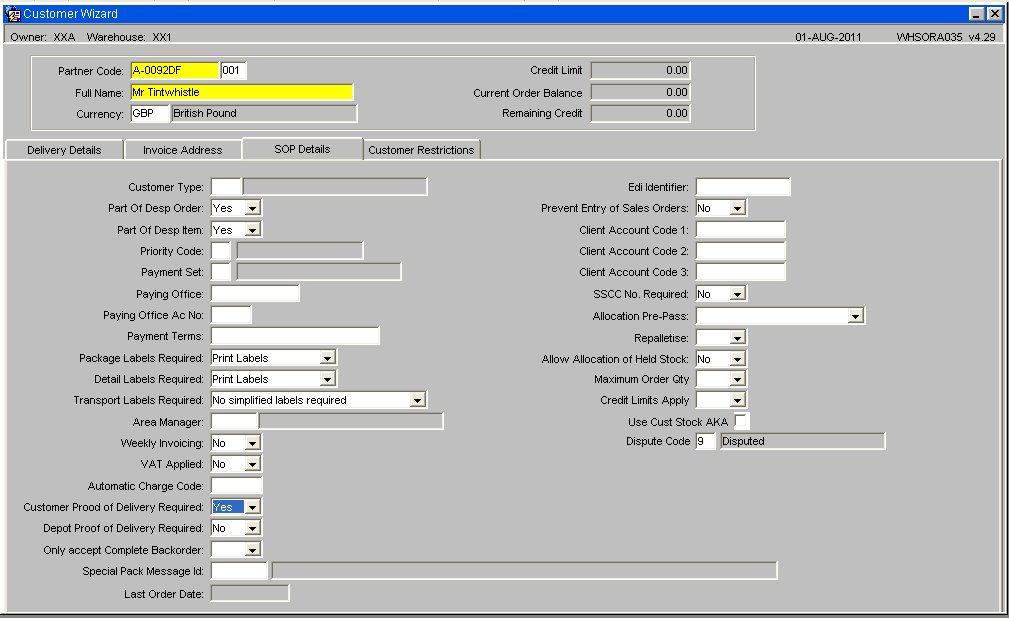
Note: in order to use this functionality, ‘POD Required’ flag must be set to ‘Y’ in customer maintenance. (see below)
Orders must despatched and be at the correct status to allow for them to be POD confirmed, i.e. status 'F'
| Field Name | Description | Options |
|---|---|---|
| Order Owner Code ** | The owner of the order to be POD confirmed – will default to current | Must have been created in owner maintenance – LOV available |
| Order ** | The order number to be pod confirmed | Must be at status ‘F’ |
| Customer Code | The customer code the order was raised against | Display only |
| Addr No | The address number the order was delivered to | Display only |
| Despatch Date | The date the order was despatch confirmed | Display only |
| Date/Time Delivered ** | Prompts for a date and time for actual physical delivery to the end customer | Must be a valid date and time |
| POD Received ** | Prompts for confirmation that the POD was actually received from the end customer | Y or N |
| Date/Time Received ** | The date and time the POD was received | Must be a valid date and time |
| Signed By ** | The name of the person who signed for the delivery | 20 character free text field |
| Expected Rtn Date | The date the stock is due to be returned to the warehouse (if a return is required) | Must be a valid date |
| Goods Return Note | The return note reference number the order will be returned on | 30 digit numerical field |
| ETA Date | The estimate time the goods will arrive at the warehouse | Must be a valid time |
| On Time | Specifies whether the order was delivered on time | Y or N |
| Totals: Ordered | The total ordered quantity | Display only |
| Totals: Despatched | The total quantity despatch confirmed | Display only |
| Totals: Proved Del | The actual quantity received on the POD – note this will default to the same as the despatched quantity unless amended | Display only |
| Product | The stock code of the order line | Display only |
| Rotation No | The system rotation number (batch) of the order line | Display only |
| Weight Despd | The total weight of the despatch confirmed quantity | Display only |
| Description | The product description of the stock ordered | Display only |
| Delivered | The quantity received on the POD – note this will default to the same as the despatched quantity unless amended | Display only |
| Del Weight | The total weight of the quantity on the POD – will update if the quantity is amended | Display only |
| Buttons | Description |
|---|---|
| Proof Delivery | Takes the user to POD text which allows them to enter specific information received on the POD
5 x 70 character free text fields |
| POD Reason Codes | Takes the user to an additional screen to enter reason codes if the quantity to be POD confirmed is different to the despatched quantity. This will then put the missing stock into a virtual location for investigation |
| Confirm POD | Confirms the totals entered as POD confirmed. Once actioned, cannot be reversed |
| Cancel | Cancels the POD confirmation (not migrated) |
POD Reason Code
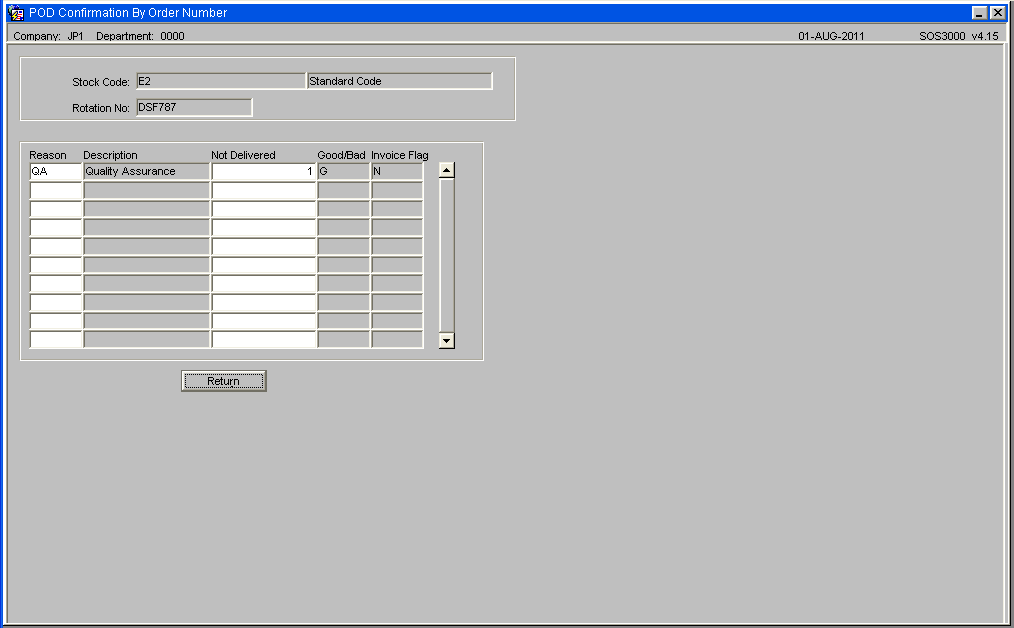
Field Information -
- Reason - Reason Code and description which can be either directly entered or selected from a LOV. The description will be displayed once selected.
- Not Delivered - The quantity of stock not delivered
- Good/Bad - Type of reason code, Good means the stock will be returned to the warehouse
- Invoice Flag - display only
